
Navigation
Install the app
How to install the app on iOS
Follow along with the video below to see how to install our site as a web app on your home screen.
Note: This feature may not be available in some browsers.
More options
Style variation
You are using an out of date browser. It may not display this or other websites correctly.
You should upgrade or use an alternative browser.
You should upgrade or use an alternative browser.
Not Needed (hopefully): Over-priced Machine Shop with experience resurfacing 2F intake/exhaust manifolds
- Thread starter Rusto
- Start date
This site may earn a commission from merchant affiliate
links, including eBay, Amazon, Skimlinks, and others.
At least get yourself this machinist straightedge if you do not already have one. Chicago Brand Straightedges 56430 31 in. It is long enough to check both the manifold and the head for warpage. Depending on how bad it is, you can make a decision on what to do next. Remflex gaskets supposedly can close up to 1/16 in of gap. Measure everything and post the results as I am sure people here can guide you as to how far out of alignment (if applicable) is acceptable for the manifold.
- Thread starter
- #63
@lcolon good tip - ordered. Hopefully not a tool I'll need very often, but a nice one to have. Plus, makes me feel a lot better about doing this myself, and spitting the intake and exhaust manifold.
Last edited:
@lcolon good top - ordered. Hopefully not a tool I'll need very often, but a nice one to have.
That was the cheapest one I could find when I was looking for one. Good Luck!!!
I still have overheating after my manifold job. Ruled out everything else so I am likely going to have to take it apart again and pull the head.
- Thread starter
- #65
That was the cheapest one I could find when I was looking for one. Good Luck!!!
I still have overheating after my manifold job. Ruled out everything else so I am likely going to have to take it apart again and pull the head.
I went with a 24" one I as able to use an Amazon gift card with. Only other options on Amazon were 36" and I felt I would be able to get it on the head. 24" is a lot better than I had. It was $45.... $20 after applying a gift card I found in my wallet. Gets here on Friday. I have a lot of work to do between now and then.
That is a great deal. The 31" one is long enough to go front to back on the head but 24" would be fine to check everything. Good LuckI went with a 24" one I as able to use an Amazon gift card with. Only other options on Amazon were 36" and I felt I would be able to get it on the head. 24" is a lot better than I had. It was $45.... $20 after applying a gift card I found in my wallet. Gets here on Friday. I have a lot of work to do between now and then.
- Thread starter
- #67
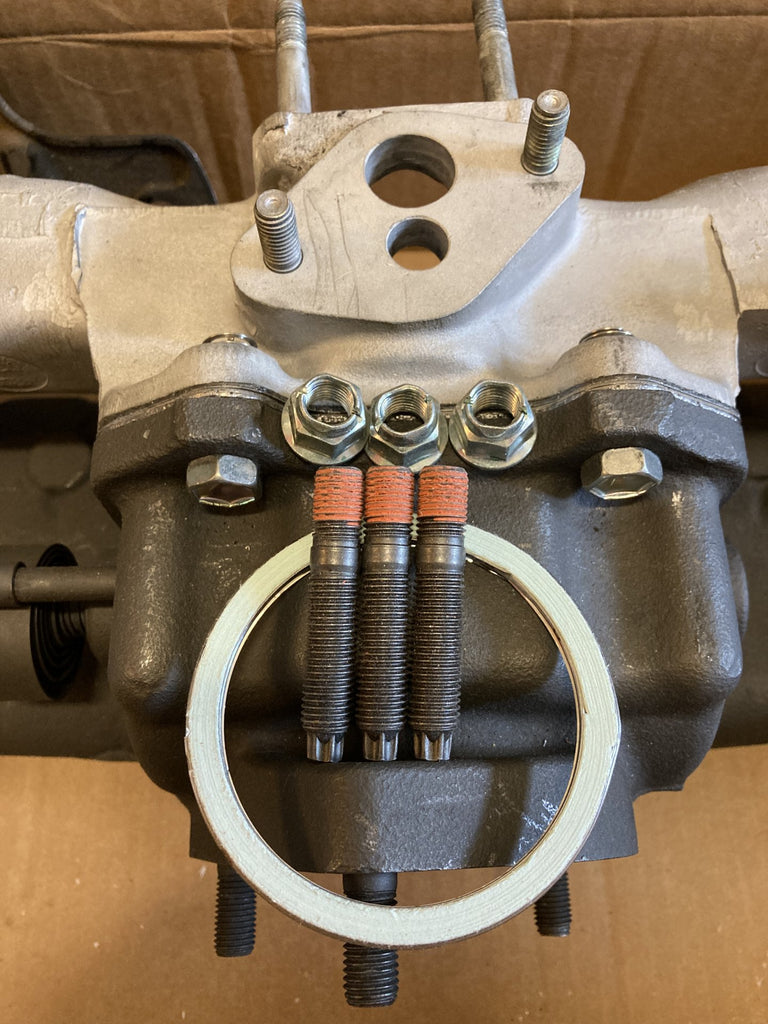
Couple of things from yesterday - with the straight edge ordered and some of the older gaskets completely toast, I decided to separate the manifolds. Glad I did, as there was nothing left of the "gaskets" except some dusty thin metal.. and no insulator plate at all.. Part number 17169-61011. Do I need that? I would say, yes, but it ran fine w/o it. Thinking it's setting me up for an intake manifold crack if I don't put one back in.
Also, I ordered this thick exhaust manifold to down pipe flange - GBE 3/8" THICK STEEL TOYOTA LAND CRUISER 2F ENGINE EXHAUST MANIFOLD FLANGE | eBay
And damn, that thing is THICK! Will I still be able to use the stock studs? Seems like it's almost too thick. And do I also keep (order a new one) the O-ring gasket or does the manifold flange replace that gasket entirely?
The deeper I get, the more noob I am.
@ToyotaMatt offers an all-OEM kit that is perfect for your needs. While the manifold is out, easy to remove the old studs and replace with these modern torx head studs and then use the PROPER Exhaust locking nuts.

1/75 -1987 FJ40 / FJ60 Exhaust Down PIPE Repair Kit #1 OEM TOYOTA Genuine Parts FJ60 2F Engine Updated / Upgraded Exhaust Manifold to Front Down Pipe Gasket and Special Unique Hardware TORX Studs and Locking Flange Nuts - VintageTEqParts.com
OEM TOYOTA Genuine Parts FJ60 2F Engine Updated / Upgraded Exhaust Manifold to Front Down Pipe Gasket and Special Unique...
vintageteqparts.com
This is what I ordered, @Rusto. Quick shipping from @ToyotaMatt. Also sourced the heat riser insulator from Cruiser Parts. Cheapest OEM replacement I could find.@ToyotaMatt offers an all-OEM kit that is perfect for your needs. While the manifold is out, easy to remove the old studs and replace with these modern torx head studs and then use the PROPER Exhaust locking nuts.
1/75 -1987 FJ40 / FJ60 Exhaust Down PIPE Repair Kit #1 OEM TOYOTA Genuine Parts FJ60 2F Engine Updated / Upgraded Exhaust Manifold to Front Down Pipe Gasket and Special Unique Hardware TORX Studs and Locking Flange Nuts - VintageTEqParts.com
OEM TOYOTA Genuine Parts FJ60 2F Engine Updated / Upgraded Exhaust Manifold to Front Down Pipe Gasket and Special Unique...vintageteqparts.com
View attachment 2280716
@Rusto - Verify that your thermo flap thing (butterfly valve) is working properly before deciding which insulator plate to buy.
btw, also important to use the PROPER exhaust locking nuts on the J-tube/manifold/gasket studs.
btw, also important to use the PROPER exhaust locking nuts on the J-tube/manifold/gasket studs.
- Thread starter
- #71
Yep. I'll be placing an order with @ToyotaMatt today. The butterfly valve is working properly and I found a good deal on the heat riser at toyotapartsdeal.com
I've ordered a lot from CruiserParts. Going to spread it around a bit")
Thanks all. The costs are adding up, but incrementally and I'm doing it right.
Order placed with @ToyotaMatt . Couldn't order everything I wanted, but I am going to upgrade exhaust nuts and stuff., and... heat riser ordered, too. Another $100 "Invested"
I've ordered a lot from CruiserParts. Going to spread it around a bit
Thanks all. The costs are adding up, but incrementally and I'm doing it right.
Order placed with @ToyotaMatt . Couldn't order everything I wanted, but I am going to upgrade exhaust nuts and stuff., and... heat riser ordered, too. Another $100 "Invested"
Last edited:
- Thread starter
- #72
Alright. I think I have all the remaining items I'll need to finish the job in the mail.. Double the money and double the time. Something my dad always said when wrenching.. That's about right, especially when dealing with your typical PO.

- Solid, unmolested air rail.. It's in the mail. Scored a good deal through a fellow MUDder - thanks @fj60dan
- Air injector Union Nozzles. enroute to CO. Another MUDder came through and is sending me a couple of spares, just in case. - big shout out to @tjhaga
- Gaskets via Remflex (delivered and patiently waiting)
- New exhaust manifold to down pipe donut gasket and new studs/nuts courtesy of @ToyotaMatt (in the mail. Thanks!)
- New exhaust steel flange, may not be necessary, but hey - why not at this point?
- high-temp RTV for the horns (picking up from O'reilly's today)
- high-temp exhaust paint (Cast Iron color - oh yeah)
- thread tap 10mm x 1.25 to get those bolt holes nice and clean and ready for their 20-25 ft. lbs. of torque. I believe @Spike Strip
- Flat bastard file. Good tip @F226continental
- Sand paper (I'm leaning in this direction for the bubba resurface that @Spike Strip suggested
- Machinist Straight Edge - a must have if I want to know if manifolds are flat. Thanks @lcolon for that good tip.
- Insulator Plate (mine was not there).. Should be here on Friday...
Last edited:
FWIW, you prolly won't need the downpipe flange you bought, but a few things to check on the stock one:
1- The holes where the manifold studs go through get 'raised' over time. Check and file as necessary.
2- Check the weld of that existing flange for cracks. Cracks are common. Weld or have welded as necessary.

1- The holes where the manifold studs go through get 'raised' over time. Check and file as necessary.
2- Check the weld of that existing flange for cracks. Cracks are common. Weld or have welded as necessary.
- Thread starter
- #74
The insulator plate isn't expected until next week, so I'm going to shift gears and change the push rod cover gasket while I wait. Take out the distributor, oil filter and heater pipe to make it easier. It hasn't ran in a couple of weeks now, so hopefully it won't be too messy when I take out the oil filter and heater hose.
Looks like a one banana job... (famous last words)
Looks like a one banana job... (famous last words)

Once you get everything and are ready - make sure you have everything loose. Check the flange on the jpipe and make sure it has not rusted to the point it needs a little weld. The two 14mm bolts on the EGR cooler being loose and the flange nut to the jpipe tight enough to allow a little back and forth movement, plus a easy to move exhaust downpipe will go miles to make the install easier. The hardest part about getting the manifold bolted back up is the reconnection to the jpipe and the exhaust. Once you have it all loosly together with nuts/bolts started on all the appropriate parts, i would get everything snugged up before torquing the manifold. For remflex, don't over-torque or you will crush the gasket. Follow the remflex torque specs not the FSM. ANTI-SIEZE ALL BOLTS AND NUTS. Good luck!
Last edited:
The insulator plate isn't expected until next week, so I'm going to shift gears and change the push rod cover gasket while I wait. Take out the distributor, oil filter and heater pipe to make it easier. It hasn't ran in a couple of weeks now, so hopefully it won't be too messy when I take out the oil filter and heater hose.
A word of advice on the side cover gasket - you do not need any sealant on it. Set the truck to TDC, take the cap off the distributor, and note the general position of the rotor. When you pull the distributor, the rotor will move as you pull it out. Note the end state. You will need to replace the distributor with the rotor in that position when it goes back in. The cork gasket is probably baked on. Carefully remove the side cover and make sure not to bend it. The bolt torque is very light and I use my inch pound torque wrench for it. I have changed it a couple of times with no leaks. If the cover flexes and bends, you have a greater chance of a leak. You can use some toothpicks if necessary to hang the cork gasket onto the block while you reinstall the cover.
- Thread starter
- #78
Good stuff, @lcolon -
effing ToyotaPartsDeal.com just sent me a notification that my order for the insulator plate was voided because the part is NLA and/or back ordered with no timeframe for delivery.
Shoulda went with Cruiserparts.net to begin with as it was a $6 diference in price. Just placed the order with them. Hope I don't get the same news from them in a couple of days.
effing ToyotaPartsDeal.com just sent me a notification that my order for the insulator plate was voided because the part is NLA and/or back ordered with no timeframe for delivery.
Interesting - gotta get one for myself now as mine is damaged but still alive. As long as the block under the carb with the tube is intact, if the insulator plate is otherwise torn it does not really matter. Just in case you cannot source one. They all crack.
I can post a pic of the crack on mine if helpful. (I am assuming you are talking about the carb insulator plate correct?) Note that the older series of landcruisers the insulator was just the block with the tube without the surrounding plate.
Last edited:
- Thread starter
- #80
Interesting - gotta get one for myself now as mine is damaged but still alive. As long as the block under the carb with the tube is intact, if the insulator plate is otherwise torn it does not really matter. Just in case you cannot source one. They all crack.
I can post a pic of the crack on mine if helpful. (I am assuming you are talking about the carb insulator plate correct?) Note that the older series of landcruisers the insulator was just the block with the tube without the surrounding plate.
The block under the carb with the tube IS intact. Mine carb insulator plate isn't just cracked - it's non-existent! I feel like I should have something in it. Hopefully Cruiserparts will have one. I'd prefer not to put it all back together knowing that is isn't 100% correct. I think it would be helpful to post a pic, if you don't mind.
It ran great without it, but I'm worried that it will eventually crack the intake manifold if it's not setup right. The butterfly valve is functioning correctly, so I guess that helps, but that plate is there for a reason.