Builds My HZJ77 Build

This site may earn a commission from merchant affiliate
links, including eBay, Amazon, Skimlinks, and others.

Oh my that rig is so NASTY!!! :)

Can't really wait to import one - damn 25 year rule. May have to have you sneak one across the border for me - and I'll fly you home!

Keep up the posts -
 
Oh my that rig is so NASTY!!! :)

Can't really wait to import one - damn 25 year rule. May have to have you sneak one across the border for me - and I'll fly you home!

Keep up the posts -

that would be a fun road trip. Do know that 77s are freaking expensive overseas.....

I'm going to try my best. Turbo install keeps getting postponed.....
The welding shop I want to get my exhaust tig'd at is closed until the 2nd. There is some talk of trying to get it in a few days before. Just sucks because its my daily and I need to keep downtime to an absolute minimum. Not to mention I can't get it into the shop yet, I'm trying though.
 
All my stainless has been bought
I am doing stainless so it will last longer.
The truck is ran in all weather so I wanted the best possible corrosion resistance
 
1tontoy said:
Curious - besides the exhaust, how much do you estimate adding the turbo will cost in parts?

Off the top of my head ummm
Probably 4k

I like the idea of doing it myself. Get exactly what I want and the kits don't have everything that I want to do.

3k for a kit then add taxes, add your gauges, exhaust, ceramic coating.... Probably the same cost in the end but I know if I turbo the 75 down the road I have already learned tips for saving money on this build.
 
saving money + build = really?

i have yet to see a build that saved money. actually, every build, including my own has always exceeded the guesstimate by 2X - 3X when it is finally completed.
 
crushers said:
saving money + build = really?

i have yet to see a build that saved money. actually, every build, including my own has always exceeded the guesstimate by 2X - 3X when it is finally completed.

Yeah it was more expensive than anticipated but hey there are worse things I could be doing with my money.

But in the end it's exactly what I want and I don't really care on the final cost. It just means at times I will have to save longer to get what I want

Can't wait till its in.
 
and that is the issue, is a build ever really done?
$4K for a turbo is cheap ... you so save a lot in labor by doing the work yourself.
i look forward to the results.
cheers and enjoy the holidays.
 
I am realizing a build is never really done, i keep planning stuff! Which makes it fun.
I am going to do a tally on the turbo after and show where i could have saved money.
I have a s*** load of receipts and have bought little things I have found out that didn't work. I don't really care in the end, in an ideal world I would be saving as much money as possible but its a learning experience.
 
Curious - besides the exhaust, how much do you estimate adding the turbo will cost in parts?

I did add in the exhaust onto my last tally.
I'll add it up in the end here for a better total.
I am sure I misplaced a bunch of receipts but I can do a quick tally here.

$1600 turbo
$300 Ex Manifold
$300 Ceramic Coating
$120 1HD-T Airbox Lid
$500 Gauges
$1000 for all my stainless, clamps, silicone, hangers, aeroturbine
$120 water/oil lines and misc fittings.
$100 msc s*** along the way for just

So $4140 so far off the top of my head. I was told I could not do it for under 5k but I call bull s*** on that, there have been some mistakes along the way but as I said its a learning experience, the second time is always easier. I am sure I missed a bunch of shipping costs in there too, I tried to add them in what I remembered.

Comparison to say a Denco kit.

$3000 Turbo kit
$1000 Stainless Exhaust
$300 Ceramic Coating
$500 Gauges
$100 Msc s***.

$4900 bucks just as a baseline.

For basically as Wayne has stated before its will probably work out to be about the same, in the end you will have exactly what you want for a turbo but more effort is involved. The savings may be marginal at that but savings do mean more mods for other things:hillbilly:
 
beautiful ride, nicely thought out mods, fun doing the build ...
what better way to spend the money and invest the time?
congrats
 
Christmas Eve it was wheeled into the shop, short notice but I had to say yes.
Yes I have a few pictures, I just left the camera in the shop.

Day 1 (11am - 3pm)
Removed old exhaust
Removed Exhaust Manifold
Fitted turbo and manifold assembly
Fitted oil feed fitting.

Ran into a problem and I need to get two more brass fittings tomorrow.
Found out the manifold studs I ordered were a little too short. I'll order a new set here from Akella

Day 2
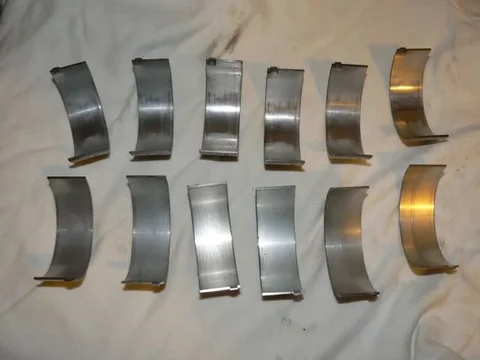
Connecting Rod Bearings. Easy yet s***ty job. Everything was was checked with plastigage and was within spec. Used Taiho Bearings and minty fresh toyota rod bolts. The old bearings looked fine, no pitting anywhere.
My buddy tacked 2/3rds of my exhaust together. The rear portion should go fairly quick. 3in is a tight fit.....
Prepped the oil bung to be welded into the pan.

Tomorrow's agenda:
Get the two brass fittings, install oil line.
Try and get someone to weld my oil pan bung (assuming a shop is open)
Build and Tack the remainder of the exhaust
Build Water Lines (if time permits)
Re-install oil pan.
Get it out of the shop to make room for other stuff, I have a bit of a tight timeline...

The exhaust is set to be TIG'd on the 2nd unfortunately, this is the joys of doing stuff over the holidays.
In the mean time I can get the gauges wired and what not. Clean a few things up and make all the other little stuff look good.
 
Adam B said:
What route did you take with the exhaust?

And thanks for taking the time to keep us updated. I know it isn't easy when you're in the middle of a project.

Followed the factory route roughly.
I have to make hangers, and the last foot of the exhaust. 3" is tight.
 
Well she runs, took her for a little test boot around the block. I have a boost leak where the is a fitting to run a line to the boost comp on the 1hd-t. I'll block this off tomorrow.
I am going to try and get the exhaust tig'd tomorrow. Otherwise its all done other than running my gauges and cleaning some wiring with split loom. Can't wait to have it all welded up and the leak sorted out. Updates tomorrow for sure.

In the mean time I'll post a few shots of the install process and talk about a few things we ran into.

Connecting Rod Bearings. This sucked more than I remembered. The third truck I ran into. A few little skinny wedges a torch and a putty knife work quite well getting it off.
Nothing alarming in the pan thankfully.
Tip: Put the truck in neutral and it makes spinning the crank easier to expose the conrod caps if you haven't done this before.

Minty fresh bearings and bolts
New Bearings and Bolts.webp

View inside the pan
Pan-off.webp

Old Bearings that were perfect.
Old Bearings.webp
New Bearings and Bolts.webp
Old Bearings.webp
Pan-off.webp
 
Exhaust Fabbing.

Thankfully I have a friend who did some exhaust work in the past, I bought 2 UJ Bends and used roughly 5 feet to build this whole exhaust. He did a fantastic job that i am quite happy with. A bunch of hanger work got done after these photos. I'll take a few shots of the finished product tomorrow. Also used 4 V-Band clamps and an Aerotubine 3030XL.

We were joking the whole time its a one of a kind custom Chas SS 3" exhaust. I am very impressed with my buddies ability on this. I owe him big time.

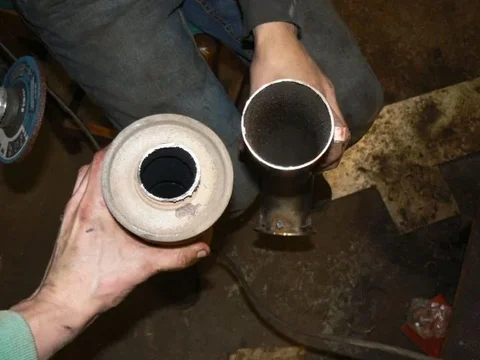
The Factory Resonator, apparently just removing this alone is a huge performance gain.
Comparison with 3"
Resonater vs 3" Pipe.webp

Dump Pipe Fab work.
Dump Fab.webp

Routing #1
Routing 1.webp
Resonater vs 3" Pipe.webp
Dump Fab.webp
Routing 1.webp
 

Users who are viewing this thread

Back
Top Bottom