My Desmog Thread

This site may earn a commission from merchant affiliate
links, including eBay, Amazon, Skimlinks, and others.

Milo, maybe you're getting worldspan and Flentge pics mixed together?

No worries Milo....Thanks for the reply Jim. Am i supplying correctly the primary adv on my diaphragm to the carb with the other nipple capped?
 
Desmog gurus - Please chime in

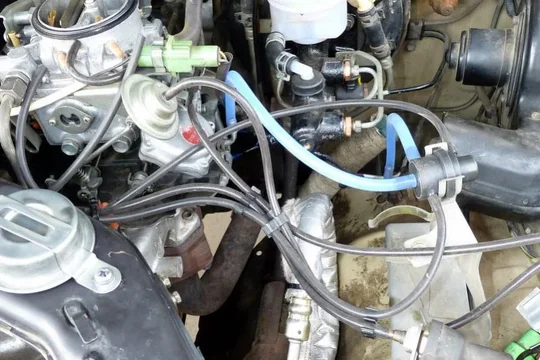
Do these two pics look correct. I've have gone over this thread religiously and can not pinpoint whether or not im set-up correctly.

1984 FJ60 w/ TrollHole Carb, no HAC (live in Texas)

1st pic:
From Vacuum Diaphragm to the TrollHole Carb. No HAC hooked up. Do i have the hose in the correct vacuum diaphragm adv?

From PCV(?) to the intake manifold 3 port prong. 2 of them are plugged, the 3rd connected as seen

From Dizzy cap to firewall

From Tee'd PCV to other dizzy vent

From widget underneath air-cleaner to another Tee'd section

2nd pic:self explanatory

Appreciate any feedback
Engine Bay.jpg
photo.jpg
 
Looks as right as it can be with the chinese carb.

CHINESE????? What? Oh well, at least it's chiny..i mean shiny. Thanks Jim for your input.

Should the primary or secondary vac on the dizzy be hooked to the carb if im timed at the BB? Have not sent my dizzy to you yet for the recurve. What do you recommend.

Again, many thanks and happy new year
 
wow.........:bang: I'll take your advice and see what happens.

With a recurved dizzy, what should the correct timing be? Without recurve dizzy?
 
what's the opinion on timing with 40 over pistons and RV Cam? been told to keep it at 7 because of the heat build up.
 
Dunno about heat buildup. Timing that is too late puts heat into the cylinder wall and exhaust gas. Too early will predetonate (knock/rattle), which will eventually crack the fire-ring on the HG or chip away at the piston crown or break the top rings or...

Same basic rule applies, advance until knock is heard then back it down several degrees. The driver can't hear knock until it is loud, that's why it needs to be backed down so far. With the bigger piston displacement, compression is higher, so less timing is needed, but with the radical cam, compression is bled off, so more timing is needed.

Probably best to start stock and listen carefully for rattle at peak tork (2000-2400RPM) at full operating temp.
 
If the truck is desmogged correctly, the evap system works the way it's supposed to work.

If the desmog is hacked, then the only thing to do is "do no more harm". By venting the tank to atmosphere through the canister, the filter function for air in/out of the tank is maintained. Dumping to atmospere prevents pressure/vacuum buildup in the tank w/ the associated problems.

do you have pictures of this correctly done on a desmog
 
Desmog Complete & Purring Like a Kitten

I promised a final tally and here it is... Complete FJ60 Desmog - HAC delete.

- Air Rail removed - Plugs from Jim C.
- Smog Pump Removed - Idler from SOR
- EGR, EGR Cooler, all EGR tubes removed & Intake EGR Tube Mod
- Exhaust EGR port capped with Remflex & 3/8" plate
- Air Pump Exhaust tube - plugged w/big a$$ bolt and hose clamp (Hill-billy - oh yeah!)
- EGR Cooler Removed - the frnt suspension sighed with relief
- Vacuum spaghetti tubes removed
- Carb rebuilt and tuned for desmog - Jim C.
- Dissy re-curved for desmog & no HAC - Jim C.
- Intake crack welded - small crack directly under carb, welded from back side
- New Int/Exh Isolator plate from SOR
- Modified Heat Control Valve- trimmed to clear new Isolator Plate
- Refaced Int/Exh manifold, what a pain finding a shop to do it...
- Installed Int/Exh manifold with one TOY gasket, which turns out to be a felpro as observed by Jim C.
- Re-routed all Vac lines with silicon tube from McM-Carr
- Charcoal canister hose swap on the EVAP system to keep gas tank pressure from building

P1040241.jpg
P1040242.jpg
P1040243.jpg

And just for fun...
- New air & fuel filter
- Flushed radiator and installed new t-stat
- New fuel pump
- New plugs
- New valve cover gasket
- Adj valve lash

Lessons learned:


  • First - make sure ALL vacuum lines are either plugged or connected before trying to fine tune after re-installing carb and dissy. I left the tee fitting from the PCV open to atmosphere and couldn't get the beast idling when I first started up. Thanks again to Jim C. for spotting it on a pic that I posted.

  • The 1981 Toyota 2F Engine Emisson Control Repair Manual or FSM is vital. This little document breaks down each individual system, making it a breeze to remove and reroute all the vacuum lines remaining after a desmog.

  • If you have the DESMOG schematic/layout, marked up to show all the parts no longer needed, side-by-side with the one in the FSM, the desmog process makes perfect sense. You just have to stare at it long enough.

  • That members of this forum are very intelligent, supportive and eager to assist, without which I would never have completed my journey successfully. Thank you one and all... and special thanks should go to fowldarr for starting this thread - in '07 !!
Thanks... Doug

PS: I could only put 3 pics up, don't know why:confused: but I'll try to put up a couple more pics, the FSM and the desmog schematic & layout for future reference.
P1040241.jpg
P1040242.jpg
P1040243.jpg
 
Desmog Complete & Purring Like a Kitten - Part 2

More Pics...

P1040244.jpg
P1040248.jpg
P1040249.jpg

Don't know if I can attach the FSM, it might be to big.
P1040244.jpg
P1040248.jpg
P1040249.jpg
 
Desmog Complete & Purring Like a Kitten - Part 3

Schematic I used - along with the FSM of course...
DESMOG_jimc-approved.jpg

Layout with all the bits no longer needed...
DESMOG-Layout.jpg

The FSM...
View attachment 2F Emission Manual.pdf

With these tools, the people on this forum and patience... anyone can do this.

Cheers - Doug
DESMOG_jimc-approved.jpg
DESMOG-Layout.jpg
 
What are necessity items to save when desmogging? Basically I live at sea level have no AC and I am wondering what is the bare essentials that I need to keep her going?
 

Users who are viewing this thread

Back
Top Bottom