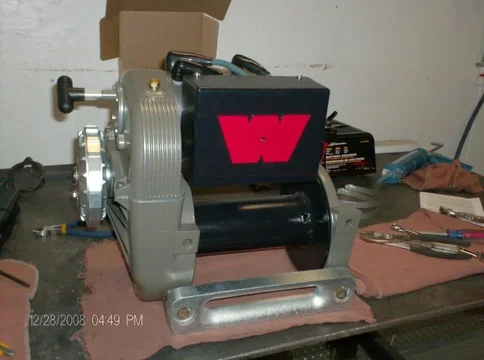
Just another 8274 rebuild - lots of pics (1 Viewer)

This site may earn a commission from merchant affiliate
links, including eBay, Amazon, Skimlinks, and others.

Thanks lulo

So at work yesterday I made up a couple of quick storage brackets for these guys. Any of you who have handled and moved these 8274's around knows how heavy and awkward they are. These brackets will protect them and me.

Welded corners and strap at home.
HPIM1886.jpg

A quick coat of black primer for corrosion.
HPIM1887.jpg

And throw in a winch (oy my back!)
HPIM1889.jpg
HPIM1886.jpg
HPIM1887.jpg
HPIM1889.jpg
 
parting shot

I am storing them dry (no oil inside)
HPIM1891.jpg
THANKS FOR WATCHIN!!


And now for the truck..........


But that's another thread :D:D
HPIM1891.jpg
 
Nice 45 plate..... like the location:flipoff2:
 
Incredible job!!! Great write up!! The talent available on MUD is endless!!
 
Nice 45 plate..... like the location:flipoff2:

I figured you would see it there :D


Thank you Vango, I agree about the talent. In fact my inspiration came directly from Mud and the two links in the first post on this thread.:cheers:
 
This has to be one of the best posts here on mud that I have followed. Great work! Rezarf's trailer and this thread are great and most entertaining. I have a 12,000# Warn that I might just have to take off and freshen up just to see what I can do. Great job and the new knobs look great!
 
Very high praise indeed. I have read Rezarf's trailer thread and it is awesome. Here is the knob spec sheet from McMaster Carr.
knob.jpg
knob.jpg
 
Yeah - that gigglepin setup is awesome. Just wish it wasn't so expensive or I'd buy one.:cool:


Expectations - I think I may be in for a long haul with my truck but I'll do my best. This forum is as much of a motivator as my own desire to finish. I sometimes find myself pushing to do something just so I can post it and get feedback from all you guys. God knows my wife doesn't give a hoot till it's all done and shiny.;)
 
awsome job on the rebuild, I'm currently rebuilding mine and have a question, how do you test the solenoids? I have the winch all back together, cleaned all electrical conections, but only get 1 solenoid to click.
 
WOW! What great workmanship you have sir. Please add me onto the list for a cover.
 
awsome job on the rebuild, I'm currently rebuilding mine and have a question, how do you test the solenoids? I have the winch all back together, cleaned all electrical conections, but only get 1 solenoid to click.

To test the solenoids I put alligator clips on the larger terminals connected to my multimeter to test continuity. There should be no through-put of current (normally closed). Then put negative 12V (ground) to the mounting bracket of the solenoid and positive 12V to one of the small control terminals (cant remember which one). You should hear a click and get continuity through the large terminals.

Kevin

Thanks Kevin,
I Tested as you suguested and all worked great, I found that I had a bad groubd situation with the solenoids in the control box, a simple ground wire from the control box case to the motor solved the problem.
thanks again
 
Glad to help.

Yeah - mine must be getting enough ground through the gear clamps and the paint on the motor because I don't have the noid box grounded or even have my control curcuit hooked up yet.
 
Pictures for 85fr16

P1010002.jpg

P1010001.jpg

P1010004.jpg
P1010001.jpg
P1010002.jpg
P1010004.jpg
 
Awl_TEQ said:
-Tapping cast aluminum can be a challenge, it may crumble rather than bite in - take your time. (I actually put the tap in my cordless drill and went very slowly on the trigger. That may sound reckless but it can work better than turning a tap handle and not keeping the tap perpendicular to the hole - this causes the tap to crumble the aluminum rather than cut threads.)

Awl, for those with drill presses, I find this Machine mount with guide a great help in keeping the tap perpendicular. McMaster has them under power-drill tapping attachments, but it's really a hand power only process. They come in three different sizes.

2550a64p1s.gif


What I would like to see are aluminum end caps. I can easily make one out of flat plate, but would need a mill or lathe to be able to make the sealing ring under the cap. Anyone know of someone who does make them in the same shape of the stock plastic ones?
 
Last edited:
Blue77 - that's a great idea. I can make the plastic drum endcap from aluminum in a flat plate and with a second flat plate on the inside to function as the plastic lip does (to locate the cover). I could then powdercoat it or anodize it. The plastic ones are a bit fragile.

Oh - and the tool you suggested would definitely work for that purpose.
 
Thread revival

85fr16
cruiserjunkie
Theycallmenica
LCSODIVER
db2nsoaz
GussesCruzer
dslcruzr
mudcrzr
codyc


The above members have all expressed an interest in buying one of my 8274 solenoid pack covers made from aluminum and powder coated with a red "W". Some of these requests were made quite some time ago so I will attempt to PM each of them to see if they might still be interested. I will be fabbing these up in the next three weeks at a price of $28.00 Canadian Funds for one. This cover fits my older M8274 model and I have no idea if it will fit others. Keep in mind I am in Canada so would likely mail them parcel post. Canada posts website quotes $10.70 to ship ground 6-12 business days to the lower 48. Somewhere in this forum someone said that Warn wanted $37.00 US for their replacement plastic cover.


Don't post up here - I have started a thread in the classified section - https://forum.ih8mud.com/merchandis...k-covers-made-aluminum.html#post4729204/SIZE]


HPIM1191.jpg

HPIM1352.jpg

HPIM1801.jpg
HPIM1191.jpg
HPIM1352.jpg
HPIM1801.jpg
 
Last edited:

Users who are viewing this thread

Back
Top Bottom