How to Replace Oil Pump seal w/ Pics

This site may earn a commission from merchant affiliate
links, including eBay, Amazon, Skimlinks, and others.

98 SNAKE EATER said:
Anyone know the price of a new crank bolt?

I plan on tackling this job soon and was just wondering if it would be worth it to replace the bolt as well :hhmm:

Reuse.

New one is about $9 or $10.
 
Anyone tried using a Craftsman right angle impact with a screw extractor to take out stripped oil pump cover screws?
 
IIRC M8x1.25
 
Just to toss out the idea, has anyone tried to break the 30mm bolt lose while the belts are tight? Allowing the belts to retain the needed friction?

Also? Before I dive in, how much drip is enough to warrant the job.

Current drip will be 2-3 small drops after truck sits for 10 hours. More drops if the motor is running.
 
Just to toss out the idea, has anyone tried to break the 30mm bolt lose while the belts are tight? Allowing the belts to retain the needed friction?

The friction of the belts is associated with the crankshaft not turning due to compression in the cylinders. Turning the 30mm bolt will overcome the resistance of compression.

Can the oil pump seal be replaced without removing the crank bolt and associated nonsense?

No.
 
Got mine done yesterday :)

I'm at 307,3xx miles and all 7 screws came out without stripping :grinpimp:

fzjoilpumpseal1.jpg


One was being a little bitch due to the fact that it was the only one being bathed with oil (note where the seal was busted)

fzjoilpumpseal2.jpg


I'd like to thank whoever it was that suggested using a mini torch :cheers:

I just heated each screw up for about 40 seconds, tapped the #3 bit into place with a hammer and cracked each one of them loose with a 1/4 drive ratchet :cool:

After breaking each one of them loose, I re-tightened them until all were loose to avoid putting unwanted strain on the ones that were still tight.

The last one that was being a bitch had to be heated numerous times and tapped hard, but it eventually cracked :clap:


Tools of the trade :cool:

fzjoilpumpseal3.jpg


I welded up this crank holding tool using a scrap bar and a lawnmower blade and it worked great :)

fzjoilpumpseal4.jpg


I also welded up a torque wrench extension so I could use a regular Tq wrench set to only 118ft.lbs. :cool:

fzjoilpumpseal5.jpg

fzjoilpumpseal6.jpg

fzjoilpumpseal7.jpg


One of my workers had a brand new HF 300ft.lb. Tq wrench (one they replaced because the first one wouldn't click) and although it's rated up to 300, the adjuster cranked all the way to 320 :hhmm:

With the crank holding tool braced against my foot, I got a solid click out of the HF Tq wrench set to the max :cool:

Then I switched over to the SK Tq wrench with the extension set for 304ft.lbs. and was able to get a good 1/4 turn before clicking :meh:

Now, I trust the SK's calibration over the HF Tq wrench any day, but being this was the first time using the extension, I figure I'd go a little tighter, so I bumped up the extension setting for 320 and it went about another 1/4 turn before clicking and I just called it good :cool:

While I was down there, I replaced the crank seal, all 3 belts, the idler and A/C tensioner :cool:

I think the hardest part was the damn fan shroud.

Since I have dual batts, I had to pull it along with the tray in order to slide the shroud out.

And getting it reset while avoiding breakage for either the shroud or the plastic radiator nipple was a pita.
 
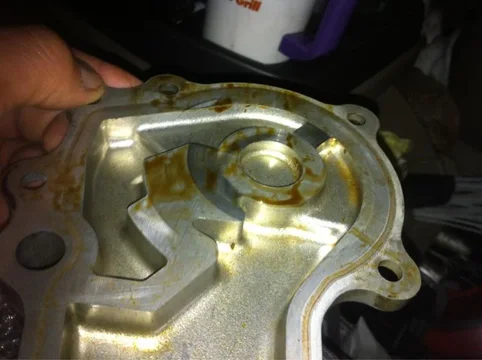
Did anybody have any contact wear on the cover from the pump?
Ill post pics in a second...
 
cool breeze said:
did anybody have any contact wear on the cover from the pump?
Ill post pics in a second...


image-1637718094.webp


image-3918404525.webp
image-1637718094.webp
 
Mine had wear also, sanded it a bit using full sheets of sandpaper on a flat piece of marble. Before popping the cover back on I put some moly-graphite assembly lube on/in the pump rotor as I had previously cleaned that area using a spray solvent (photo shows the cover before sanding flat).
DSC01691.webp
 
Last edited:
I'm just about finished with mine.

I had some wear/abrasion on my cover as well. And most others I've seen had some wear too. I lapped the cover slightly and put a small layer of FIPG in the groove to seat the o-ring and to give more size to the o-ring. I think the diameter of the o-ring is too small even with swelling. I think the FIPG should help.
 
I don't recall having any wear on my cover when i took mine off.
 
All done and noticed the idler puller stuck. Theres not a diagram of whats associated with it. Is this the right orientation?


image-4117645747.webp
 
The toothed washer goes on the outside of the rear cover of the idler pulley, teeth facing out and screwed down the bolt threads by hand (hold the washer, turn the bolt). Are you saying the idler pulley doesn't turn by hand?
DSC02426.webp
DSC02432.webp
 
Last edited:
I tried that way (i thought) already. Im wondering i im missing some hardware. It should be the:
Pulley, bolt, two spacers and the star washer?

It will not turn with the belts or by hand. Think my pulley is done. It barely moves by hand.

Does the pulley stabalize te long run of the belts at that point? I cant see any other purpose. So im thinking it will be ok to drive for a few days while the part arrives. Maybe just keep the revs down...
 
Last edited:
Finally decided to tackle this project over the weekend. Had a few hiccups, but all-in-all, went pretty well. The following are a few comments about the job:

MUD suggestions that worked like a champ:

1) Cordless impact driver on the seven screws, I PB blasted them first but these things were a non-issue, 30 sec job.
2) 2" PVC coupler to drive in crankshaft seal, perfect fit, like it was made specifically for this job.
3) 14mm Deep Impact Socket on the torque converter bolt method, a little bit of muscle and a 5 foot cheater worked great to break the crackshaft bolt loose.
4) 3/4" everything. Busted sockets and breaker bars was a non-issue for me.
5) Long breaker bar. Leave-ridge is your friend.
6) Removing the battery tray and fan shroud. Don't think this is in the original instructions, but it's too easy to do and adds a lot of working space to the job.

What didn't work for me:

1) The bump method. It turns out my battery wasn't up to the task, the first bump kilt it.
2) Chain on the frame and bolt in the crankshaft pulley method. Sheared the bolt off in the crankshaft pulley.

And FYI, the length you need on the 7 replacement screws for the oil pump cover is 14mm. At least at the time I bought all the stuff for this job (few years ago), this had not been tied down, because I had two lengths on hand.[/QUOTE]
 
What is everyone using to torque the crank pulley? I am going to rent or borrow a torque wrench big enough. Just curious if everyone has 300 ft/lbs wrenches lying around.
 
What is everyone using to torque the crank pulley? I am going to rent or borrow a torque wrench big enough. Just curious if everyone has 300 ft/lbs wrenches lying around.

See post #369

I used both a 300 ft.lb. TQ wrench from HF, but the one that really got it torqued down was a regular (but higher quality) SK 150 ft.lb. TQ wrench and an extension I welded up :cool:

TQwrenchExtension7.JPG


Going by this online calculator, I only needed to crank the 1/2" SK TQ wrench to 118ft.lbs. :)


The HF TQ wrench was a brand new replacement for one of my workers as his previous one wouldn't click.

My calibration cube only works up to 147 ft.lbs., so I was only able to check the smaller SK TQ wrench and trusted the extension combo more than the big HF wrench :meh:
 

Users who are viewing this thread

Back
Top Bottom