Help with 3-link on '99 4-Runner (1 Viewer)

This site may earn a commission from merchant affiliate
links, including eBay, Amazon, Skimlinks, and others.

Thanks for the kind words of encouragment BeratE. I do get a little frustrated from time to time with the lack of responces to questions but figure I'll just keep asking them.;)

I worked on the truck tonight and got the fuel cell mounted on its carrier. This picture is a little dark but here's how it looks from the bottum. It bolts in front and back with 3 5/16" bolts each side.
DSC00857.jpg
Here it is top side. I still have to add on to the cage for the upper coilover mounts. They will come up through the floor on either side of the cell.
DSC00858.jpg
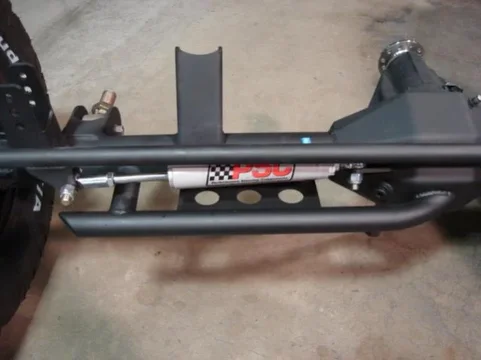
I also got the hydro assist cylinder tacked into place. It's a tight fit managing to clear everything and this is my first go around with the assist. If anyone sees anything wrong with the way I have it mounted please speaK up.
DSC00861.jpg
DSC00857.jpg
DSC00858.jpg
DSC00861.jpg
 
There's some phenomenal attention to detail going into this build; nice work! You seem disheartened by the lack of response a couple of times, but I hope it doesn't really get to you, those of us who are inspired by your work really appreciate the time you are taking to document everything, even if we can't help along the way

I've been watching from the start and I agree the fab work is top notch. This type of build is over my head as far as "hard core wheeling modifications" go so I have no advice to offer but I enjoy the skilled fab work immensely. Keep it up!!

Kevin
 
I had the same space issue. It took awhile to figure out the right location with the limited space availalbe

Its hard to tell from the picture but I think the current location of the ram will attract rocks.

Some how I try to move the drag link mount a bit higher


Thanks for the kind words of encouragment BeratE. I do get a little frustrated from time to time with the lack of responces to questions but figure I'll just keep asking them.;)

I worked on the truck tonight and got the fuel cell mounted on its carrier. This picture is a little dark but here's how it looks from the bottum. It bolts in front and back with 3 5/16" bolts each side.
View attachment 387952
Here it is top side. I still have to add on to the cage for the upper coilover mounts. They will come up through the floor on either side of the cell.
View attachment 387953
I also got the hydro assist cylinder tacked into place. It's a tight fit managing to clear everything and this is my first go around with the assist. If anyone sees anything wrong with the way I have it mounted please speaK up.
View attachment 387954
 
Last edited:
Thanks Awl_TEQ. It's good to know you're watching the build.

Qtipp, I'm pretty sure you're right about the rock magnet. I'll have to look again but I'm not sure it'll fit anywhere else. I was thinking I would build a guard out of some tube, possibly with a piece of plate to act as a skid. I've seen some pretty nice setups done that way. Thanks for the input.
 
This is one of the best builds I’ve ever come across. You and mrqtipp are real inspirations, keep it up!
 
Thanks, glad you're enjoying it SLOW LN.

I've been avoiding the front coilover hoops and finally forced myself to give them some attention. Sure enough it was a pain measuring and re-measuring, and then tacking them in only to hammer them back off again. They didn't win in the end though. I painted the upper portion that will be hard to get installed and left the bottum bare to facilitate welding them onto the frame. I'm going to gusset them once they're burned in as well. The tabs on the closer one are for mounting the factory fuse box back in it's original location. The 4Runner had a tank mounted in the driver side fender well to hold extra vaccum. Has anyone heard of using something like the welded up shock hoop instead? Kind of like Marlins' roll bar/air tank but opposite?
DSC00871.jpg
DSC00871.jpg
 
R u going to run a removable (flanges) bar from hoop to hoop to minimize the flex?

Just wondering. I noticed you had already painted the top of the hoops and once they are burned in you might have a hell of a time preping the metal for the support bar.

I am no expert in the matter but I think you need one.


Just an idea


By the way you have the cleanest shop floor ever!

Keep up the great work


Thanks, glad you're enjoying it SLOW LN.

I've been avoiding the front coilover hoops and finally forced myself to give them some attention. Sure enough it was a pain measuring and re-measuring, and then tacking them in only to hammer them back off again. They didn't win in the end though. I painted the upper portion that will be hard to get installed and left the bottum bare to facilitate welding them onto the frame. I'm going to gusset them once they're burned in as well. The tabs on the closer one are for mounting the factory fuse box back in it's original location. The 4Runner had a tank mounted in the driver side fender well to hold extra vaccum. Has anyone heard of using something like the welded up shock hoop instead? Kind of like Marlins' roll bar/air tank but opposite?
View attachment 388985
 
I am still undecided on that one... I have given it alot of thought. At this point I was planning to patter out some plate to weld on either side of the hoop tubes (four per side) to fill in the void and gusset the hoop beween its' mounting point of the side of the frame, top of frame and hoop uprights. That is why I didn't paint all the way down to the frame mounts. I'm thinking I'll try it like this for a while and see. If it's still not stiff enough then it will be on to hand sanding.:eek: I'm kind of going after the design of the coilover hoops that Offroad Solutions used to make when they were in business. That said they also offered a support brace as an option. Qtipp, do you have any thoughts on using the welded up hoop as a vaccum canister?
 
I have been thinking about it.

On one hand it is a great space savor on the other hand you might be setting yourself up for some issues.

If I were you I would put the hours into it and see how it goes.

Worst case scenerio it doesnt work and you go another direction.

Give us updates


I am still undecided on that one... I have given it alot of thought. At this point I was planning to patter out some plate to weld on either side of the hoop tubes (four per side) to fill in the void and gusset the hoop beween its' mounting point of the side of the frame, top of frame and hoop uprights. That is why I didn't paint all the way down to the frame mounts. I'm thinking I'll try it like this for a while and see. If it's still not stiff enough then it will be on to hand sanding.:eek: I'm kind of going after the design of the coilover hoops that Offroad Solutions used to make when they were in business. That said they also offered a support brace as an option. Qtipp, do you have any thoughts on using the welded up hoop as a vaccum canister?
 
Thanks. Here's a picture of the front upper frame link mount. Sorry it's pretty dark. The mount is a 22.5* inner frame mount from Ballistic that I shaved down to about 15*.
DSC00879.JPG
I had a little help this weekend and mangaged to make so good progress. We sanded and sprayed the "bed" with bed liner and I made a battery tray for the second battery. It is mounted on the passenger side directly behind the rear seat.
DSC00875.jpg
The friend helping me had these stickers made up for my truck. They will fit the Heepetr well.
DSC00876.jpg
DSC00879.JPG
DSC00875.jpg
DSC00876.jpg
 
Last edited:
Worked on installing the ARB compressor last night too. I modified the bracket for the abs controller to fit the compressor instead. It will run off of the aux. battery so that I can run it with the motor off with no fear of draining the starting battery.
DSC00877.jpg
I spent a lot of time trying to make sure the harness was perfect. This picture is where I decided to mount the switches. I put the engine bay back together as well. The compressor test......nothing! I'm not sure what is wrong, have a blown fuse on my multimeter, and fear I may have to pull the entire harness. I jumpered the compressor directly and it ran so it's somewhere in the wiring.:mad:
DSC00881.jpg
I put driver seat back in and the tires on for weighing this afternoon. I have a friend with racing scales that's going to help me so that coilovers can be ordered Monday. I am planning to go with 16" Fox all corners. Any opinions?
DSC00880.jpg
DSC00877.jpg
DSC00881.jpg
DSC00880.jpg
 
Last edited:
Back at it again tonight. Here's another picture for you mmml4. I took this one looking forward with a flash.
DSC00883.jpg
I got my compressor working tonight. I had to buy a new multimeter and do some checking. I'm ashamed to admit it but I had the aux. battery hooked up backwards. My winch would still run so I didn't think it was possible...:lol:

I wired the Mallory fuel pump using the factory fuel pump harness. No word as to whether or not it works though. I'll have to wait untill tomorrow when I can have someone turn the engine over while I'm under the truck to see if it turns on.
DSC00882.jpg

I did get the truck weighed tonight. For anyone that might be interested here's what we got with weight for the cell, two people in the front seats, weight for the roof rack that is still not back on, and weight for a cooler and the recovery gear.

Unsprung:

RF: 318#
LF: 336#
RR: 266#
LR: 259#

Totat Vehicle:

RF: 1076#
LF: 1062#
RR: 954#
LR: 991#

That works out to 4083# with a 52.4/47.6 distribution front to rear. I can't wait to get some coilovers on this thing and see how it sits without jackstands! :cheers:
DSC00883.jpg
DSC00882.jpg
 
Thanks for the great pic, it helps alot. I found a build thread very similar to yours when I was doing my research and here is a quote from his build

"The 14" SAW coil-overs are pretty big. Had I done it over again, I would have picked up 12" coil-overs right away".

I have no experience with coilovers but it looked like his were too tall. The build thread is here Hunt4Steve.Com , you may have seen it already.

Thanks again​
 
Glad the pic helps mmml4. I am familiar with Steves' site and have found some pretty helpful info there. I think the reason he would have gotten 12" coilovers is that he didn't cut into the fenders and build his hoops up into the engine bay. I went the other way and cut out more fender than I needed to :mad:... but I should be able to fit 16s well. At full stuff (articulated) I measure about 25" from hoop eye to where I'm mounting on the axle. I'm pretty sure Fox 16" coilovers are 24.1 collapsed and 40.1 extended. I was happy to chop the fender wells to accomodate the extra travel. Post up some pictures of you progress if you get a chance; I hope it's going well.
 
With some help I made good progress on the build last night. I reinstalled the fuel cell and got the lines ran up to the engine. Also I turned the engine over and sure enough the fuel pump came on.
DSC00885.jpg
I finished the bracing plates for the front coilover hoops and burned everything in. Primer and paint followed. This is how I'll run the hoops for a while and see whether or not I'll need to tie the two together over the engine.
DSC00889.jpg
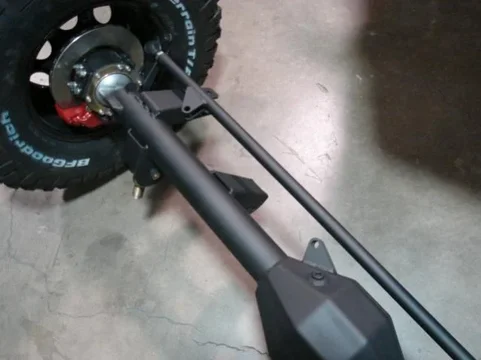
I burned in the hydro ram mounts as well and now have to fab up a guard to protect it's vunerable location.
DSC00890.jpg
DSC00885.jpg
DSC00889.jpg
DSC00890.jpg
 
Last edited:
This is the guard I built for the hydro ram. Tube is .25 x 1.75 DOM and the skid is 3/16" plate. No those are not dimpled holes. I only wish I had a set of dimple dies.
DSC00892.jpg

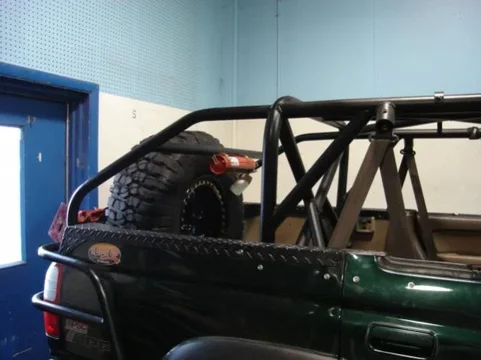
I acomplished quite a bit this weekend. I got the front axle re-installed (again!), hopefully for the last time. I finished the rear cage extension over the "bed" and finished plumming the fuel system. I had one leak in the system and what do you know, it wasn't something I did. One of the bulkheads on the fuel sump leaked badly and it ate up some time fixing it. I took a little gas from my old tank and yes the engine came to life!:clap: Rear brake calipers finally got mounted and a few other things that have been bothering me got cleaned up.
I ordered the coilovers last week and I'm hoping I might see them by the end of next week. I've still got to plum all the brakes and I'm dreading it. I wish I had a friend around that did brakes. My plan is to have the truck done by mid Feb. so I've got some time to work out the gremlins and get used to driving it by the time Cruise Moab rolls around.:cheers:
DSC00892.jpg
 
Last edited:
Thanks Qtipp. I took your advice and went ahead and ordered all the line and fittings. Should have it this week. I was originally going to rework the old hard lines with a combination of braided line. All new is going to be much easier.

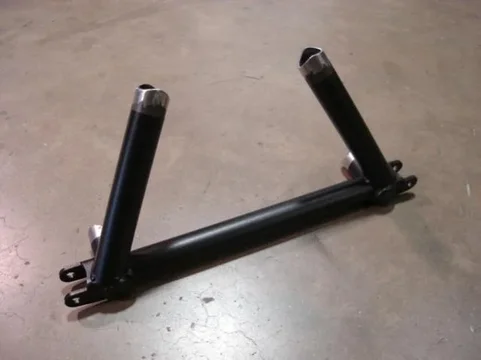
This weekend I built the truss for mounting the coilovers in the rear. Here it is ready to be burned in.
DSC00893.jpg
And installed. It is setup for 16" coilovers, same as the front.
DSC00894.jpg
I thought I'd include a picture of how the back hoops turned out too.
DSC00897.jpg
DSC00893.jpg
DSC00894.jpg
DSC00897.jpg
 

Users who are viewing this thread

Back
Top Bottom