Help me plan for a 2FE

This site may earn a commission from merchant affiliate
links, including eBay, Amazon, Skimlinks, and others.

Some update pics... a few are double posted with the head thread.

Hastings rings are on their way, the Delta reground camshaft and lifters are on their way.

Crank is back from the machinist (along with the head). Evidently it was already in v. good balance, so they just polished up the journals and thrust surfaces a bit and called it good.

IMG_5411.jpg


Gratuitous pics of the head.

IMG_5420.jpg

IMG_5417.jpg


Prepping the pistons, bearings and rocker tips for coatings. They've been blasted with 100 grit aluminum oxide and washed up. They'll need to be rinsed with acetone to remove any unwanted residue, have the coatings applied with an air brush, then dry and be baked (300* for an hour). Fingers crossed for tomorrow.

IMG_5400.jpg

IMG_5406.jpg

IMG_5401.jpg

IMG_5423.jpg

IMG_5425.jpg

IMG_5424.jpg
 
Piston skirts masked, ready for a quick acetone rinse, then coating.
IMG_5427.jpg
 
The coatings are on pistons, bearings and rocker tips now. Need to wait till my roommates are out of the house for a while to bake them on, I expect they'll smell somewhat less than fantastic.

Applying them is definitely something there is a learning curve to. A few things I picked up that would help for anyone else interested in trying DIY coating:

Don't apply any masking till after the parts have been rinsed with acetone. The acetone will leach out a bit of adhesive from the tape, and the tape will hold some acetone under it. Both of these things screw up getting an even coverage once you start spraying.

Warm the part up before spraying it. By doing this, the coating will dry much faster, and won't have a chance to run. Holding the part in front of a heater just after spraying speeds up drying too.

Go light on the coverage, then add some more if needed after taking a good look over.

I would be a good idea to filter the coating as you pour it into the gun, as there must be some solid globs left after stirring and shaking that will clog up the nozzle. On a similar note, it's likely best to use a cheap air brush to apply rather than an expensive one with fine nozzles. Easier to clean after (on the go too) and less expensive if you wreck it in the process.

Play around first on some scrap material to get a handle on how much coating is enough, how much air pressure is good, etc so you don't have to remove your first attempts from a good part and re-prep it.

Some pics:

IMG_5428.jpg

IMG_5429.jpg

IMG_5432.jpg

IMG_5431.jpg
 
Getting close.... Any suggestions on engine assembly lube?

IMG_5434.jpg
 
Assembly lube... I used Permatex on mine, and I add melling assebly lube to my oil changes for the zddp. The permatex was very sticky, more like strawberry jelly/molasses. I didn't like the way it would clump together over time when spread across the bearings. I've never applied the mel-lube, but it is thinner than the permatex.
 
They don't look too different coming out of the oven. 4 of the pistons look good, 2 look like they got a light coat of the thermal barrier, and cracked/flaked (hard to tell how thick it goes on as the wet color isn't very far off from the blasted aluminum of the piston). I think I'll be reblasting their tops and recoating them. Have a post on the techline forum to find out if that's the best....

IMG_5436.jpg

IMG_5437.jpg

A flaky one:
IMG_5442.jpg


Rocker tips and rod bearings.

IMG_5441.jpg

IMG_5440.jpg


New Hastings rings.
IMG_5447.jpg

IMG_5446.jpg

IMG_5445.jpg


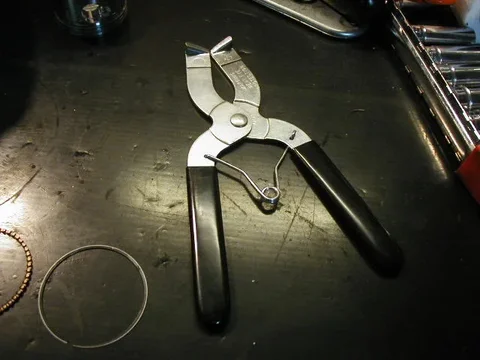
Will a cheap ring spreader/expander like this work with iron rings, or should I track down one that supports around the full circumference as it expands?
39.webp
39.webp
 
I've been hearing about a 2FE for a long time.

Can someone please just sum up the actual benefits of it to me.

I've read through about 9 threads and must be missing the ones as to why.

I know it gets you more cu and some more power.

How much more power?
Any better mpg??

Sorry for such a noob question but I must be missing the one thread in hundreds that tell me why. :cheers:
 
In a nut shell

More power and torque. As for how much more all depends on how big yur budget is.

The biggest reason is to be cool and join the 2FE Club :D

MPG I would say better than carbi but worse than a 3FE, except mine that drinks like a fish.
 
The strong points of a 2F are in the bottom end. Longer stroke, longer rods, taller, more stable pistons, IIRC a stronger crank. The bottom end of a 3FE is somewhat weaker. To shorten the deck the geometries were changed. On top of the shorter stroke it also has a much short rod and a shorter piston. The shorter rod means greater a greater maximum angle with respect to the centerline of the bore, and the shorter piston is less stable. Additionally, on a 3FE at bottom dead center the entire piston skirt has dropped out of the bore, IIRC, the piston stays completely within the bore at BDC on the 2F (I'll be able to check that in a couple days). *edit* A portion of the skirt also drops below the bore on the 2F, but it is slightly less in absolute amount, and significantly less in terms of proportional length than with the 3FE, since the 2F piston is much taller.

The strength of the 3FE is in the top end. The head has a tighter combustion chamber, the exhaust ports are bigger, the intake manifold and exhaust manifolds are both a more smooth flowing design than on the 2F, and of course you have a multiport fuel injection system, with all the engine management and fuel mixture benefits that come with it.

Compared to a 2F, you get better fuel management, and I would think an engine more suited to higher revs with the improved intake and exhaust. Compared to a 3FE, you get more low end grunt because of the extra stroke length (my 3FE doesn't really come alive till ~2500, but is strong in the 3000-4000 range) and you get a bottom end that while heavier, is supposedly stronger and better able to handle revs in the 4000-5000 range.

The 60 series trucks are well suited to fit a 2FE, since the 60 came with a 2F and was designed to accomodate the extra 2" of engine height. In a 60 or 62 with a 2FE, apparently the top of the intake manifold just rubs on the hood liner. With the 80 series trucks, I understand that underhood clearance is an obstacle for fitting a 2FE, you would either need a body lift, or a modified hood to get the clearance.

HTH
 
Last edited:
Well tonight (or last night as the case seems to be) I started putting things together again. Gave the bores a second cleaning since I glaze-broke them, gave the oil galleries a bit of a clean, and got the main bearings and crank in. The mains all spec between 0.045 and 0.050mm clearance. Standard is 0.020-0.045mm with a limit of 0.10mm, so I'm happy considering they are old bearings.

I also blasted and recoated two piston tops that got sprayed thin on the first go round, so hopefully tomorrow I can get the piston/rod assemblies put back together and installed. Once I see how well the piston coatings stand up to installation, I'll have to make the call on coating the combustion chambers and valve faces or not. I was leaning toward not after the two pistons came out flaky, but I think that was prep and spraying rather than the coating being crappy, and feedback on the Techline forum suggests that flaking isn't an abrasion risk for the rings and bores.... so I'm not sure right now. The dry film lube coating seem to be pretty stout. No scratches or anything showed up monkeying with the mains. It seems to burnish up to a real nice polish too, so I have hope that that one was worthwhile.

Anyway, time for scotch and bed. Should have more to show after tomorrow night.
 
You're just going to bed? Late night for you, I'm in my 9am class already:lol:

Good work on the motor. The coatings you are using have the potential to really catch on in the market of restoring old cruiser motors.
 
You're just going to bed? Late night for you, I'm in my 9am class already:lol:

Good work on the motor. The coatings you are using have the potential to really catch on in the market of restoring old cruiser motors.

I'm lost in life somewhere between being a grad student with no real schedule, and bat-$^&* crazy. :D I'm always better at the tail end of the day than at the beginning, or the middle for that matter. Last night I wanted to get some real stuff done, so I just kept at it.

Looking at the matte coating on the piston tops, it's hard to believe that between the piston, chamber and valve faces there's supposed to be a 8-10% gain in power/efficiency. Something seemingly so insignificant as "paint" in comparison to all the other things that go into an engine. :confused:
 
The strong points of a 2F are in the bottom end. Longer stroke, longer rods, taller, more stable pistons, IIRC a stronger crank. The bottom end of a 3FE is somewhat weaker. To shorten the deck the geometries were changed. On top of the shorter stroke it also has a much short rod and a shorter piston. The shorter rod means greater a greater maximum angle with respect to the centerline of the bore, and the shorter piston is less stable. Additionally, on a 3FE at bottom dead center the entire piston skirt has dropped out of the bore, IIRC, the piston stays completely within the bore at BDC on the 2F (I'll be able to check that in a couple days).

The strength of the 3FE is in the top end. The head has a tighter combustion chamber, the exhaust ports are bigger, the intake manifold and exhaust manifolds are both a more smooth flowing design than on the 2F, and of course you have a multiport fuel injection system, with all the engine management and fuel mixture benefits that come with it.

Compared to a 2F, you get better fuel management, and I would think an engine more suited to higher revs with the improved intake and exhaust. Compared to a 3FE, you get more low end grunt because of the extra stroke length (my 3FE doesn't really come alive till ~2500, but is strong in the 3000-4000 range) and you get a bottom end that while heavier, is supposedly stronger and better able to handle revs in the 4000-5000 range.

The 60 series trucks are well suited to fit a 2FE, since the 60 came with a 2F and was designed to accomodate the extra 2" of engine height. In a 60 or 62 with a 2FE, apparently the top of the intake manifold just rubs on the hood liner. With the 80 series trucks, I understand that underhood clearance is an obstacle for fitting a 2FE, you would either need a body lift, or a modified hood to get the clearance.

HTH

My biggest questions will be how the assembly goes between the 2 engines; things like water pump and belt driven accessories.

Example, you should have 2 different options for mounting PS pump, actually you have the option between two different PS pumps (3FE or 2F).

It will be neat to see this go together. Are you going to run A/C on this Doc?

As far as I'm concerned there is only one option. The 3FE water pump will not bolt to the 2F block, so you must use the 2F pump. Also, the accessories are much easier if you use the 2F arrangement. Aaron was able to modify his FJ62 to keep his accessories in the FJ62 locations, but if this is an install into a FJ40 or FJ60 it's easier to just use the 2F accessores in the factory location. There really isn't anything to figure out.
 
My biggest questions will be how the assembly goes between the 2 engines; things like water pump and belt driven accessories.

Example, you should have 2 different options for mounting PS pump, actually you have the option between two different PS pumps (3FE or 2F).

It will be neat to see this go together. Are you going to run A/C on this Doc?


I'm pretty sure I'll go without the A/C to simplify the mounting (don't use it much up here), but I'm not sure on the rest. I'll have to have a good look over the accessories and pulleys, but I may go 62 alt, smog pump (drop if not needed as an idler) and PS, or 60 PS with dual 60 and 62 alternators. Not sure if positioning a PS pump above the 62 alt would be asking for failure of the alternator... :hhmm: I have all the 62 accessories, but none from a 60 at this time.
 
As I was tightening everything up last night, it seems it's the rear main seal that puts the most drag on the crank. Could turn the crank reasonably easily by hand using the counterweights until I tightened the rear two bolts on the rear main cap. Then it took almost all my gusto to turn the crank in this way. Is this typical?

The lip of the seal and the corresponding surface on the crank were given a bit of moly grease to lube. I would assume sliding the seal in while the cap is loose and then tightening it down is a kosher way of installing...
 
Those pistons look great Rock Doc, just read your entire thread. im excited to see how this comes out! keep up the good work
 
Just checked a few gaps with the new rings. The top rings seem to fall around 0.70mm gap, second rings around 0.60mm and the oil control scrapers a touch wider. Not as tight as I would have hoped or the FSM specs for range, but at least they'll be fresh.
 
Starting to look more like an engine. :hillbilly:

Today I got the rings on the pistons, pistons and rods reassembled, bores rubbed down with an anti friction coating and the pistons installed.

IMG_5449.jpg

IMG_5450.jpg


The stuff for the bores is called PKSX. It's a dry powder that you burnish/rub into the cleaned bore. Has a sweet sulpher smell, and you can really feel the bore slicken up as it's rubbed in. Leaves kind of a bluish greasy/graphity appearance. To prep the bores were wiped with brake cleaner, wiped with acetone, then rinsed with acetone to make sure no oily/grimy residue was left. After the PKSX was applied, the bores were rubbed down with engine oil. In the lower pics you can see the comparison between the near bores which have been treated, and the far bores which are cleaned but not yet treated.

IMG_5457.jpg

IMG_5458.jpg

IMG_5454.jpg

IMG_5456.jpg


Pistons went in without any trouble. The coatings seem to have held up well, and I'm happy with them. The DFL on the skirts and bearings is interesting stuff. As you rub some oil over it, it seems to suck up the oil and your finger runs dry and the oil quits spreading. Seems like it's adhered well where the surface was prepped properly. I didn't see any chips, scratches or flakes in the thermal coating. :) I'd say aside from a little fumbling as I went through the learning curve for prep and application, I'm quite happy with how they've worked. Think I'll do the chambers with the thermal coating. :cool:

A pic with the pistons in, and one how it sits.... covered for the night. I'll check the big end clearances and torque down the caps tomorrow. :hhmm: Maybe my camshaft will show up too.

IMG_5460.jpg

IMG_5461.jpg
 

Users who are viewing this thread

Back
Top Bottom