Hello- new BJ42 owner- Australia.

This site may earn a commission from merchant affiliate
links, including eBay, Amazon, Skimlinks, and others.

That sounds complicated Hans. I think some kind of footrest next the accelerator (RH side) might be simpler and still work OK. (So you can rest your foot partially on the footrest and "lean if over onto the pedal" to achieve "fine low-throttle-control".)

But having said that, I think I'll just live with it and try and fine-tune my "BJ - bunnyhop- avoidance - skills". :D

:cheers:

That explains why I'M not in the hopping club. So far street driving has been staedy paced nothing special and I haven't found a place to get the thing off road yet to really let her shake her legs. :doh:
 
Hey Jabxyz,
I got my replacement Japanese indicator Lamps today from Roodogs- there is a world of difference between these Japanese made ones and the Taiwanese (crap).
Just picking them up with eyes shut you can tell- let alone when you pull them apart (like I seem to have to do:D).
I'll put some photos up some time once I get them off the camera.
I did a little comparison between the Taiwanese ones and the Japanese both opened up:lol:

Today I took off my dash and disconnected all the controls (making sure I photographed and clearly labled all the wires). I have it in my electrolysis set up to de-rust it (not that it is rusty, but to bubble off the paint).
Then I am either going to paint it myself or send it off to the plating company by girlfriend uses (she's a silversmith).
Not sure what to plate it in... black chrome maybe?... 23ct Gold?;):D
dunno- open to suggestions.
If I don't plate it, then I will just spray it black.
 
Hey Jabxyz,
I got my replacement Japanese indicator Lamps today from Roodogs- there is a world of difference between these Japanese made ones and the Taiwanese (****).
Just picking them up with eyes shut you can tell- let alone when you pull them apart (like I seem to have to do:D).
I'll put some photos up some time once I get them off the camera.
I did a little comparison between the Taiwanese ones and the Japanese both opened up:lol:

Today I took off my dash and disconnected all the controls (making sure I photographed and clearly labled all the wires). I have it in my electrolysis set up to de-rust it (not that it is rusty, but to bubble off the paint).
Then I am either going to paint it myself or send it off to the plating company by girlfriend uses (she's a silversmith).
Not sure what to plate it in... black chrome maybe?... 23ct Gold?;):D
dunno- open to suggestions.
If I don't plate it, then I will just spray it black.

Hans,
I'm glad that you got that straightened out with Roodogs, they sound like good guys. I would like to see the comparison pics of the two signal sets if for no other reason than I'll know why it is worth it to pay the difference next time I have a choice in parts. The other reason is as seems par for this course, my signal lights went out last night. Hopefully just a burnt out set of bulbs, I guess I'll have to crack them open and take a look see.
On the dash good idea on the wiring, I was going to buy a panel cutout from this guy Trail Candy LLC-Put a little Candy in your rig and drop in newer gauges that would be easier to see at night but I can't get him on the phone no matter the time of day. I'll try email. I wanted him to give me the cut out in black textured finish and do a matching glove box door and punch out for the ashtray which I won't use. If this plan falls through then I guess I'll try and renovate the panel I have upgrade the light cans to LEDs so I can see them better at night. Let me know how your dash refit goes.
Regards
 
Congrats Hans ! :clap:

Mine doesn't hop at all, but then I have 5sp.Wonder if it is only a 4sp&3B thing then?:confused:
 
5spd no hoppity...interesting...(you buggers:D)

oh well.
I'll have to get used to it... and maybe try a little experiment.
Lostmarbles, by 'gearing' the accelerator cable- it could be something as simple as extendeding leverage...

for example heres the throttle on the air intake
IMGP2829.jpg


My basic idea would be that if this lever was extended and the accelerator pedal was made to have more range of movement to compensate... wouldn't be too hard at all- and then maybe the foot thing and the hoppity might not happen so much? (if that is actually the cause like it seems to be)
IMGP2830-1.jpg
 
Last edited:
and heres the grubby seat I got for the back. In needs a good clean, and then I will get the vinyl replaced (maybe fabric too if that watermark doesn't come out).
IMGP2818.jpg
IMGP2826.jpg
to fold
IMGP2820.jpg
IMGP2821.jpg
IMGP2822.jpg
to tumble
IMGP2823.jpg
IMGP2824.jpg
IMGP2825.jpg


The bottom of the seat is sits about an inch or two above the wheel arch, and overlaps the wheel arches a little.
I may look at lowering this so it sits snug (so long as I can still fold it forward).

Pizza's arrived...
photos of lights coming up later.
 
Heres the little comparison between the Taiwanese Lamp and the Japanese

I should have taken one of them before I pulled them apart... but...
anyway, they look pretty similar from the outside, except the plastic casting quality and surface is much better on the Japanese

Taiwanese first.
IMGP2814.jpg

IMGP2815.jpg


Japanese
IMGP2812.jpg

IMGP2813.jpg


and both
IMGP2816.jpg

IMGP2817.jpg


notice, for the Japanese,
the rubber gasket on the bottom, the rubber gasket around the inside of the lens (to keep water out :idea:), the metal base, the proper reflectors, better globes (and bigger one for the bottom), and actual care to isolate the two (or three really) lights from the eachother...
the Japanese one is a lot heavier... long bolts go all the way to the back to captured nuts, rather than crappy screws into plastic and simply has a much better feel and finish.
The Taiwanese is rubbish, nastly plastic, nasty tinny metal, dodgy base and dull grey reflectors. The actual lense itself isn't so bad (aside from lacking the nice little isolating metal detail the Japanese one has), so will serve as a spare for mine if I crack any.

Probably more than obvious to most anyway, but certainly worth the money for the Japanese. They are bound to be brighter, and actually have a chance at keeping water out.
 
Hi Hans. If you try modifying your accelerator linkage I'll be interested to see how it works. (Of course any increase in throttle cable movement at the air intake butterfly would need to be mirrored by increased cable movement at the accelerator pedal too. Which could get complicated - Especially if you're trying to do a neat job and keep it looking original.)

Regarding your blinkers
- Those Japanese ones certainly look significantly superior to the Taiwanese.

I'm still using my originals and they often temporarily fill with condensation. (My vehicle is left permanently out in the weather because there's no room in my tiny garage.)

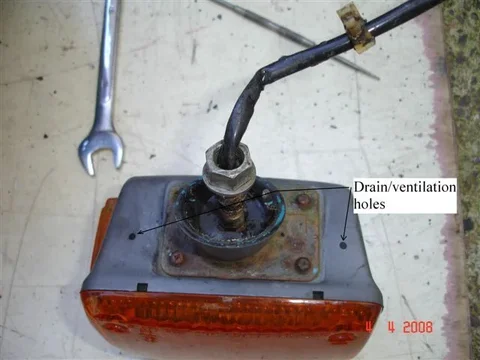
So I've found that an important feature of my stock items is the drain/ventilation holes that allow trapped water to escape and that allow condensed water to re-evaporate.

drainholes.webp

--- I suggest you make sure your new ones have holes too. Without them, I think the plated metal components inside are likely to rust pretty quickly.

:cheers:
drainholes.webp
 
Hey beejay,

I think you need an engineers certificate for those rear seats seeing as they never came standard on a landcruiser. It may not help just passing roadworthy with them in, as they don't take photos or note types of seats etc...
 
Thanks hes21,
yeah I won't be putting the seat in for roadworthy-

When I do put it in, it will be in a way that is not too hard to remove- also it will be used mostly for wheelin and holidays (and at that, pretty tame stuff compared to most around here)- so I don't really anticipate any problems with not having an engineers cert. It will be rare that I ever need to drive on the road with more than two (or even one) passengers. And if do start to use it more frequently, or have problems, I will contact the company that made and installed it for the guy I bought it off (made for a BJ42) to try to arrange a 're-intallation' and an eng. cert.

Or maybe I could just put an LX badge on my truck and paint some stripes on the back seats to match the front;):D


Lostmarbles-
but I dun wanna drill holes in ma new blinkers:crybaby::D
If its going to be a problem, maybe I could focus on making them actually watertight- with the addition of a little silicon or rubber washers on the four screws, etc... maybe even seal in a little bag of that silica stuff from a vitamin jar:hhmm:...

No garage for mine either.
 
G'day Beejay,

I bought all LED globes for my lights, and since they have a 50,000 hour life span, I completely sealed all of my lights with silicon. If you are interested, I can get the email address of the bloke in Sydney who I got them all from. I also have the part numbers, which is handy. They look really cool, as they are much brighter than the incandescent globes, and they use almost no juice.

As for an engineer's certificate: good on ya. Aussies are far too scared of the gummint for their own good. Wasting money on a Nanny's, er I mean an enginee's certificate for a bloody seat is simply throwing your money away. If you are comfortable with it, then use it! What Big Brother doesn't know won't hurt her.

Cheers,

Josh

Josh,
Got any pics of your post LED converted instrument panel? You can PM them to me rather than hijacking Hans's thread. I just cracked open my non functioning panel and was thinking about LEDs as well.
Thanks.:cheers:
 
Thanks Josh, I would love the email address and part numbers- that sounds great- and don't worry about highjacking... post up any and all info if you have it- I would like to do a LED conversion on the instrument panel too. Cheers, Hans.
 
Small update, after trying and failing to make the gear for my window regulator, I bit the bullet and drove out to Halls 4x4 (wreckers) and bought a whole new one- $65... probably just should have gone there straight away.

Primer pump and set of glowplugs arrived this morning. haven't had time to put the primer pump in yet (and I think I am just going to keep the plugs as a spare set now as it is starting and running fine- and the PO just changed them).

after a scrub down yesterday, the instrument panel is still bubbling away in the electrolysis set up- to get the last of the paint off. Then I can repaint it or get it plated- and reconnect everything up.

Oh, and I got my 'kill-switch' (or manual EDIC) working properly- pull it out, it stays out, turn it, it goes back in. Pulled it apart- promptly lost the spring that was out of place (and would have required a 2 second fix) and after searching in vain for the spring for half an hour- began pulling random things apart until I found a similarly sized spring (found one in one of those click-blow-torch ciggy lighters).

slow progress... blah blah blah.
 
G'day BeeJay42 and jabxyz,

I will post up all of the part numbers, etc. when I get home. For now, I will just say that what you need to do on the instrument panel is to pull off the little helmets that cover the globes inside the speedometer cluster. If you pull off the front cover (the bit you are paint-stripping, BeeJay), and look inside, past the speedometer, but above the guages, you will see where the globes for lighting the guages are. They are covered (for no good reason) with a small metal helmet, the only purpose of which is to stop light from getting onto the intruments. Pull this cover off with a pair of needle-nose plyers, and put the cluster back together. You can either use LED or regular blade-style globes, but the difference in lighting is significant.

I did this to my 83 FJ40 back in the early 90s, and it has worked fine ever since. I did it to me troopy in about 96, and it has been fine, and I did it to my 84 FJ40 LX when I got it 2 years ago, and it has been fine- so I know it will not cause problems.... not sure about the engineer's certificate, though.:)

Cheers,

Josh
 
Cheers Josh, I'll check that out.

I often cause confusion with my bad terminology- sorry.
The cover to my instrument cluster has already been restored-
here it is.
I am not sure what the PO has had it painted or as it sort of looks, plated in- but it is nicely done. (I am going to ask him today as I might as well try to match it)
IMGP2539.jpg


what I pulled off and am stripping for re-paint or plate is the middle cover,
this one
IMGP2810.jpg


Sorry for the confusion-

I am interested however in doing both the LED light conversion for the instrument panel as you have described, and for all the indicator lights. I'll give that 'removing the metal helmut' trick a try- as my wish for the LED conversion there is basically to just get it brighter.

Thanks mate,
Hans.
 
G'day Beejay42 and jabxyz,

As promised, here is the info for the LED globes. The email is jag-trading@hotmail.com and he is called John. The part numbers are:

2 x 36 LED BA15S WHITE GLOBES (for reverse)
4 x 36 LED BA15S AMBER GLOBES (for indicator)
2 x 36 LED BAY15D RED GLOBES (for stop/tail)
6 x T18 18 LED WHITE GLOBES (for marker lamps)
1 x 36mm 6 LED FESTOONS WHITE (for interior)
2 x 50W LED RESISTORS (for indicators - one resistor per side)

If you want to use the factory indicator relay, then you will need 4 LED resistors- one per side. I only ordered two, and wound up buying an LED flasher instead of using four resistors. If I were to do it over again, I would probably order 4 resistors, however it defeats the purpose of LEDs to reduce amperage because the resistors use draw as much amperage as a regular incandescent globe- but this only affects the indicators.

The very nice thing about the globes is how bright they are, and you don't have to worry about heat ruining or dis-colouring the plastic lenses, because they generate almost no heat. The interior dome light (your door switch may not work beejay due to your older doors) puts out a slightly blue colour, but it doesn't draw much power, so it is worth it I reckon. Remember that these globes don't like water, so you must silicon the lenses on place and the back where the wires go in as well. Given they have a 50,000 hour life, though, you shouldn't have to worry about ever having to replace them.... in theory.

After I put all of these globes in, I left my parking lights on all night just to see what would happen. In the morning, the lights were still just as strong as thery were when I closed the garage door 12 hours earlier, and the engine started as if the bettery were completely full. Let me know what y'all think.

Cheers,

Josh
 
Last edited:

Users who are viewing this thread

Back
Top Bottom