Going Aisin-details, details, details

This site may earn a commission from merchant affiliate
links, including eBay, Amazon, Skimlinks, and others.

PCV Question

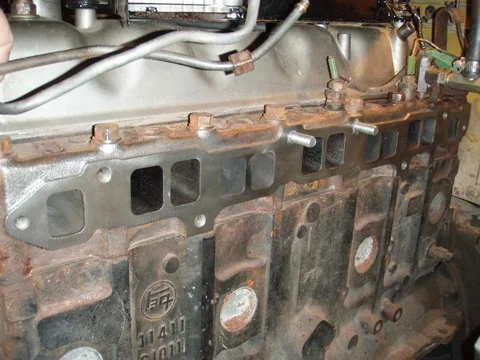
Pulled the carb to retorque the manifold bolts just to try a 30 min fix vs the overhaul again and noticed the bottom of the manifold was wet. Wiped it out and its motor oil, must be coming in through the PCV line. Didn't think too much about it and remounted the carb. Pic #1
Oil intake 1.webp

After remounting carb drove all of about 3 miles, came and convinced myself I would have to pull everything so when I pulled the carb again there was the oil again! See #2 & #3
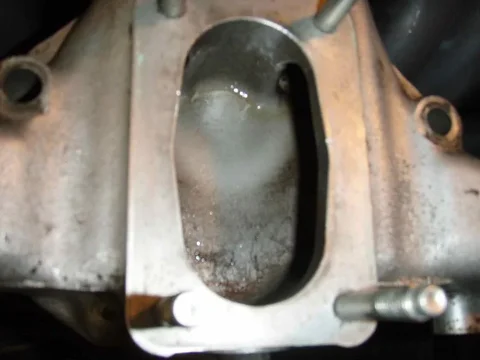
oil2.webp
oil3.webp


PCV is brand new TEQ along with the grommet, hose and connection. Can I actually have a PCV that is bad? Would that be a major vac leak? How do I test its function?
Oil intake 1.webp
oil2.webp
oil3.webp
 
davegonz said:
I didn't think that you could get that much oil vapor blowing by the PCV. The PCV should rattle when you shake it.

Yeh it rattles but the one disturbing thing I found was this...in my Haynes manual there was a sentence that indicated that you should not be able to suck air through the hose going to the manifold with the engine off. Well I don't have any problem sucking air through the hose so I'm wondering if the PCV valve is messed up and that could be my major leak.
 
Is the PCV in backwards, I think it is a oneway valve type of affair. I've never seen that much clean oil come from one. I usually see oil come in the breather on the top of the valve cover. In an engine with lots of blowby, you can fill the aircleaner with oil.

Plug it off and try a spin around the block. Won't hurt anything for a short period, leave the hose loose and high, avoid dust.
 
To test if PCV valve is the idle problem:
Pinch PCV hose flat while engine is idling. If idle smooths out totally, then PCV is a problem.

BTW, that is not oil in the manifold. It is the heavier components of gasoline left behind when the lighter components have flash evaporated inside the manifold. Gasoline is soup of many different random ingredients.

Edit: Post up a pic of the dissy with and without cap installed so we can tell you what type it is.

Jim thanks for your interest. I have placed a clamp on the hose running from the PCV to the manifold with no change in the idle. Scratch one.

Never thought about the multitude of distillates in gasoline, your explanation makes sense. It just looked like oil, smelled like oil, felt like oil, tasted not ... well you get the picture.

Lastly here are some distributor pictures. I've had the electronic pickup for a number of years. Think I bought it from TPI, can't remember the name on it, not sure if its Petronix. I believe my dizzy is vacuum advance and I have pulled the hose and sucked on it and the vac advance appears to rotate the table.
dissy1.webp
dissy2.webp
dissycapoff.webp
 
Pertronix in a '69 & earlier dizzy...exact same as I'm running
 
FJ40Jim said:
It takes the 1962-1974 dissy cap & rotor.

Thanks Jim

Sent from my iPhone using IH8MUD
 
OK hopefully this is the last excercise, here is the clean head mating surface. Wire wheeled and cleaned with acetone to remove any oil, gas or thread compounds. cleanhead.webp

Cleaned up the intake with acetone, rag and elbow grease. manifold.webp

Last after placing a straight edge on everything (again) I held the intake up to the head thinking if there was something not flush I would definetly be able to see it. When held in place if fits like a glove, could not see or feel any place this thing should be leaking. I'm thinking that I'm going to assemble this with the TEQ gasket without Permatex just like the book says.:grinpimp: dryassym.webp
cleanhead.webp
manifold.webp
dryassym.webp
 
FJ40Jim said:
That much looks good. But the other half of the manifold sealing issue is getting the clamp load (thickness) identical on the ears of both the intake and exhaust manifolds.

Agreed, one of the reasons I bought this header (and intake) to replace my old was the fact the PO had taken both to the machine shop to have the surfaces milled to ensure a consistent ear / flange thickness. I will measure each bolt location and post the results before making this up.
 
caliper.webp

Here are the bolt hole measurements by torque sequence:

Bolt # Cylinder # Intake Exhaust Delta
1 3 .358" .361" .003"
2 4 .358" .359" .001"
3 2 .355" .355" -
4 5 .355" .356" .001"
5 1 .352" .355" .003"
6 6 .358" .358" -

Anyone see issues with 3 thousands of an inch variance?
bolt.webp

Last mounting questions:
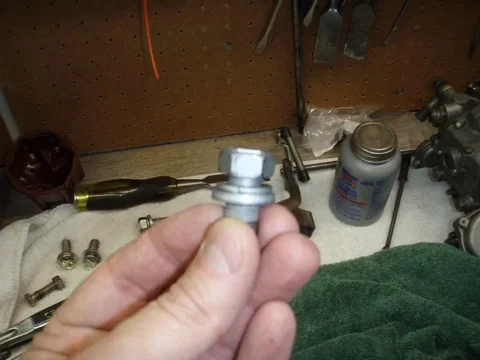
The bolts have been used once and the lock washers are flat so should I buy new hardware? Can someone explain the differences in the CA and USA torque specs? Not sure what I have but the difference between 37 and 50 foot pounds is 36% which is significant. What is the purpose of the low torques on a 13X1.50 mm bolt that could appear to take so much more? Is it the gasket design?:confused:
caliper.webp
bolt.webp
 
.003 is very good. .010 is my max permissible.

Where did the manifold bolts come from? AFAIK they never have a lockwasher, only a ground & hardened flatwasher. The similar looking engine mt. bolts have a lockwasher.
 
FJ40Jim said:
.003 is very good. .010 is my max permissible.

Where did the manifold bolts come from? AFAIK they never have a lockwasher, only a ground & hardened flatwasher. The similar looking engine mt. bolts have a lockwasher.

Jim I ordered them from $OR before my last assembly. Yesterday I stopped at the dealership and have 2 studs, washers and nuts coming. I'm going to use them at positions 5 & 6 so I have studs across the top. Then was going to try to take that .003" off half the washer in those positions to try to nail this thing.

I could not see a lock washer in the diagram at the dealership so Im going with the 2 remaining 13mm bolts in positions 3&4 using the ones i pictured and hope it shouldn't be a problem.

Sent from my iPhone using IH8MUD
 
Isn't it typical to have studs in all the bolt locations except the very front and rear holes.

I don't know if that makes a difference or not. I know I found some of the nuts loose on my FJ-60 years ago after I bought it at 175K, retorqued them and I have never checked them again. The manifold has never been off that vehicle as far as I can tell, and does not appear to leak at all at 225K miles.

My 40, with a 1F has had several leaks. I had terrible luck with the heades and the white paper gasket thing MAF sent with it. Much better results using a regular style gasket, dry, no goop. I later went back the factory ex. manifold and regular type gasket. I've had to replace it a couple of times now, but it has been doing well. This is on a 1F, smaller studs, but I have always used lock washers and brass nuts. They don't rust and seize on. Torqued to specs for the engine, in the pattern described. I use studs, with locktight on them in the head, red as I recall many moons ago. Only had one back out during a removal. I always use grade 5 or 8 lockwashers, they seem to hold their spring longer than standard grade 2 stuff that is common at the hardware store. Bringing the torque up in increments and even to each stud may help too.

I've found that some of the engine bolts stock to a cruiser can be fairly light bolts grade wise, I've replaced several with grade 5 equivalent bolts, SAE. A pain when mixing the JIS and american head sizes, but I found several original engine bolts over the years that were stretched. The captured washers are convinient, but once they are mashed down they are pretty well used up. I have actually used visegrips and lots of cussing to remove the washers to reuse the bolts with new washers when I had to. But that is time consuming.
 
SOR sent the wrong bolts. Probaly cause they are cheaper.

There should be studs in the center 2 holes only. They are there for convenience when hanging the manifolds & gaskets. Studding all the holes just makes it more difficult to get the manifolds on & off w/ the engine in the chassis. If you add more studs, you're just making my job harder down the road.
 
FJ40Jim said:
SOR sent the wrong bolts. Probaly cause they are cheaper.

There should be studs in the center 2 holes only. They are there for convenience when hanging the manifolds & gaskets. Studding all the holes just makes it more difficult to get the manifolds on & off w/ the engine in the chassis. If you add more studs, you're just making my job harder down the road.

Just let me know when your flight arrives and I will pick you up. Roundup is next week.

Sent from my iPhone using IH8MUD
 
Well I started out another wasted day by filing .003" from two of my washers. I placed them in the vice and carefully worked them with a flat file.

washer filed.webp

Next I marked the opposing side with a sharpie paint roller. The colored side is the unfiled or deeper side that will recess into the intake mounting ears.

washers marked.webp

Next against Jim C's advise I installed studs in holes 5 & 6 which gave me four studs across the top 12mm mounting holes.

new studs.webp

All was looking good:wrench:
washer filed.webp
washers marked.webp
new studs.webp
 
Next the assembly, the header and intake was easy to set into place get flush with one another so I started making up hardware

manifold mated.webp

I torqued the bolts in 5 foot pound increments, all good so far

manifold closeup.webp
manifold mated.webp
manifold closeup.webp
 

Users who are viewing this thread

Back
Top Bottom