Builds Evolution of a Land Cruiser: My 80's build thread (8 Viewers)

This site may earn a commission from merchant affiliate
links, including eBay, Amazon, Skimlinks, and others.

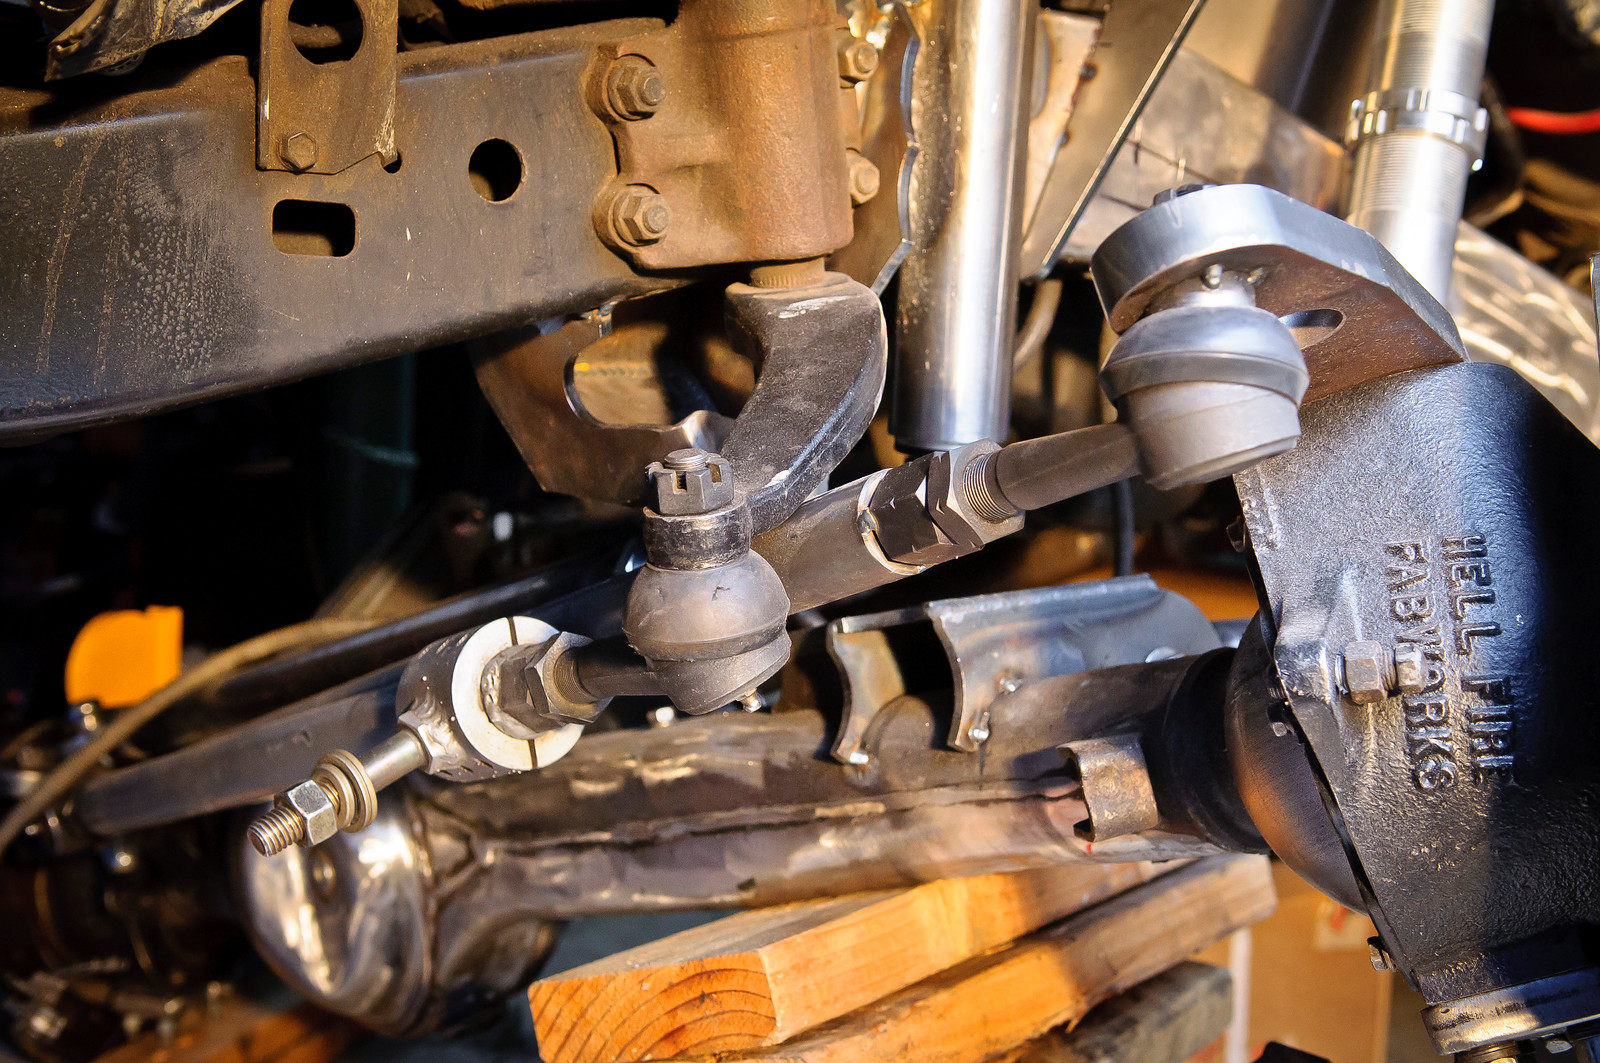
This weekend I tackled the part I was dreading the most, shock towers. Well driver's side at least because that's the one that has the least amount of room. Steering shaft is gonna be in the way, so out came the grinder. Cut a notch so I could fit some 2.5" 1/4" wall square tubing and welded it all around.

16204948994_11e3536885_h.jpg


The shock tabs up top don't come welded so I finished those up.

16826226821_6372942c38_h.jpg


I like the shape of the Barnes tower vs the RuffStuff tower because this one is flat with square corners. The RS tower has a curved back which makes a bit trickier to notch (as Booger did).

16826225901_3395fb3968_h.jpg


And here's where it will sit. Nothing was tacked in at this point, just resting against the frame.

16204945904_eb82894815_h.jpg


16826223461_f1beec8de7_h.jpg


Ended up taking about an inch off the bottom of the tower in order to clear the brake master cylinder and match the contour of the frame rails.

16619979477_d58b8a9fae_h.jpg


16207356603_8d474b13a6_h.jpg


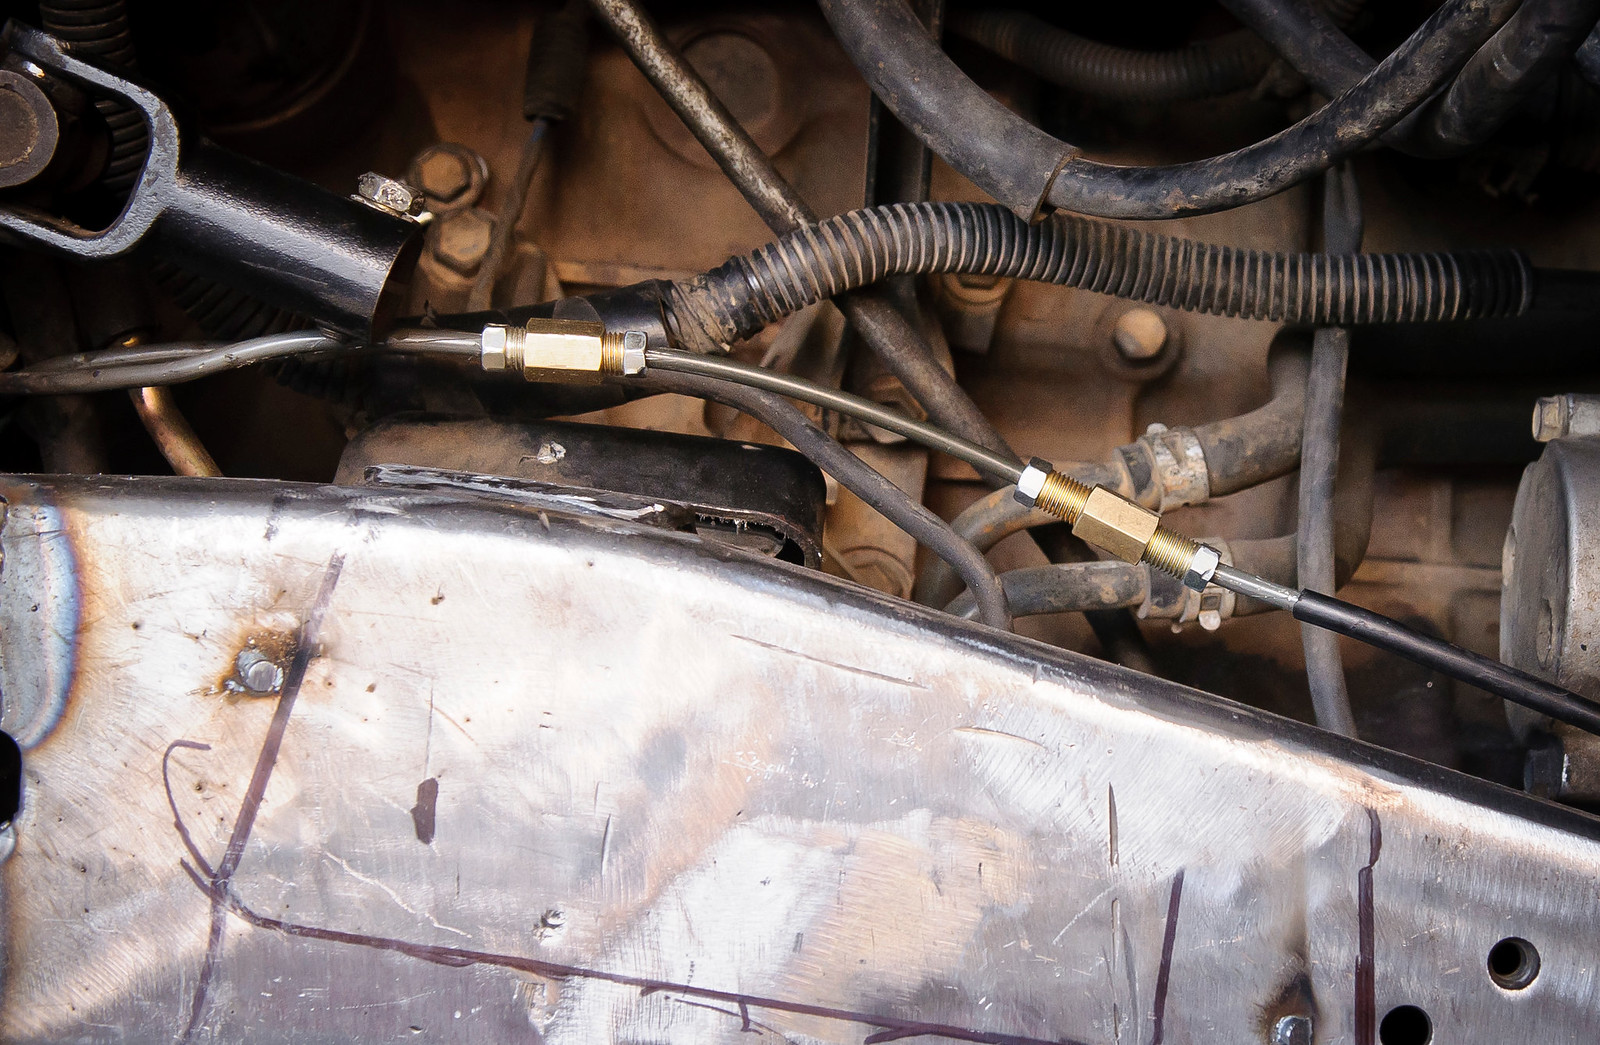
View from the engine bay. Sits right under the master cylinder.

16619976957_42df8a9160_h.jpg


About an inch clearance from the cylinder. Now that I have this one in place I can tackle the passenger side which should be much easier.

16204938904_59cc3472fa_h.jpg
 
Looking good bro!
 
It must be drier than a popcorn fart where you live! You have had bare metal exposed for WEEKS and no surface rust. I was working on a different car this weekend and cleaned off a gasket sealing surface, left for 2 hours and came back to surface rust. And I'm in the middle of the USA!
 
It must be drier than a popcorn fart where you live! You have had bare metal exposed for WEEKS and no surface rust. I was working on a different car this weekend and cleaned off a gasket sealing surface, left for 2 hours and came back to surface rust. And I'm in the middle of the USA!

Cali is about to be reclaimed by the desert if they don't start getting some rain.
 
So when will you be "testing" your work?
 
Time to update this thread. I created a separate 3 link thread to keep it focused on the 3 link and also let it serve as a guide for users in the future. A lot of good info here: https://forum.ih8mud.com/threads/the-4wheelunderground-3-link-thread.843392/

So I'll just copy/paste all my posts that had pictures here

How bout some more tech?! Thanks Booger for the words of encouragement. Like he said, Brian took all the guesswork and difficulty out of the equation. I think anybody with basic fab skills and decent tools can tackle this. And so far it's just been me by myself. Would be nice to have an extra set of hands sometimes.

So I finally have everything tacked in place except for the shocks. Still need a bit more measuring before I decide where those are going. There were a few little things that were preventing from going any further. One was the passenger side control arm mount. As mentioned, the bolt would interfere with the e locker motor as Brian only had a non-locked 80 for mock up. In fact, it's just that tiny little hump that sticks out. Otherwise it probably would have been fine. Brian was a great help as usual and quickly sent me a machined & threaded insert to replace the nut. All I had to do was drill out the hole a bit bigger and weld it in place.

o52eabeh.jpg


FCtFPIqh.jpg


And finally I could tack the bracket in and move forward. Note the long bolt that still needs to be trimmed down.

16898478131_8d4eace5d3_h.jpg


The next set of snags was with the steering. I wanted to reuse my y-link steering so I asked Billy for 1-ton inserts to go in his Hellfires. Well the inserts were too big for my GM 1-tons. What gives? But the taper seemed to work fine on my draglink TRE which is slightly deeper than a GM 1-ton. Not wanting to wait any longer I took a drive out to PartsMike in Auburn and picked up some their deeper taper draglink TREs (ES2027).

But this meant I would lose my y-link TRE, leaving me nowhere to put the draglink. And due to clearance issues, I believe a y-link is going to be the best option with the 4WU kit. Luckily RuffStuff just made a y-link adapter, big machined piece of chromoly that adapts to any TRE you want. This gives you more options. And luckily they're only a short drive away from PartsMike.

Here's RuffStuff's y-link adapter.

16899476685_45a4d15245_h.jpg


The beefier ES2027 tie rods with the taper to match Billy's inserts

16898485431_1e72e2f392_h.jpg


Steering all connected. Because the new tie rods and y-link adapter are much longer than the single y-link TRE I had before, I had to shorten the overall tie rod by using new weld-in bungs.

16692148287_d123f71146_h.jpg


16713325099_12b20e72fa_h.jpg


Full turn

16898482321_9ac2795dcf_h.jpg


About as far as you can turn the wheel to the left before the Hellfire arm touches the panhard's heim joint

16277099954_771bc06aba_h.jpg


16898481161_cb466ffe8f_h.jpg


16279485473_e3e5b27b7e_h.jpg


After that was done I started cycling and flexing and checking for clearances. I was surprised to find how much up travel is limited on the driver's side because the tie rod hits the pitman arm. You have a lot more up travel on the passenger side. Are there any flat pitman arms for these trucks?

hskH1qJh.jpg


I then set the bump stops. Just tacked in place in case I did screwed something up.

16898486741_c07f691383_h.jpg


And started playing around a bit with a tire mounted

16899487935_18f4c5bf8a_h.jpg


16873593356_fbe770afd6_h.jpg


16898257762_ec74a00242_h.jpg
 
Update time! Lots of things happened even thought it doesn't look like much in pics. After my last update I had several discussions with Brian about the panhard bracket touching the Hellfire arms. I was fine with it but Brian wasn't happy. So what does he do? He drives up to my house to check it out in person. I'll repeat that. BRIAN DROVE FROM HALFWAY ACROSS THE STATE TO HELP ME OUT. I was surprised he even suggested it and I didn't think it was necessary but I'm glad he was able to come up. Talk about customer service! This was a good chance for Brian to see what the interference was so he could make the changes in the kits going forward. The only thing we could think of is a slight difference in the new generation of Hellfire arms that threw off Brian's templates.

Brian took the panhard bracket and modified it, pushing it in and back. He also shortened the panhard about an inch by, putting in a new welded bung.

Here's the panhard bracket in its new position.

16785316238_c650a401f8_h.jpg


Here it is at full turn. No touching at all. We shaved a bit of the Hellfire arm to let it slide under the heim but at full turn it still doesn't even touch.

16971681252_291dc75644_h.jpg


16350652414_c120e4fbb5_h.jpg


For full steer, we let the knuckles hit the lower shock mounts. Turned out to be nearly perfect as the knuckles are almost maxed out at this point.

16785315818_12f5b888ad_h.jpg


16971677652_c8ec33e567_h.jpg


Even though his job was done Brian decided to stick around and help me cycle the suspension, find out the true location for the towers and check for clearance. We started off by re-squaring the axle and setting caster at about 6º for the estimated ride height.

16350648164_a539c795d3_h.jpg


The angle finder was set on the flat surface of the knuckles as seen here

16785541490_71e86d34fc_h.jpg


I then tacked the shock towers to the outside of the frame just to cycle everything with shocks in place. This is full stuff and full droop. Not too bad eh?!

16352924183_f7e2d07609_h.jpg


Lots of down travel

16785550450_344b122a9c_h.jpg


Can't thank Brian enough for helping me out. I said it before and I'll say it again, this guy goes above and beyond to make sure his kit works to its fullest potential.

The next day I cut off the shock towers after measuring where they should go. I redid the air bumps by notching them into the frame. I was a little hesitant about this but I'm glad I did it. Much cleaner install. One thing is cutting brackets off the frame. It's entirely different cutting INTO the frame.

16765636377_d938ffb21d_h.jpg


And I finally fixed the brake line I cut a few weeks ago while grinding. Had to make 3 flares and use several fittings to fix this. Don't make the same mistake I did. Now I can finally proceed with the towers. Once I have those in it will be home stretch and time to do all the finish welding!

16352916713_3c60a84ebe_h.jpg
 
Time for an update! Sorry for the lack of activity. I made a stupid mistake which cost me over a week of downtime as I waited for new parts to arrive. I ended up making the shock towers too short. So short that I was losing about 2" of up travel. I couldn't live with that so I ordered a new set. My mistake was that I measured and marked the cuts while I had the towers tacked onto the outside of the frame. It didn't occur to me that after making the cuts and moving them INTO the frame, the shock travel had now changed. Lesson learned!

Here's the old photo showing where I had them mounted for mock up and cutting. No bueno.

16785550450_344b122a9c_h.jpg


After the new towers arrived I knew what I had to do. Make a template of the frame's contour then transfer that to the tower. The driver's side will be the guide for setting the height of the towers. To set the height I tested the axle at the most extreme angles in order to find the interference. This turned out to be driver's side fully stuffed, passenger side fully drooped and the wheel turned all the way left.

16886112940_83fdecd607_h.jpg


And here's why. In this scenario this is the absolute maximum up travel you can achieve before the tie rod hits the pitman arm. Note that this already puts a 37" well beyond your factory sheet metal, both inner and outer fenders.

17047697996_0f2eb809f4_h.jpg


16453508213_bb8a927334_h.jpg


Not much to worry about on the passenger side when fully flexed out

16866259437_7e4547cc05_h.jpg


All the steering clears and neatly tucks in between the panhard bracket

17073659915_9b19e00f84_h.jpg


Also note that if you straighten the steering wheel the tie rod drops, leaving more room between the pitman arm.

16887431029_9c21676233_h.jpg


Using the template I made for the frame's contour I carefully trimmed the towers. I was playing it safe this time. Ended up making a series to two cuts as to not make them too short again!

16453509313_9d51f3545e_h.jpg


The height of the towers was set so that the shock is fully compressed and the shock's bump stop stops movement just before the tie rod hits the pitman arm. At this point I'll be also slightly compressing the air bumps.

17073660895_3ab02ac5d5_h.jpg


And lowered back down to ride height, you can see the final angle of the towers and coilovers. I'll have about 5" of shock showing at ride height which is the number that gives Brian the warm n fuzzies. Here you can see the tower matches the contour of the frame exactly. I had to clearance just a bit around the motor mount.

Final steps will be to duplicate this for the passenger side. Put the steering shaft back in and notch the driver's side tower then FINISH WELD EVERYTHING :cheers:

17072175132_625f807176_k.jpg
 
Updates are starting to have some substance now! Finished cutting and tacking in the passenger side tower. Now I can finally do some REAL testing and clearance checks. This one has some pics you guys have been waiting for.

Here's full droop on passenger side with shocks installed

17068731306_866fbc9b07_h.jpg


With full stuff on driver's side

16908477579_4f52023627_h.jpg


Full droop on both sides. I swear you could fit 16" coilovers on these things for ridiculous down travel

16474532233_6c47ef0862_h.jpg


16907126880_1cf9f90979_h.jpg


Now lets test with the tires on

17093996281_cc55bd09e9_h.jpg


17068727366_f465324cc0_h.jpg


With my trimming the tire can fully stuff no problems. But you can't turn the wheel left because of how the axle moved forward. I will need to cut more out of the front part of the fenders. I'm going for maximum travel and don't mind cutting sheet metal. Those that aren't willing to do so will need to lower the shock towers accordingly.

16472232634_1db0f2442b_h.jpg


I couldn't even turn the wheel here. All this will need to go

16887283437_93a347a2e7_h.jpg


Now the wheel turned all the way right

16472229704_2753f4ee09_h.jpg


No issues with the sheet metal

17094681415_3e337a4dd8_h.jpg


But here's a problem. Tire touches the springs about 1/2" before hitting the steering stop. I think what I'll do is slightly modify the towers so they angle in towards the engine bay just a bit more.

17093172012_0b82fc72d8_h.jpg


And driver's side tire mounted

17068721906_24c4aea953_h.jpg


17093989351_dcbc29a222_h.jpg


Turned all the way left
16908467449_e2f6a30afc_h.jpg


16472224884_ace7a09b22_h.jpg


And similar issue on this side with the spring. This is actually full turn, touching the steering stops. I was able to move the spring over enough to get it fully turned.

16887280237_5edc1622a5_h.jpg


Till next time :cheers:
 
Ok I'm back with another update. So I last left off with the tire rubbing the springs at full stuff/full turn. No matter how much I tried angling back the towers it would always rub. Not satisfied I cut the towers off yet again and pushed them forward, in a more upright vertical position.

Angling the coilovers back too far with the Barnes tower simply will not work. So here they are after re-shaping them and lowering them about 1". You'll notice I had to slightly straddle the air bump. This is why I didn't put them here in the first place.

16936185888_3b5cc1545e_h.jpg


The other reason I didn't want them too vertical is because of the air cleaner on the passenger side. I may have to notch the whole air box like Booger did. I'll deal with that hurdle when I put it all back together.

17122428302_82cea5bcc8_h.jpg


Finally! No rubbing at full stuff/full turn. Driver's side

16503828033_8255cb876a_h.jpg


Passenger side all clear

17123328111_b0e4f06fae_h.jpg


Still plenty of up travel even though I lowered the towers 1"

16503818523_5d58595ace_h.jpg


At ride height. Coilovers sure are sexy

17123330491_c48e904136_h.jpg


16503821543_a426131f5e_h.jpg


And you can rest assured the towers are FINAL because this mofo is fully welded with a 1/4" thick gusset on the side and notched for the steering shaft.

17122420992_8ea6d25553_h.jpg


Made the notch a bit wider this time as I had the u-joints to clear

17098025396_d347a53bfc_h.jpg


16916579137_c01fdb1570_h.jpg
 
Back from Grand Prix weekend, time to get back to welding. Since I was in socal I had my buddy stop by G&J Aircraft in Ontario to pick up the custom brake lines I ordered. Looked around at the aftermarket extended brake lines and couldn't find the size I needed. I wanted them quite long since I'll be bypassing all the OEM soft lines and connecting straight from the frame hard lines to the caliper, routing them along the lower links.

Highly recommend G&J. They don't have an online store but can make whatever you want and ship. http://gandjaircraft.net/ These purtty little things were about $30 each. 52" length and stainless braid with an orange sheath to match the coilovers.

17030633078_11ec897446_h.jpg


Also got the housing all finished up complete with armor, brace and truss. Poor man's RuffStuff housing!

17192447616_d6ddcf90b9_h.jpg


16595959574_a4edbaa9d5_h.jpg


17030631568_a87d8e5be3_h.jpg


17192450536_34f9c66880_h.jpg


17030869240_4b0de0125e_h.jpg


And also added the RuffStuff knuckle gussets

17217832371_dc079d5339_h.jpg
 
I CAN SEE THE LIGHT. All welding is done. Only thing left to do is route the brake lines and do all the final painting. I want to get everything painted before final assembly so I don't have to take it apart again. This weekend I started painting the links and added the limit straps. I also recharged the shocks and air bumps since I dumped all the nitrogen out for mock up.

If all goes as planned I should be able to go on a test drive soon. Unfortunately is month-end in the finance world so I'll be working long hours this week. Once it's road worthy I'll need to get the front drive shaft extended then focus on the part-time spool.

Ended up not liking this orange color. Wanted a metallic orange and this was all I could find. So I'll redo this to just a plain orange like the springs.
I0zWmGll.jpg


Limit straps installed with the new brake lines attached.

WGIjcJLh.jpg


Waiting on these little clamps to finish the brake line routing

61JE7v0vxkL._SL1500_.jpg
 
IT'S DONE!!!!!!!!!!!!!!!!!!!!

It only took me 3 months. I wonder how fast I could have gotten done if I didn't have a day job. While it's done and sitting on its own weight I still haven't driven it. Have a few small tasks before it goes on a test drive:


- Bleed the master cylinder and all brakes since I drained it dry when I cut the line by accident
- Reset caster and tighten all links
- Notch the air cleaner to clear the shock towers

Overall I'm really happy how it turned out. The truck look stupid ridiculous - in a good way. The colors really pop once I get the wheels repainted it should look pretty sharp.

Painted the nasty exhaust pipe with VHT high heat paint and finally painted the inner fender which was looking gross as well.


17359352982_1695e53eb7_h.jpg


Brake line routing. The tab near the panhard is for the limit straps.

16738759054_56b6a9b136_h.jpg


Color used here is Rustoleum metallic "Black Night" for a little bit of bling

17173695790_6012a6dbea_h.jpg


Links and knuckles painted in bright orange

17335307546_0b193eac39_h.jpg


17360906051_3277b72fef_h.jpg


And finally at its new stance! This is with about 1/2" of preload on the springs. I like this ride height. Now to see if I can match the rear to this height.

17153804527_49966fdac8_h.jpg


17173466908_be018f9187_h.jpg


17153802747_3477005524_h.jpg


17173691060_6a2aa71d80_h.jpg


Time for a beer. I'm exhausted after this weekend

16740997953_577a676373_h.jpg
 
your build was posted to brobible today
 

Users who are viewing this thread

  • Back
    Top Bottom