Builds Evolution of a Land Cruiser: My 80's build thread (3 Viewers)

This site may earn a commission from merchant affiliate
links, including eBay, Amazon, Skimlinks, and others.

Alright - coilover mounting 2.0 (and soon to be 3.0). As we last left off, I decided that the 4WU brackets would not work so off I went to spend more money. After hours of browsing off-the-shelf brackets from every vendor I could find I settled on:

- Barnes4WD frenched towers
- Barnes lower coilover mounts
- Synergy 3108 link brackets to try and build a coilover mount below the axle

I got one side dialed in pretty much perfectly, or so I thought. I ended up with about 4" of shock showing at ride height which seemed just about right. I used all the up-travel during articulation like I wanted. Had to notch the frame a bit to clear the spring at full stuff.

But then I got Brian's feedback (4WU) and he said it was crap and I should scrap the whole idea before I go any further. When Brian talks I listen. I would have very little body roll resistance because I have the lower mounts in-boarded so far and says I would be very unhappy with the results. I figured this would be the case but hoped the effect wouldn't be too bad. Problem is I don't want to find out after I have everything welded up. So - back to the drawing board yet again.

I am going to try and push the lower mount all the way out to the tire then move the Barnes towers back to a crossmember like I did on v1.0 In-boarding the top is not ideal either but at least I'll have some better stability by having the lower mount pushed out. I'll then notch the frame even more if I have to in order to clear the springs.

And since forums are all about sharing, here is what you should not do when trying to mount rear coilovers on an 80:

Here is the setup at ride height. Better angle than before, about 70º back. Plan was to trim away the excess from the upside down link tower

RK98CIgh.jpg


Full stuff, spring just cleared the frame

JKG006Uh.jpg


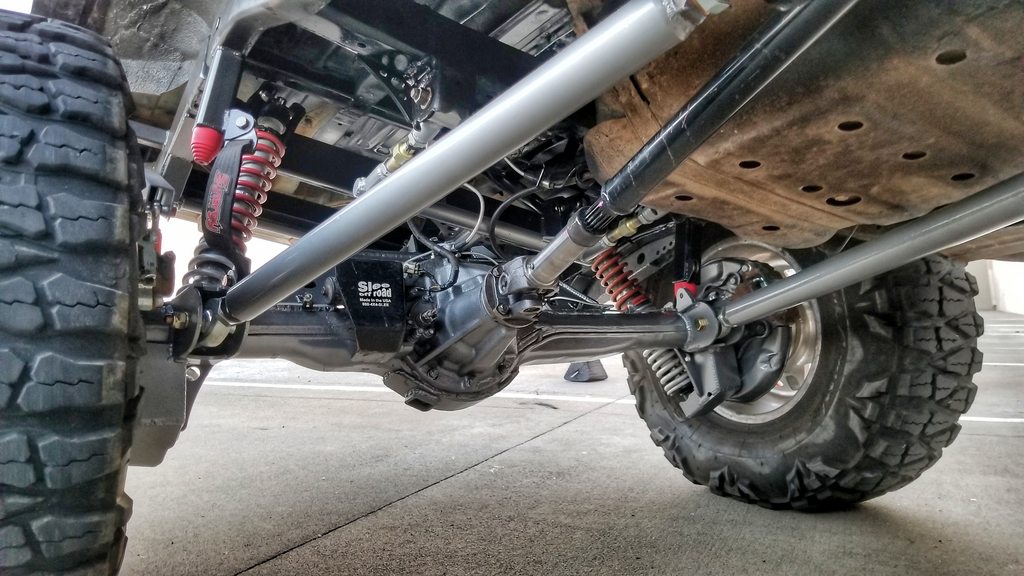
Here you can better see where the coilovers sat which is far too in-boarded. Even though this right about where the factory coils springs where, coilovers are different animal because it's a shock+spring combined. The factory shocks go all the way out to the tire.

zxNeM8rh.jpg


FqUElMCh.jpg
 
COILOVER MOUNTING v3.0 (and the last version so help me GOD).

Last night I cut everything off and tried again. This should be a lot better than before. The coilover is oriented similar to my first attempt using the 4WU brackets but this time shock travel and angles work much better as I had more flexibility with the custom brackets.

I pushed the lower coilover all the way to the tire, as far as it would go on the axle tube - similar to the factory shock mount. Put the crossmember back on and angled the Barnes towers to fit. I would like to have the top mount not be so in-boarded and frankly I could make it work if I modify the brackets and notch the frame more but at this point I just need to move on.

Right now the coilover is angled about 25º back and 35º in. From what I've read coilovers work best when angled in and FORWARD 15~20º for rear axle applications. That would involve serious mods so this will be a compromise. But for being able to fit a 14" coilover under an 80 without cutting into the cab I'm pretty happy with the results. Hopefully that feeling carries forward to when I drive this piece of crap.

At ride height. Notice how far in-boarded the mounts were from the previous attempt. Once I trim the excess metal away, you will notice just how similar this is to the factory shock mounting. Only difference it's now behind the axle.

eabQbkth.jpg


4DVgvCoh.jpg


Side view

KsLOfxPh.jpg


Upper mount on the crossmember

q3B9Kd1h.jpg


At full stuff. I need a vacation.

mLmRXoFh.jpg
 
Did you hang a tire on the axle yet? I'm surely wrong but looks like the tire/wheel would be all over that lower mount.
 
Did you hang a tire on the axle yet? I'm surely wrong but looks like the tire/wheel would be all over that lower mount.

I didn't as it was getting late but that's a valid concern. Was planning on doing more testing tonight after work. But I think it should be okay given my wheel's backspacing + spacers. Since I'm at work I can only use older pictures as a reference:

34704502893_3d99e15bca_h.jpg


View from in front of the axle with factory shock mounts

35098814921_4518c51c69_b.jpg
 
Oh yeah i think you're good to go after seeing those photos! Nice job Jose, always bringing the tech and innovation to this forum!
 
Last edited:
EVERYTHING IS READY FOR FINAL WELDING! Sure feels good to have all the hard work out of the way. This weekend I wrapped up the coilover mounting and set the bump stops. Unlike the front where I essentially have two stages of bump stop using the pads built into the coilovers and the air bumps, on the rear the bump stops are set to hit at the exact same time the coilover pads compress. That's because I have quite a bit less of up-travel in the rear due to tire fender clearance. This ended up being just about the right amount of up-travel based on how I set the uniball (right before it binds in the housing).

The only thing I'll have left to do is limit straps. But I won't be able to figure those out now because the truck is too low on the jack stands. I need a bit more height to fully flex the suspension to figure out where max droop is.

Here is the crossmember for the upper coilover mounts. Factory crossmember/spring perches were removed. Definitely no going back from this. Didn't have to touch the fuel filler which is great. One less headache to worry about. I'll be adding some additional bracing on the towers during final welding.

twoeS3ih.jpg


At estimated ride height. You can see the bumpstops in this pic.

nkcrc0kh.jpg


fB7Ke0Th.jpg


L3yLqS7h.jpg
 
Truck should have been done by now but unfortunately life has gotten in the way. But all welding is officially done. Now it's time for paint and reassembly.

Made some new hard brake lines for the axle. Also relocated the factory soft line from the rotor dust shield to the axle for less bends.

JjpSNeGh.jpg


Full shot of the new brake line routing, new center tee and Trail Gear extended flex line that will go up to the frame connection.

zz68stQh.jpg


Reinforced the upper link mounts on the frame. Not sure if it'll help but figured it can't hurt.

kKTTv0Fh.jpg


Hopefully next update she'll be sitting on her own weight :cheers:
 
Good job! I hope doing the front soon and tackle the rear by the end of the year
 
As a follow-up to my last post, yes the truck is finally done! This was a long 3~4 months, longer if you count the time I spent building the crossmember. I can honestly say this has been the hardest project I've done to-date. Sure the front 3link was tough but having premade brackets that fit perfectly makes it a walk in the park compared to cutting everything off and building it from scratch. Here's a bit more of the finishing details:

After painting the axle (you guys didn't expect me to paint this black did you???)

e6Y8qPkh.jpg


With upper wishbone attached

X4TJd6Uh.jpg


Better shot of the coilover mounting. Ended up looking much like the factory shock mounts, but behind the axle. These lower mounts are extremely beefy. I boxed up and sealed the whole thing. I have no concerns with these getting dragged over rocks.

And not sure if I mentioned this already, but these are a set of old test springs from 4WU in 300/350. Once I decided the final rate he'll order me new springs from PAC (in orange of course).

mdUMxqNh.jpg


With the truck finally on its own weight and able to move I had to tackle the exhaust as it was all cut off while building the crossmember. My stock exhaust was in really rough shape so I decided to get a new y-pipe and cats. Picked up the Magnaflow 447103 y-pipe + front cat (CA CARB approved) and 447206 weld-in rear cat.

I wanted to run a short exhaust along the frame that terminated before the rear tire so I needed a very small muffler. Settled on the Flowmaster Outlaw 815425S. These little mufflers are used in race applications and about as close as you can get to a straight pipe. The setup is LOUD. But I think it sounds good IMO. Definitely not something you'd want on a daily driver. I built the exhast myself in the garage using random parts store fittings, about $50 all together.

I still need to reinstall the second o2 sensor, waiting on a new weld-in bung. You'll also notice I finally cut out the passenger side rocker panel. Building a slider on this side is going to be a challenge because now I have a whole exhaust to work around. That'll be the next project

VM7pIIfh.jpg
 
Let's go drive the damn thing, FINALLY! Here is the full side profile. As you can see, the new links are much longer and flatter than the stock links.

XDI10NYh.jpg


Before & After. Huge difference! The factory links were in a really bad position due to my fairly tall ride height.

hPtgnjd.jpg


First test drive impressions were very good. Truck feels very planted and stable at high speeds. Haven't driven on the freeway yet but I have taken it up to about 65mph. No wandering at all and gone is the overall squirreliness I felt from the rear as the short links twisted the body and axle.

Then took it to my favorite loading dock for some quick testing. Everything seems to work well so far. It does seem as though the rear suspension is a bit stiff, but that's due to the big rear swaybar and possible the spring rates as they are stiffer than the front. But it drives so well on the road that I'm hesitant to make any changes. I think once I add a front swaybar the articulation will be a lot more balanced front-to-rear.

Hoping to do some driving this weekend and see how she performs :cheers:

mX66Uhth.jpg


7SKOMkjh.jpg


02Zlmv4h.jpg


I really love the additional clearance under the pinion because of DC driveshaft. I picked up about 3" of ground clearance under the pinion flange.

0J9WrGKh.jpg


K941lGLh.jpg


yCQW0y6h.jpg
 
Glad you like the geometry

I'm still curious to see the final numbers, plan on running the calculator again. I should have done it while building but by the end I was determined to finish and not make any more changes. So I guess I decided it was better not to know?
 
Why don't you route the exhaust on the other side of the frame rail? It’ll fit, and open up the option for a bigger muffler.
 

Users who are viewing this thread

Back
Top Bottom