Clusters, Gauges, Speedo & Odo meters (2 Viewers)

This site may earn a commission from merchant affiliate
links, including eBay, Amazon, Skimlinks, and others.

bj40green

Tssss, tssss
Joined
Dec 13, 2010
Threads
32
Messages
3,457
Location
Atenas, Costa Rica
There seems to be a lot of questions about Clusters, Gauges, Speedo and Odo meters, so I thought why not set up a page as a reference guide / database / knowledge center?
Over time I collected a lot of pictures. I created a Gallery with all the photos I have, which you can see here:
http://photobucket.com/clusters_fronts and also the back sides and 24V models: http://photobucket.com/clusters_back
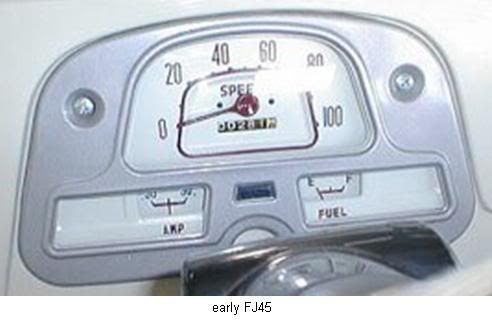
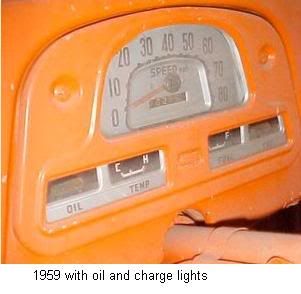
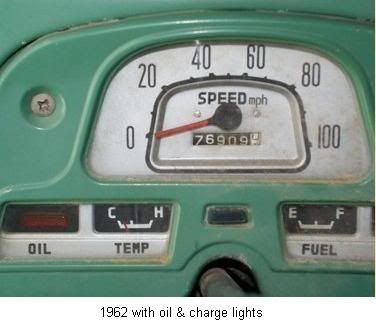
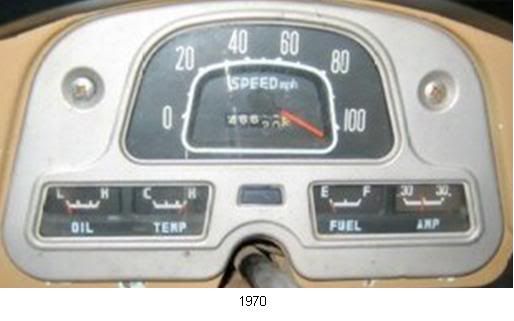
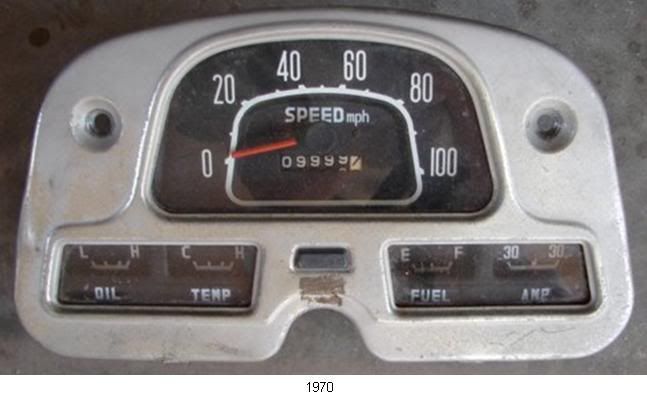
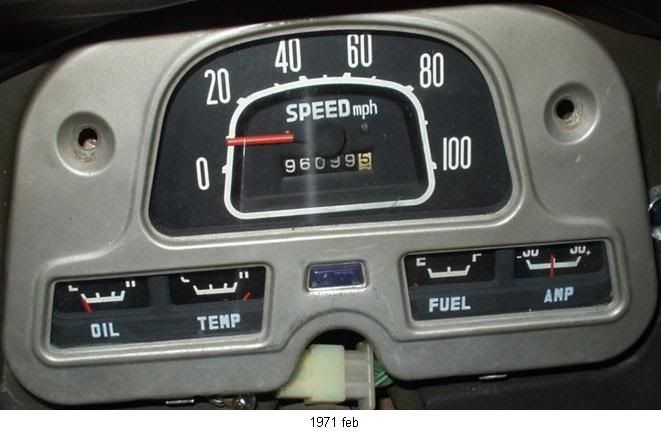
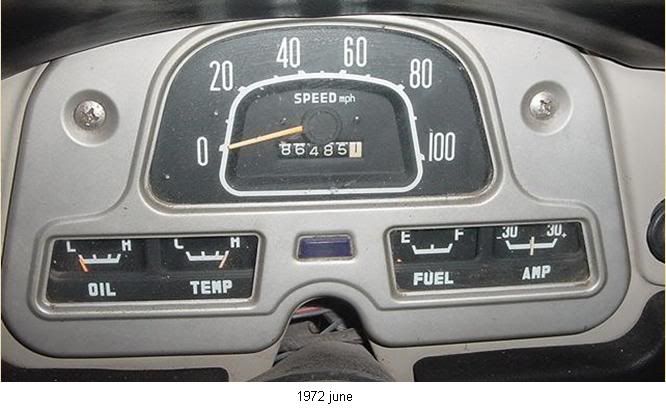
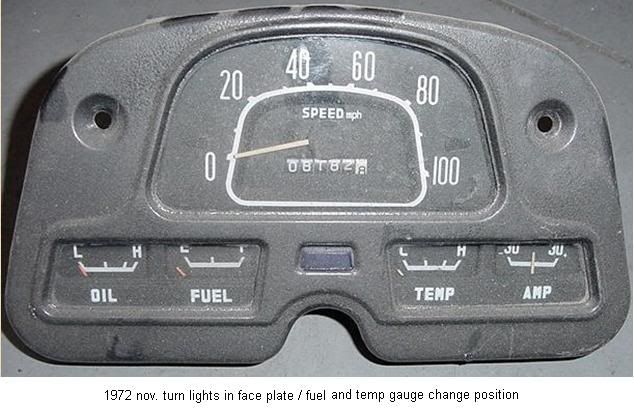
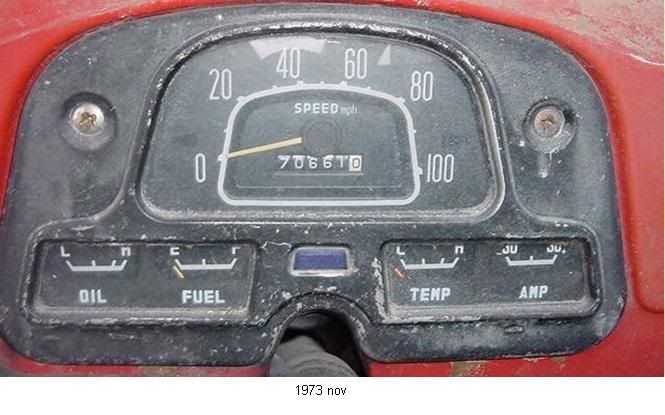
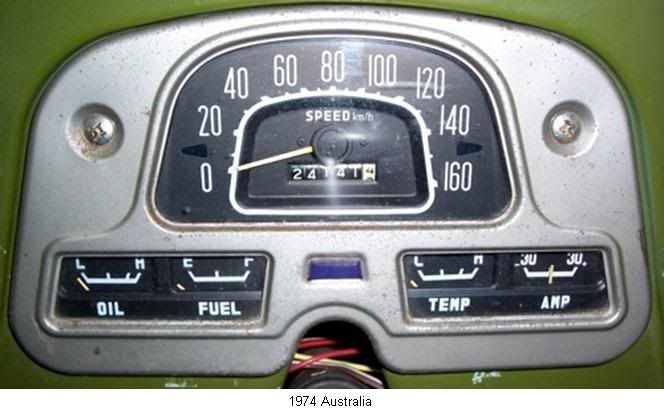
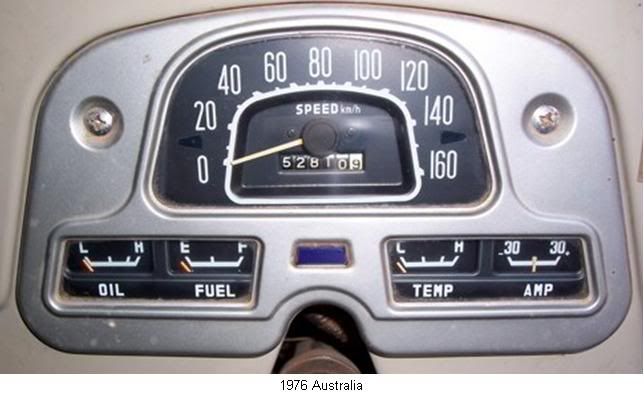
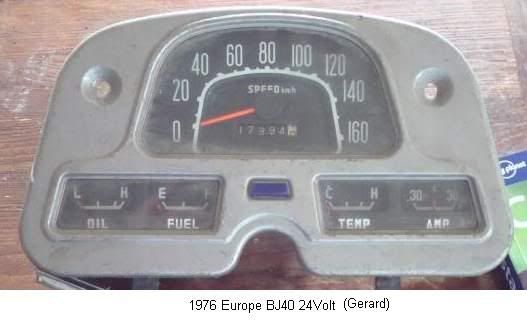
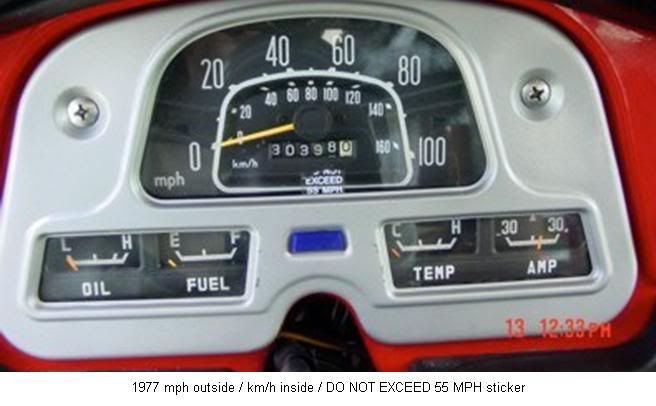
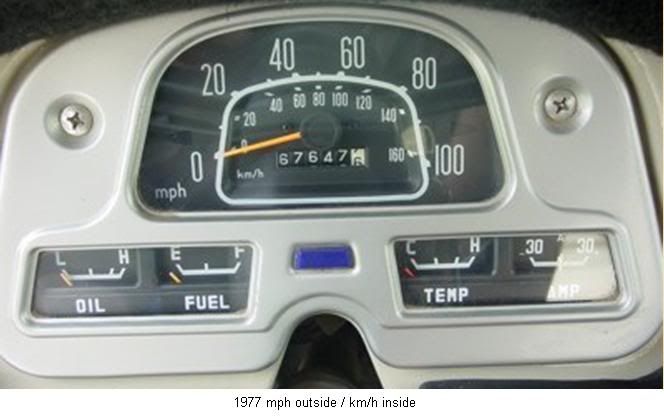
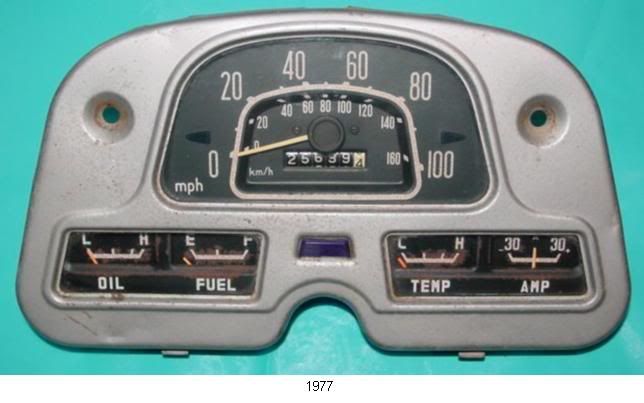
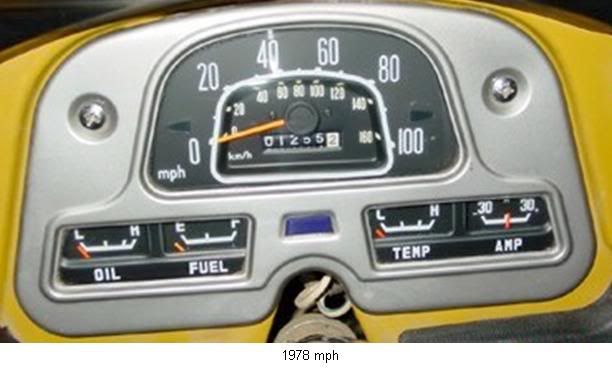
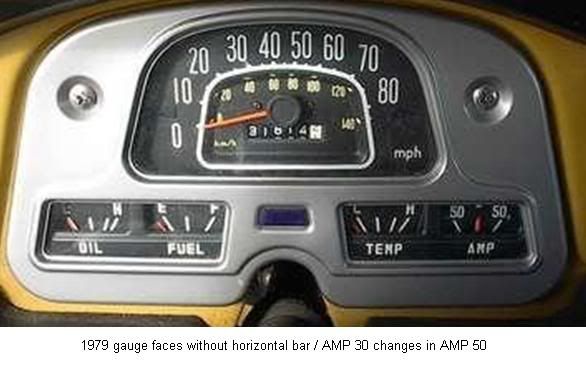
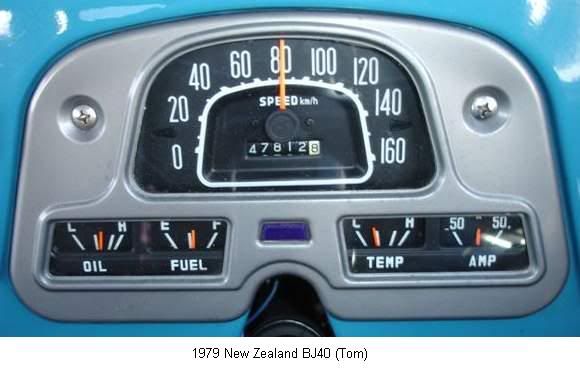
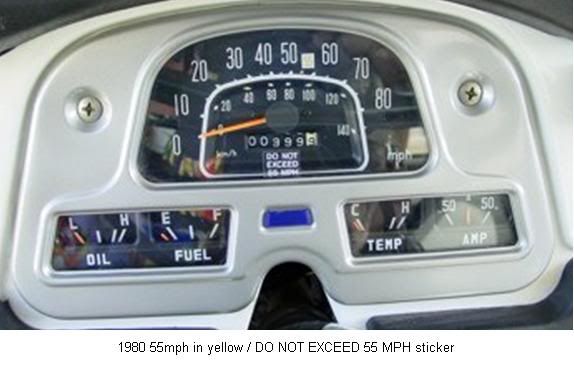
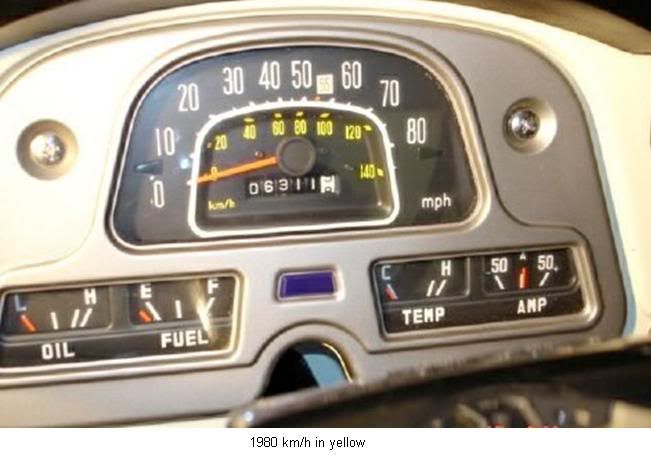
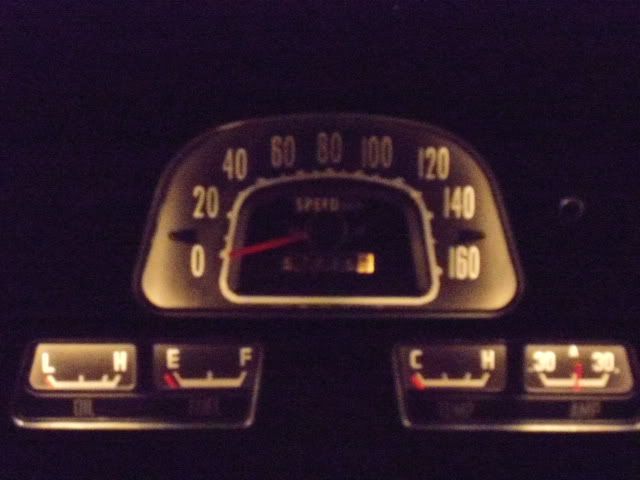
Here is a sample of what’s there.
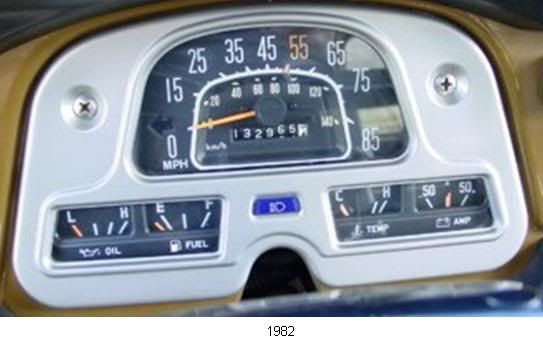
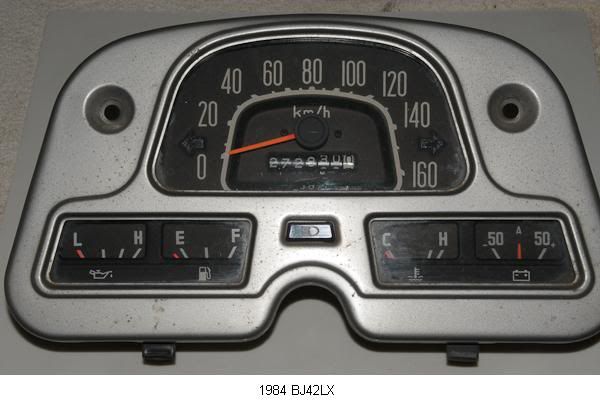
I’ll describe them (with the same photos) later, dividing them in 4 generations.
collage clusters.jpg

The credit for the photo’s goes to everybody who posted their cluster photo and info on the Internet.
If you have a cluster which is not in the gallery, post a picture here with the year, model and country info and I will upload your picture so the gallery is always up to date.


The idea behind this is to post all the info we have about years, models, exceptions, technical info, how it works, repairs, upgrade, maintenance, rebuilds, modifications, new face plates, exchanging gauges for new mechanical and / or electrical ones etc. in this thread.

I’m still looking for info on the VSS (Vehicle Speed Sensor). What years it was used and for what purpose. I know that it was used for sounding a buzzer at 100Km/h in some countries and also for activating the (de)smog stuff in FJ’s but the full explanation I don’t know. Maybe you guys can add that info here.

I’ll ad photos of the gauges and senders with part numbers and electrical info later.

This first posting will be edited when needed for adding / changing info and to keep the links up to date.

Links for cluster related write-ups:

Fixing the stuck odometer (with pics)
https://forum.ih8mud.com/40-55-series-tech/463766-fixing-stuck-odometer-pics.html

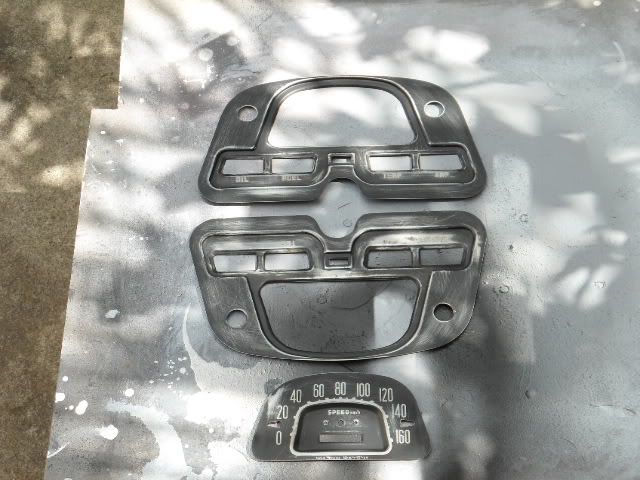
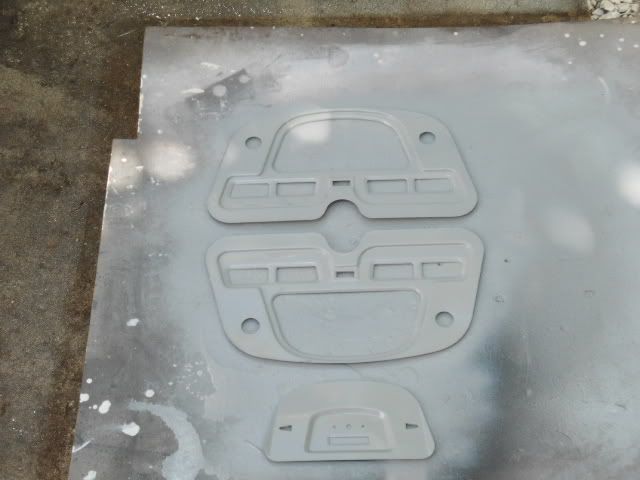
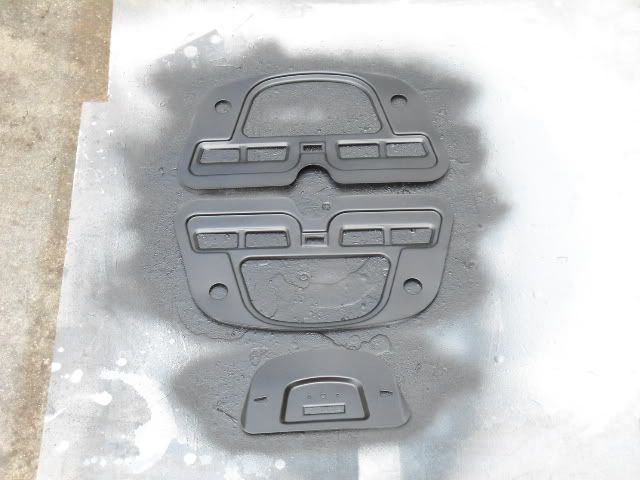
Instrument Cluster Restoration
https://forum.ih8mud.com/40-55-series-tech/336957-instrument-cluster-restoration.html

Aftermarket (even mechanical) gauges into STOCK cluster!!!
https://forum.ih8mud.com/40-55-series-tech/289513-aftermarket-even-mechanical-gauges-into-stock-cluster.html

Gauge Marks™ FJ40 Gauge Restoration Package!
https://forum.ih8mud.com/merchandise-storefront/510724-fj40-gauge-restoration-package.html

FJ40 Speedometer Upgrade for Non-Stock Tires/Diffs !
https://forum.ih8mud.com/merchandise-storefront/524103-fj40-speedometer-upgrade-non-stock-tires-diffs.html

There are more good write-ups out there but I have to find them first, or you guys & girls have to tell me so I can add them here.


Rudi

collage clusters.jpg
 
Last edited:
The 3rd generation from Sept. ’72 till Jan. ‘79

EDIT; Jan. 20, 2014 : This text is added later and is the same as in posting #310 which was inserted on Jan. 20 2014

I was always wondering why I couldn't find pictures of a '72 - '73 cluster.
Thanks to Mud member Sproggy we found it.
The front looks like a 3rd gen. cluster but the back looks like a 2nd gen. cluster.
Clearly this was the change over model from Sept. 1972 till Sept. 1973.
The cluster is technically a 3rd gen. cluster. Front and internals are identical to the 3rd gen. cluster.
The back side is a metal housing (2nd gen. style) but without the PCB (Printed Circuit Board) from the 3rd gen. clusters.

Have a look......
front.jpg


back3.JPG

Note: the red arrow points to the ground terminal for the VR inside the Fuel gauge.

back2.jpg


model num.jpg


83100-60071 part#.jpg
Back to the original posting.....

The TEMP and FUEL gauges changed places.
The wiring changed into a barrel connector.
Turn indicators were added into the cluster.

The look of the gauge faces changed a little. The horizontal bar is a bit longer. The sweep range is now 45°. The previous was 40°.
In Sept. ’73 the FJ became also available for the General and European market.
In Feb. ’74 the BJ40 24V edition came into the European and Canadian market. This is not visible when you look at the front of the cluster but will show when you turn the cluster around and look at the back. There is a “dropper” resistor to bring the 24V down to 12V for the FUEL and TEMP gauges. The OIL gauge is different and is clearly marked 24V (after removing the front) in the right bottom of the gauge and has a different sender of course. The AMP gauge is the same for 12V or 24V clusters. More about this in a later posting.


Rudi


front.jpg


back3.JPG


back2.jpg


model num.jpg


83100-60071 part#.jpg
 
Last edited:
Awesome thread! Great resource... I didn't know some of those existed. Thank you for putting it together.
 
The 4th generation from Jan. ’79 till April 1986

The gauges face plates changed. The horizontal bar is gone.
The AMP gauge changed from 30 AMP internal shunt into 50 AMP external shunt (which is basically a mV meter).
1981: Turn indicator changed from triangle to arrow, international symbols were added and the counter changed from 5 into 6 digits.
1983: Text under gauges was removed, international symbols only.

[URL="http://i1112.photobucket.com/albums/k490/ruud_coco/Toyota%2040%20series%20clusters%20fronts/1979gaugesandamp50.jpg"] [/URL]

[URL="http://i1112.photobucket.com/albums/k490/ruud_coco/Toyota%2040%20series%20clusters%20fronts/1979NewZealandBJ40Tom.jpg"] [/URL]

[URL="http://i1112.photobucket.com/albums/k490/ruud_coco/Toyota%2040%20series%20clusters%20fronts/198055mphinyellow.jpg"] [/URL]

[URL="http://i1112.photobucket.com/albums/k490/ruud_coco/Toyota%2040%20series%20clusters%20fronts/1980kmhinyellow.jpg"] [/URL]

[URL="http://i1112.photobucket.com/albums/k490/ruud_coco/Toyota%2040%20series%20clusters%20fronts/1981lotsofchanges.jpg"] [/URL]

[URL="http://i1112.photobucket.com/albums/k490/ruud_coco/Toyota%2040%20series%20clusters%20fronts/1982jan.jpg"] [/URL]

[URL="http://i1112.photobucket.com/albums/k490/ruud_coco/Toyota%2040%20series%20clusters%20fronts/1982.jpg"] [/URL]

[URL="http://i1112.photobucket.com/albums/k490/ruud_coco/Toyota%2040%20series%20clusters%20fronts/1983FJ40LX.jpg"] [/URL]

[URL="http://i1112.photobucket.com/albums/k490/ruud_coco/Toyota%2040%20series%20clusters%20fronts/1983.jpg"] [/URL]

[URL="http://i1112.photobucket.com/albums/k490/ruud_coco/Toyota%2040%20series%20clusters%20fronts/1984BJ42LX.jpg"] [/URL]

[URL="http://i1112.photobucket.com/albums/k490/ruud_coco/Toyota%2040%20series%20clusters%20fronts/198x.jpg"] [/URL]

That’s all the photos and info I have up to now. If you have additional info, please post and I’ll ad that also to the gallery.
If you want to see some custom build clusters click here. Image hosting, free photo sharing & video sharing at Photobucket


Rudi

 
Last edited:
FSM’s for cluster explanation and repair.

As my father always said: Prepare before you begin and another one of his: Preparation is 90% of the success. So let’s start with the documentation.
Here are the chapters related to cluster and gauges from the FSM’s.

From the 1971 FSM for 2nd generation clusters
If you want this in pdf format, you can download it from here: https://docs.google.com/open?id=0BwGk8zcL34N4YWQ4NDljMDQtYzNjMy00NmZjLWEzZDEtMDY3OTg4MDMxNjE0

[URL="http://i1112.photobucket.com/albums/k490/ruud_coco/Toyota%2040%20series%20clusters%20tech%20stuff/FSM%20cluster%201971/page1.jpg"]
[/URL]
[URL="http://i1112.photobucket.com/albums/k490/ruud_coco/Toyota%2040%20series%20clusters%20tech%20stuff/FSM%20cluster%201971/page2.jpg"] [/URL]

[URL="http://i1112.photobucket.com/albums/k490/ruud_coco/Toyota%2040%20series%20clusters%20tech%20stuff/FSM%20cluster%201971/page3.jpg"] [/URL]

[URL="http://i1112.photobucket.com/albums/k490/ruud_coco/Toyota%2040%20series%20clusters%20tech%20stuff/FSM%20cluster%201971/page4.jpg"] [/URL]

From the 1972 / 1973 FSM also for 2nd generation clusters.
This one is the same as the one above but for the purists under us…. the lay out is a bit different. Pdf format download: https://docs.google.com/open?id=0BwGk8zcL34N4NDIwMmUxYjUtMzY1NC00ODA4LTljOGUtMjJjYjAwOGM4NGQz

[URL="http://i1112.photobucket.com/albums/k490/ruud_coco/Toyota%2040%20series%20clusters%20tech%20stuff/FSM%20cluster%2072-73/page1.jpg"] [/URL]

[URL="http://i1112.photobucket.com/albums/k490/ruud_coco/Toyota%2040%20series%20clusters%20tech%20stuff/FSM%20cluster%2072-73/page2.jpg"] [/URL]

[URL="http://i1112.photobucket.com/albums/k490/ruud_coco/Toyota%2040%20series%20clusters%20tech%20stuff/FSM%20cluster%2072-73/page3.jpg"] [/URL]

[URL="http://i1112.photobucket.com/albums/k490/ruud_coco/Toyota%2040%20series%20clusters%20tech%20stuff/FSM%20cluster%2072-73/page4.jpg"] [/URL]

From the 1974 till Jan 1979 FSM for 3rd generation clusters.
Pdf format download:
https://docs.google.com/open?id=0BwGk8zcL34N4ZGZhOGIyZjItNzZhMy00MTlmLTk0ODAtMzcyMjU2YzhkYmEw

[URL="http://i1112.photobucket.com/albums/k490/ruud_coco/Toyota%2040%20series%20clusters%20tech%20stuff/fsm%20cluster%201974-1978/Image-25.jpg"] [/URL]

[URL="http://i1112.photobucket.com/albums/k490/ruud_coco/Toyota%2040%20series%20clusters%20tech%20stuff/fsm%20cluster%201974-1978/Image-26.jpg"] [/URL]

[URL="http://i1112.photobucket.com/albums/k490/ruud_coco/Toyota%2040%20series%20clusters%20tech%20stuff/fsm%20cluster%201974-1978/Image-27.jpg"] [/URL]

[URL="http://i1112.photobucket.com/albums/k490/ruud_coco/Toyota%2040%20series%20clusters%20tech%20stuff/fsm%20cluster%201974-1978/Image-28.jpg"] [/URL]

[URL="http://i1112.photobucket.com/albums/k490/ruud_coco/Toyota%2040%20series%20clusters%20tech%20stuff/fsm%20cluster%201974-1978/Image-29.jpg"] [/URL]

[URL="http://i1112.photobucket.com/albums/k490/ruud_coco/Toyota%2040%20series%20clusters%20tech%20stuff/fsm%20cluster%201974-1978/Image-30.jpg"] [/URL]


I didn’t put in the 1979 till April 1986 FSM because that FSM is a mix of 40 series and 60 series and it’s not clear to me what is related to which series. Maybe later when I find out what is what or somebody shines a light on this.


Rudi
 
Last edited:
Awesome thread! Great resource... I didn't know some of those existed. Thank you for putting it together.

Thanks! There is more to come. I'll continue with pics of gauges, senders and partnumbers and.... more.... and more...


Rudi
 
Last edited:
pics and part numbers

Over the years I've learned that Toyota in all his wisdom raised a partnumber with 1 if there was a minor change in that part.
The change wouldn't affect the working or functioning of that part.
So let's say we have a dingydongy with part# 12345-10010 and Mr T changed a plastic ring for a fiber ring the new part # would be 12345-10011. Right.......? .....Right!

SURPRISE !

Look at this sheet I've put together.
You can run into some trouble if your EPC says: fuel sender 83320-60050 and you get 83320-60051! The difference is a 1 or a 2 pin connector and the length of the float arm .
Or your EPC says: OIL gauge 83510-60012 is replaced by 83510-60013! This is the same gauge (electrical wise) but with a different face plate.

If any of you have additional info..... please post and I update this sheet.


Rudi
gauges and senders.JPG
 
Last edited:
Tremendous work Rudi.

I'm always impressed with the amount of research you do when you investigate any aspect relating to our cruisers.

5 star rating!
 
Awesome thread!!!!
 
Thanks for your work. Double awesome !

John
 
Very nice.


Post #2:

Oil lamp and charge lamp were not used on 1965 and later USA trucks, iirc.


:beer:
 
Cluster overhaul

A few weeks ago I bought a spare cluster through Craig list. This baby really needed a complete overhaul. This is how it looked when I bought it. It’s a 3rd generation, 12V cluster for the GENERAL market with only Km/h reading.

[URL="http://i1112.photobucket.com/albums/k490/ruud_coco/Toyota%2040%20series%20clusters%20overhaul/DSC06627.jpg"][URL="http://i1112.photobucket.com/albums/k490/ruud_coco/Toyota%2040%20series%20clusters%20overhaul/DSC06627.jpg"][URL="http://i1112.photobucket.com/albums/k490/ruud_coco/Toyota%2040%20series%20clusters%20overhaul/DSC06627.jpg"] [/URL][/URL][/URL]

First thing I did was checking the gauges with a test light. The FSM says to check with a 3.4 W bulb but I only have a 3W bulb so that will have to do. The test bulb replaces the sender.
Here are the pics of the OIL, FUEL and TEMP gauges. The AMP gauge I tested with a 50W bulb to see if there was needle movement. All gauges passed the test!

The OIL gauge

[URL="http://i1112.photobucket.com/albums/k490/ruud_coco/Toyota%2040%20series%20clusters%20overhaul/DSC06628.jpg"][URL="http://i1112.photobucket.com/albums/k490/ruud_coco/Toyota%2040%20series%20clusters%20overhaul/DSC06628.jpg"][URL="http://i1112.photobucket.com/albums/k490/ruud_coco/Toyota%2040%20series%20clusters%20overhaul/DSC06628.jpg"] [/URL][/URL][/URL]

The FUEL gauge

[URL="http://i1112.photobucket.com/albums/k490/ruud_coco/Toyota%2040%20series%20clusters%20overhaul/DSC06629.jpg"][URL="http://i1112.photobucket.com/albums/k490/ruud_coco/Toyota%2040%20series%20clusters%20overhaul/DSC06629.jpg"][URL="http://i1112.photobucket.com/albums/k490/ruud_coco/Toyota%2040%20series%20clusters%20overhaul/DSC06629.jpg"] [/URL][/URL][/URL]

The TEMP gauge

[URL="http://i1112.photobucket.com/albums/k490/ruud_coco/Toyota%2040%20series%20clusters%20overhaul/DSC06630.jpg"][URL="http://i1112.photobucket.com/albums/k490/ruud_coco/Toyota%2040%20series%20clusters%20overhaul/DSC06630.jpg"][URL="http://i1112.photobucket.com/albums/k490/ruud_coco/Toyota%2040%20series%20clusters%20overhaul/DSC06630.jpg"] [/URL][/URL][/URL]

The 12 Volt power supply and test light

[URL="http://i1112.photobucket.com/albums/k490/ruud_coco/Toyota%2040%20series%20clusters%20overhaul/DSC06631.jpg"][URL="http://i1112.photobucket.com/albums/k490/ruud_coco/Toyota%2040%20series%20clusters%20overhaul/DSC06631.jpg"][URL="http://i1112.photobucket.com/albums/k490/ruud_coco/Toyota%2040%20series%20clusters%20overhaul/DSC06631.jpg"] [/URL][/URL][/URL]

For taking the cluster apart and clean up of the housing I refer to a very good posting by ROCKCRAWLER: https://forum.ih8mud.com/40-55-series-tech/336957-instrument-cluster-restoration.html

For overhauling the odo meter I refer to another very good posting by BAAS: https://forum.ih8mud.com/40-55-series-tech/463766-fixing-stuck-odometer-pics.html

A supplement to this posting is the removing of the needle. I ran into that same problem and solved it this way: Move the needle to the 12 o’clock position. Hold the shaft with a flat nose plier and twist and pull the needle from the shaft.

[URL="http://i1112.photobucket.com/albums/k490/ruud_coco/Toyota%2040%20series%20clusters%20overhaul/DSC06652.jpg"][URL="http://i1112.photobucket.com/albums/k490/ruud_coco/Toyota%2040%20series%20clusters%20overhaul/DSC06652.jpg"] [/URL][/URL]

[URL="http://i1112.photobucket.com/albums/k490/ruud_coco/Toyota%2040%20series%20clusters%20overhaul/DSC06653.jpg"][URL="http://i1112.photobucket.com/albums/k490/ruud_coco/Toyota%2040%20series%20clusters%20overhaul/DSC06653.jpg"] [/URL][/URL]

Before you start removing the gauges spray the studs with some WD40 and let it rest for a few hours or better for a night. The problem here is that the studs are red copper with metal nuts. If the nut is stuck and you apply too much force you’ll twist the stud out of the plastic housing. Ask me how I know.

[URL="http://i1112.photobucket.com/albums/k490/ruud_coco/Toyota%2040%20series%20clusters%20overhaul/DSC06633.jpg"][URL="http://i1112.photobucket.com/albums/k490/ruud_coco/Toyota%2040%20series%20clusters%20overhaul/DSC06633.jpg"] [/URL][/URL]

This is how it looks when everything is taken apart.

[URL="http://i1112.photobucket.com/albums/k490/ruud_coco/Toyota%2040%20series%20clusters%20overhaul/DSC06636.jpg"][URL="http://i1112.photobucket.com/albums/k490/ruud_coco/Toyota%2040%20series%20clusters%20overhaul/DSC06636.jpg"] [/URL][/URL]

Here is a close up of the face plate. It really needed a new decal.

[URL="http://i1112.photobucket.com/albums/k490/ruud_coco/Toyota%2040%20series%20clusters%20overhaul/DSC06638.jpg"][URL="http://i1112.photobucket.com/albums/k490/ruud_coco/Toyota%2040%20series%20clusters%20overhaul/DSC06638.jpg"] [/URL][/URL]

I started with the PCB (Printed Circuit Board). Degreased and cleaned it and cleaned all the contact points with a fiber glass pencil until they were bright and shiny.

[URL="http://i1112.photobucket.com/albums/k490/ruud_coco/Toyota%2040%20series%20clusters%20overhaul/DSC06661.jpg"][URL="http://i1112.photobucket.com/albums/k490/ruud_coco/Toyota%2040%20series%20clusters%20overhaul/DSC06661.jpg"] [/URL][/URL]

Next step is the housing. While you have it all apart you can improve the illumination drastically with some simple steps.
Remove the 2 round light bulb covers. 90% of the light is trapped in these covers. There is a small hole on the outside to let the light out in the direction of the housing so only 10% comes out of it.
Remove the 2 covers above the OIL and AMP gauge. They are blocking the light from spreading.
Paint the housing either silver or shiny white. My choice was white because I had one spray can on the shelf. This is how it looks after these 2 small modifications.
Tip. Make sure that you clean up the ground contact behind the Fuel gauge. There is a tiny rectangular spot that serves as a ground for the build in Voltage Regulator.
If you forget this...... the Voltage Regulator will not work and so your FUEL and TEMP gauge will be slowly fried by 12 - 14Volt!
Also clean up the ground contact on back of the FUEL gauge! Check the spring tension and adjust a bit if necessary.

[URL="http://i1112.photobucket.com/albums/k490/ruud_coco/Toyota%2040%20series%20clusters%20overhaul/DSC00228text.jpg"][URL="http://i1112.photobucket.com/albums/k490/ruud_coco/Toyota%2040%20series%20clusters%20overhaul/DSC00228text.jpg"] [/URL][/URL]

[URL="http://i1112.photobucket.com/albums/k490/ruud_coco/Toyota%2040%20series%20clusters%20overhaul/DSC00191.jpg"][URL="http://i1112.photobucket.com/albums/k490/ruud_coco/Toyota%2040%20series%20clusters%20overhaul/DSC00191.jpg"] [/URL][/URL]

I also painted the back side of the main face plate white for better reflection of the light.

[URL="http://i1112.photobucket.com/albums/k490/ruud_coco/Toyota%2040%20series%20clusters%20overhaul/DSC00229.jpg"][URL="http://i1112.photobucket.com/albums/k490/ruud_coco/Toyota%2040%20series%20clusters%20overhaul/DSC00229.jpg"] [/URL][/URL]

Next step are the gauge needles. I use fluorescent red. This kind of paint gives the best results when applied on a white background so that’s not too difficult.
Here is how I did it. I lined up the gauges between 2 pieces of wood. Put a sheet of kitchen towel under the needles covering the face plates. Another sheet to cover the bottoms and gently taped the spaces in between to prevent overspray on the gauge housings.

[URL="http://i1112.photobucket.com/albums/k490/ruud_coco/Toyota%2040%20series%20clusters%20overhaul/DSC00240.jpg"][URL="http://i1112.photobucket.com/albums/k490/ruud_coco/Toyota%2040%20series%20clusters%20overhaul/DSC00240.jpg"] [/URL][/URL]

White

[URL="http://i1112.photobucket.com/albums/k490/ruud_coco/Toyota%2040%20series%20clusters%20overhaul/DSC00241.jpg"][URL="http://i1112.photobucket.com/albums/k490/ruud_coco/Toyota%2040%20series%20clusters%20overhaul/DSC00241.jpg"] [/URL][/URL]

Leave it alone for 30 minutes. The paint dries pretty fast but you are going to change the color and these paints have the bad habit to dissolve the previous layer of paint a bit so walk away, have a coffee or a beer or whatever but let it dry for 30 minutes minimum.

Fluorescent red

[URL="http://i1112.photobucket.com/albums/k490/ruud_coco/Toyota%2040%20series%20clusters%20overhaul/DSC00245.jpg"][URL="http://i1112.photobucket.com/albums/k490/ruud_coco/Toyota%2040%20series%20clusters%20overhaul/DSC00245.jpg"] [/URL][/URL]

Now….. LET IT DRY, leave it for a few hours. WALK AWAY, GET A BEER, do something else!
The point is that although the paint is “dry” after a few minutes, it’s still soft and damage is easily done at this point.

To be continued.....

Rudi
 
Last edited:
Cluster overhaul part ll

The face plates. Nothing difficult here. I sanded them, a coat of primer to check for irregularities and a final coat of flat black.
Sanded and ready for primer
.


Primer


Flat black.


It looks grey in the picture but that is because of the flash going of on my camera.
Now all the plates are ready for their decals.
I made them myself. I took photos of all gauges, did a lot of photo shopping and printed them on a laser printer. I used 3M Super 77 Multipurpose Adhesive spray glue to attach the decals to the face plates.


Put everything back in. Align all the gauges so that the horizontal bars are in the same line and height. Adjust the odo meter so the face plate lines up with the bottom of the glass window.

When everything is back in place and checked, I put in 5Watt light bulbs instead of the regular 3W.
These 5Watt bulbs together with the white paint and the covers that are removed make a huge difference in the illumination.

At night


And ready!

DSC00278.JPG

Now I'm the happy owner of a spare cluster :bounce::bounce2:

Rudi
DSC00278.JPG
 
Last edited:
That looks really fantastic, Rudy. :clap: 
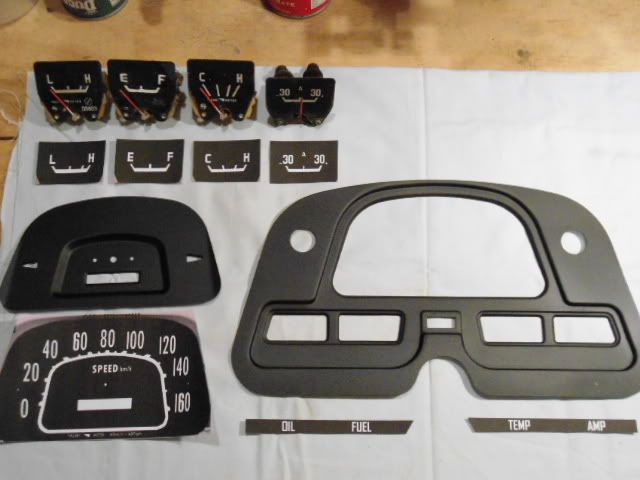
Would you be able to make those decals out of white stickers? I would think that there would be some demand for those.

Thanks for putting all of this together.

Josh
 
Great work Rudi! This is an amazing resource for people wanting to take on the same project.
 
Modified cluster to show correct speed for 33" tires.

photo 2.jpg

Will be back in production on those markings in January.
photo 2.jpg
 

Users who are viewing this thread

Back
Top Bottom