Fixing the stuck odometer (with pics) (1 Viewer)

This site may earn a commission from merchant affiliate
links, including eBay, Amazon, Skimlinks, and others.

Joined
Jul 4, 2010
Threads
24
Messages
313
Location
Brisbane, Australia
Many here have seen or experienced the symptoms of the odometer not turning over properly. Usually the minor (tenths) wheel still turns over correctly but it does not increment the next digit. The most common cause for this is the lube on the odometer becoming old and sticky. My 84 BJ42 had this problem and over the past few days I have stripped, cleaned, lubed and reassembled my odometer. I'm not saying what I have done is the best way or that it is even perfectly correct, but my odometer now works great. I took a lot of pics during the process and will post them in case it helps someone else. If you go through this and see any errors or want to add something please feel free, actually it would be appreciated!


How it works:

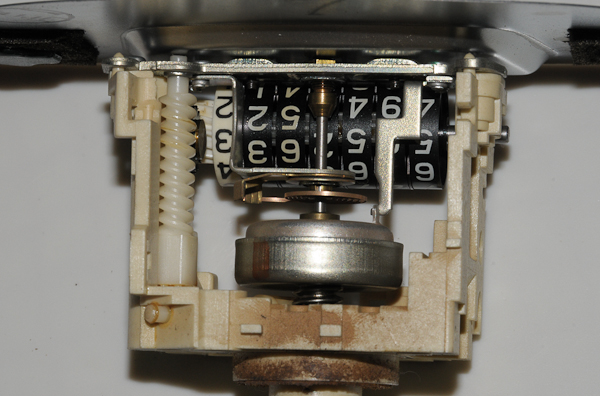
The speedo cable drives a shaft which powers the speedometer through a rotating magnet and calibrated spring (look on wikipedia for "eddy current speedometer) to give the correct speed reading. Also attached to this shaft is a worm-gear which drives a series of gears which turn the odometer "tenths" wheel. This wheel has a notch so that for each revolution it will trip the next wheel to increment by one. And so on. There are pictures further down which illustrates how this works for the odometer on my truck.

These moving parts are lubricated for obvious reasons. After 25+ years this lube has dried up on my odometer and has become a sticky gunk - I was really very surprised at how sticky - it was almost like glue. The bugger was that it was not just on the shaft but in-between the wheels as well. Safe to say, my truck has probably done a few more kilometres than is reflected on the odometer - no way those wheels were going to move!

odorebuild%20(2%20of%2014).jpg


What you will need:
1. Good light
2. Clean workspace to spread the bits around, and preferably a soft cloth to avoid damaging the speedo face plate
3. Electronic cleaning solvent - that won't attack plastics
4. Good quality grease - no melt type
5. Small philips screwdriver to remove black faceplate retaining screws - plastic-type would be good to avoid scratching the black screws
6. Small flat screwdriver and needle-nose pliers - to remove the cir-clip and the odometer shaft retaining pin
7. Soft and clean cloth to wipe off old gunk and excess lube
8. Earbud - to help with getting lube into the hard-to-reach places (I'd prefer a foam type to avoid having to remove the fluff that the cotton buds leave behind)
9. A rod/screwdriver/wire to put the cogs on when you are not working on them - just reduces the risk of losing the bits
10. A pencil and paper to note the odometer reading so that you can put it back (unless you are going to reset it to 000000.0)
11. Some time and patience ;)

odorebuild%20(9%20of%2014).jpg
 
Disassembly and cleaning

(assuming that the speedometer has already been removed from the cluster housing)
The odometer shaft is held in place with a retaining pin - see vertical silver pin on right side of the white worm gear in the picture below. Once this pin is removed (lift it straight up) the odometer shaft slides to the left and pops out of it's base. However, to remove this retaining pin you will need to loosen the speedometer face plate (it will be easier if you can take this plate off completely, but I was afraid to remove the speedo needle, so I only loosened the screws and moved the plate)

odorebuild%20(12%20of%2014).jpg


Now that the odometer shaft is loose you will need to remove the little cir-clip before taking the wheels off. For the first time in my life the cir-clip did not go flying across the workshop.

odorebuild%20(5%20of%2014).jpg


I used a spare piece of steel as a temporary "shaft" to keep all the bits together and in correct order. You will notice that there is a thin metal disc with a tiny cog between each wheel. These tiny cogs are not fastened to the disc, they simply sit on a small pin - and they are tiny so be careful not to lose them.

odorebuild%20(7%20of%2014).jpg


I used the electronic part cleaner to clean each disc, cog, wheel and shaft of all gunk and dust. Actually I did this twice, wiping each item with the cleaning cloth and leaving to dry for a few hours before doing it again. I cleaned the holes and also cleaned the sides of the wheels and cogs, as mentioned earlier they were sticky. The speedo plastic housing was a bit harder because I left the face plate on - so it was a bit time consuming, but cleaned as much old lube as I could from the worm gears (If you've left the face plate on be careful not to get old/new lube or parts cleaner on it)

odorebuild%20(8%20of%2014).jpg
 
Assembly and lubrication

I applied grease to the shaft, the small cogs, the sides of the wheels, and a very light coating on the metal discs (just rubbed it with greasy fingers) Not sure about the wisdom of that - time will tell if I over did it. You can always wipe the surface of the wheels after it is assembled so don't be too worried about greasy numbers yet.

Reassembling the odometer wheels and shaft is just a reverse of dismantling. There are a few things that you want to keep in mind though. The small cogs on the metal discs have sixth teeth each, with every second tooth being shorter. This mates to a raised ring inside the adjoining wheel - it is subtle but be sure that it all fits nice and flush. It is easier to set your odometer numbers correctly before re-fitting the cir-clip. (You can, but it involves a bit of turning and fiddling!) The numbers displayed between the two rows of lugs on the discs is what will show through the speedo window.

odorebuild%20(10%20of%2014).jpg


Before fitting the odometer assembly, lube the worms, gears, and cogs inside the housing. The earbud helps to spread it into the grooves. I used a cordless drill (in reverse) with a square torx bit to give the gears a run, then adding/spreading more lube as necessary. Wipe excess lube off the numbers before continuing.

Fit the odometer assembly by putting the right side of the shaft into the hole, aligning the shaft groove with the housing gap (on the left side in the pic below), ensure that the lugs line up with the metal bar on the housing, snap it in, and slide the shaft to the right. Re-fit the retaining pin and fasten the faceplate screws.

Note that the odometer assembly can physically fit on the other side of the housing - but it should fit on the side with the black gear otherwise your numbers will be upside-down and your odometer won't work (ask me how I know!)

odorebuild%20(4%20of%2014).jpg


Last steps for me were to clean up any extra lube, double-check that everything was installed correctly, and run it on the cordless drill again to check that the odometer would tick over properly. Now just to give it a quick wipe, replace the foam around the indicator lenses, and refit into the cluster.

odorebuild%20(13%20of%2014).jpg
 
Great Post! I guess that is the next thing I have to fix my tenths indicator goes round and round with no effect on the rest. I thought I had solved the speedometer problem with a new cable, but looks like more cleaning is needed. If you install a new cable make sure you lube it otherwise it won't show the correct speed and fluctuates up and down on mine by 10 or 15 mph.
 
1st class thread Gary :clap:

Great info and pics!
 
Good onya, Gary, thanks. I followed similar threads here to clean up my '80 petrol odometer as you might say. I miss Oz, I trust you weathered the calamities.

I wanted to get an odometer with the extra digit and I was lucky enough to source an '81 fj40 speedo at a semi-reasonable price. The odometer and c-clip setup were a bit different, though the vertical pin setup was the same. I was reluctant to mess with this rare odometer so I bought an fj60 cluster on ebay and swapped in that odometer - the digits were moving very freely and it seemed well lubed. I set the odometer to 80K ( acouple of K more than when the old one gummed up) and all seems to be working well. I only road tested it for a few miles; it's cold when topless here in CT.

The speedo needle is not that hard to remove, but be gentle and careful. If it flies like a c-clip the brittle needle is likely to break. Cheers.
 
I need help Odo not working

I disassembled cleaned and reassembled now the miles turn on the 5 instead of the 9 so after .5 it turns 1 mile and then on the next .5 it turns 2 miles after 5 miles it turns 15 miles and so on. What might I have done wrong? I tried taking it apart again but I got the same results. Please help!
 
Try again

I disassembled cleaned and reassembled now the miles turn on the 5 instead of the 9 so after .5 it turns 1 mile and then on the next .5 it turns 2 miles after 5 miles it turns 15 miles and so on. What might I have done wrong? I tried taking it apart again but I got the same results. Please help!

I had similar issues with mine, must have reassembled at least four times. Finally the cruiser gods smiled on me and it works right finally. It does read about ten mph slow though. Smooth but off. Might be the 33 9.50's.
 
Last edited:
Got it!!!!!!!

So as careful as I was trying to be, I got the plates with the little gears turned around the wrong way. Thanks to Baas' pictures and careful study I realized what the problem was and corrected it. Then I had to be careful to put it together so the shorter tooth on the little gear lined up right. Tested it with a variable speed drill and it works. At least it did not turn on the .5 of a mile. Road test is in order, but it is pouring down rain and all I have is a bimini top. Thanks again for the encouragement and advice. Baas Thank to you especially for this thread and those terrific pictures.
 
If any of the gears are stripped out and you dont have a spare odometer to part out, you can swap the gear with the furthest one on the left ( hundred thousands ).

Also while its all out, consider cutting out the metal shields that sit between the speedo light and the speedo. Your dash lights will be twice as bright.

cheers-
Dustin
 
This is great! i need to do this to my 40. This should be a in the tech links or FAQ
 
great information... Helped me alot in fixing my odo... They were indeed stuck due to greese turned gum.. Cleaned and lightly greesed.. Will try out later in the evening

thanks for sharing.. :)
 
Also while its all out, consider cutting out the metal shields that sit between the speedo light and the speedo. Your dash lights will be twice as bright.

cheers-
Dustin

Which shields do you mean? The round ones covering the lightbulb? And/or also the shields covering the top of the gauges?

Rudi
 
odometer exchange: Km to Miles

Hi guys,

I know this thread has been resting for a while, but I have a question which someone here may be able to answer.

I just bought a speedometer from an '81 US Spec to get the MPH speedo instead of the one on my LX which is in French miles (Kilometres). This thread has provided great info. on fixing one of the problems with the MPH odometer: it does not turn.

My other question is about the numbers: they are all pretty faded, where the ones from my LX (having just 82,000 miles (133,000 French miles) are perfect (and spin nicely). Can I simply swap my French odometer (from my LX) with my English odometer (from the US Spec speedometer)? Has anyone done this?

If this is not do-able, does anyone know whether Toyota still sells the odometer cluster? Thank in advance.

Cheers,

Josh
 
Hey Josh,

I'm not sure myself - never done a swap like that. There is a calibration number on the face (below the white centre circle) and I guess if these are the same you could just swap them over.

But if you are going to the hassle of taking it all apart I would recommend just swapping the number disks across onto the spindle. You can clean and lube the odometer at the same time, getting stuck is a factor of time rather than turns. And you could put the unwanted one back together and recover some cash?
 
Hi Josh,

If the bottom line on the faceplate reads: 60mph=1026rpm
and on the other one: 60kmh=637rpm then they are equal and you can swap them out.

Rudi
 
My speedo stopped working so I popped it out. Had a lot of sand in the whole thing. So while trying to get the numbers clean I broke the bracket one of the thing sits in. So be careful. I'm waiting for toyota to get me a new one from one of their remote dealerships.
 
Hi guys,

I have not pulled mine out of the rig yet but it is a J06 (petrol) and the US Spec one is also out of a petrol, so I hope that they are the same.

It's funny: the tenths wheel on my Aussie one is white where the tenths wheel on the US Spec one is more of a cream colour. I can't recall whether my 83 FJ40 in the US was also cream or was white, so I wonder whether they are different from the factory.... :hmm:

I think what i will do is pull the other one apart as well and clean it up, then use it in the MPH speedometer. I like the look of the white tenths better. My Aussie speedometer looks brand new - I only wish the MPH one looked as nice.


As for the speedometer needle, has anyone actually tried to pull theirs off as described above? I tried with mine but I really did not want to break anything so did not pull too hard. I want to put the needle from my Aussie speedometer onto my MPH one because the orange is nice an bright and not faded. My LX was a CFS truck in its last life, so it rarely saw the outside of the firehouse.

Thanks for the help - your thread was inspirational. I've re-assembled the MPH odometer and it works perfectly.

Cheers,

Josh
 

Users who are viewing this thread

Back
Top Bottom