MScruiser
obsessive-compulsive oppositional-defiant wise-ass
With the installation of my new 225W spotlights, I began to consider installing an auxiliary fuse box to handle the new load, and to also allow for the installation of future accessories (lockers, floodlight, compressor, etc.). In just a few minutes of researching, I, like so many before me settled on the Blue Sea brand of hardware. Blue sea makes components for boat electronics, so they are more than adequate for installing in a 200 series.
I got a list of needed components from @Willy beamin , who was also kind enough to text me a few pictures at random times of the day; it was extremely helpful, and I am basing my simple system from his setup. I also used the write up written by @pdxlc200 to ensure I was using the proper wire gauge size. And I think all of this is really thanks to @sleeoffroad who has a write up on their webpage, and a host of other write-ups on MUD.
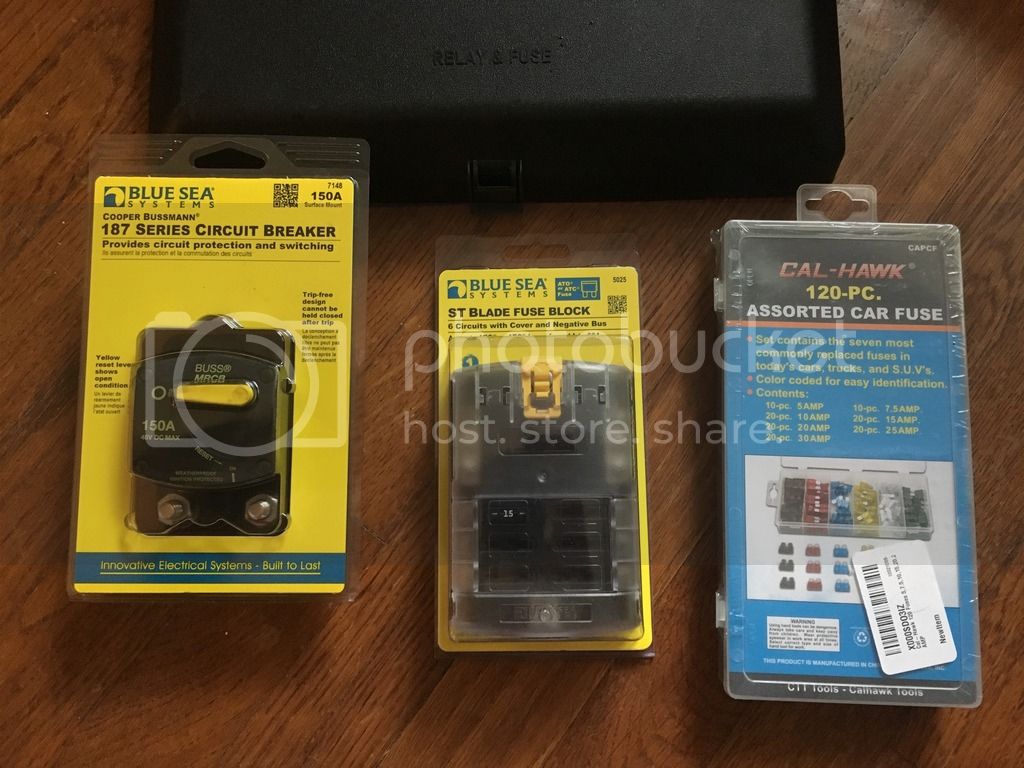
From Amazon.com, I bought:
Blue Sea 187 Series 150amp Circuit Breaker
Blue Sea ST Blade Fuse Block (6 fuse version)
Cal-Hawk 120 piece assorted fuses (I only needed 1 30 amp fuse for this project)
From my local parts store, I bought:
A few feet of 4 AWG Type II cable, in both red and black
Six 4ga copper terminals
From Harbor Freight:
Marine Grade Heat Shrink (it has a special adhesive on the inside)
Eye-type wire conectors (I bought a set of 250 fittings)
Hydraulic Wire Crimper
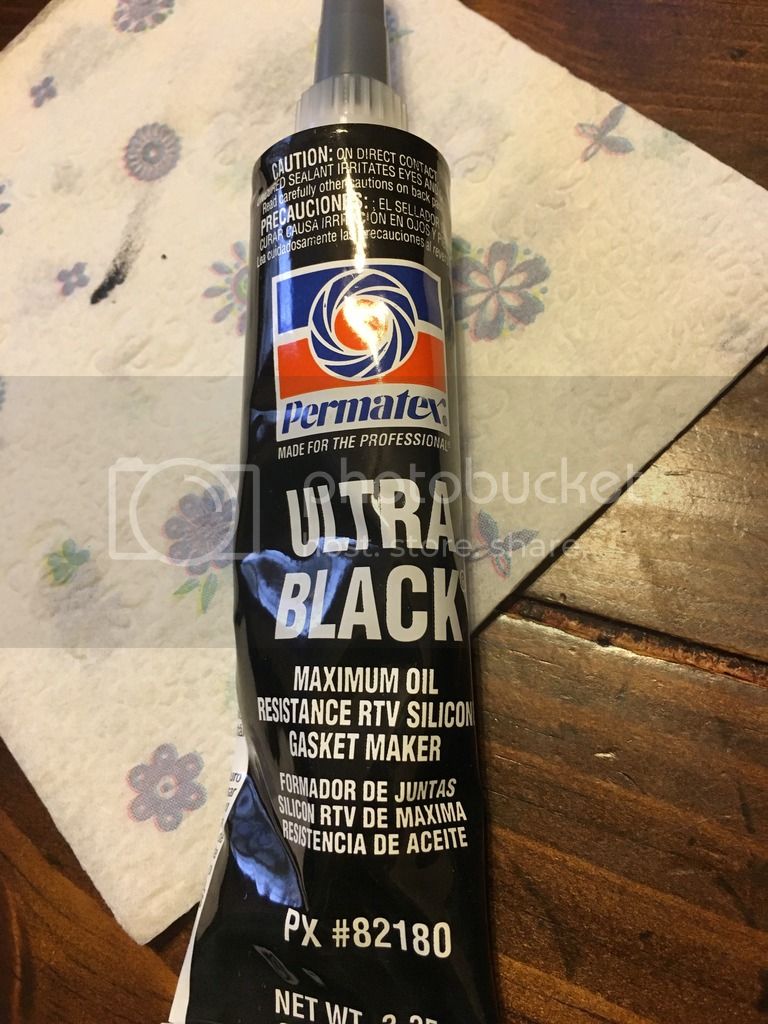
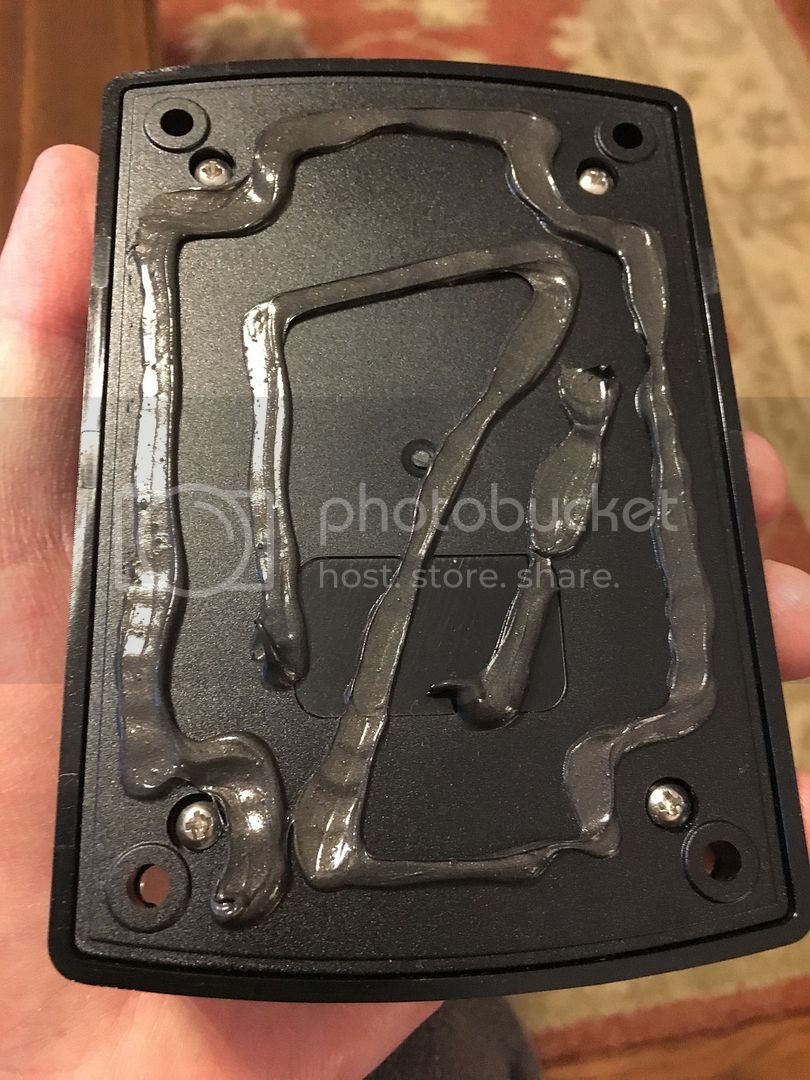
I mocked everything up and made measurements for my wiring. After all was found to be good, I used black RTV to glue the components to the OE fuse box cover. I have been using Black RTV for years, with very good success. This stuff rules. It is shock/oil/cold/heat resistant.
I also bought myself a new Hydraulic Wire Crimper

It make great crimps!

I then coated the wire connections in the marine grade heat shrink.

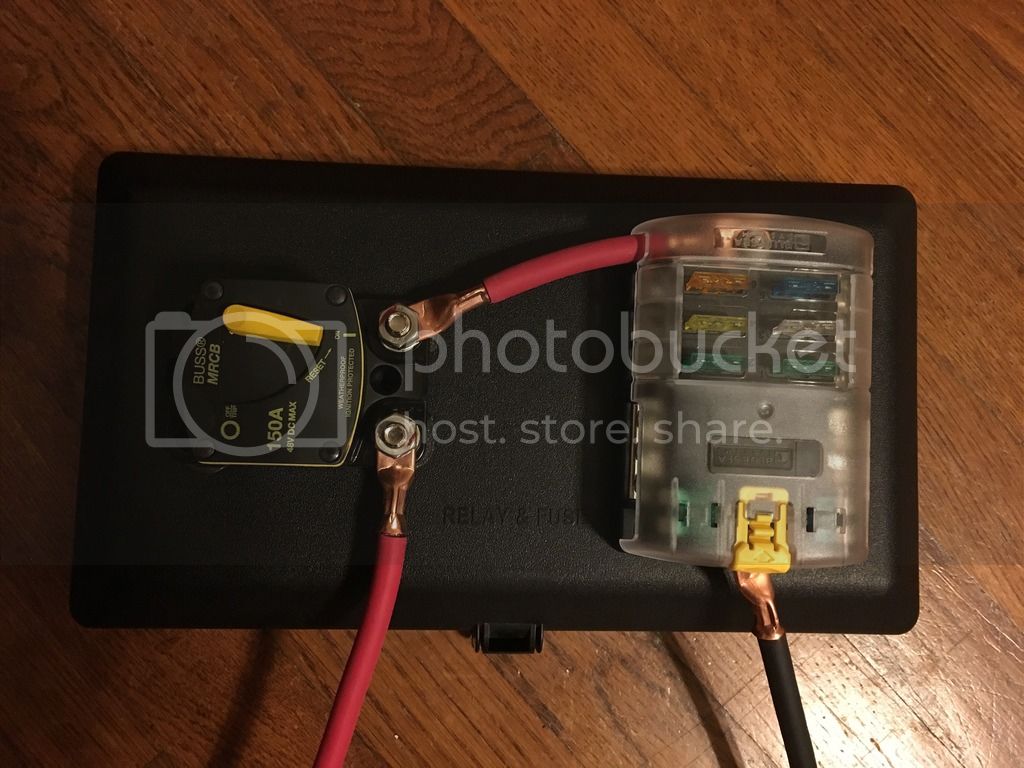
Here is the finished product

Now, the reason I installed this system in the first place, was to properly power my new lights.
I had a pice of 6 strand 18 ga coated wire laying around, and figured I could install it now, and it would save me the hassle of running wire in the future when I added more accessories. Just so you know, each interior switch has 3 wires you need to worry about; a 12V ground and 12V power for the small LED inside the switch itself, and the 12V power to the relay. This means that with a 6 strand coated cable, I can effectively run 6 aftermarket accessories before I run out of wire. I began by cutting the end off the rubber nipple in the firewall grommet (Toyota intentionally places these nipples just for these type of projects), and ran the wire from my switch panel to the engine bay. I then put a dab of RTV on the grommet to make it water tight.

I tapped into the 6-wire strand from the firewall (to my switch) and ran that to a relay. I mounted the relay into an existing hole in the engine bay. I then ran my 12V power and ground from my lights to the ground and 12V 30 amp fuse in my fuse block. You can see the two wires going into the fuse block 2 pictures above this one. As I install more accessories, and gain more relays, I will come up with a new relay mounting solution. But for now, this will do.

And then a bit of split-tube, electrical tape, and zip ties:

After everything was tightened down, I started up the truck, and switched my lights on. Lo and Behold, they worked just fine!

I will keep an eye on the RTV and make sure it holds. I have been using it for years, and have yet to have any failure of any kind. I may go back and secure it with screws in the future, but for now, I didn't want to screw a bunch of holes into the OE fuse box cover.
I spliced the smaller gauge wire connections with lineman's knots, which were soldered, and encased in marine heat shrink. Most of the wires were then coated in 1/4" split tube, which was then wrapped in electrical tape, to keep with the OE Toyota look.
I got a list of needed components from @Willy beamin , who was also kind enough to text me a few pictures at random times of the day; it was extremely helpful, and I am basing my simple system from his setup. I also used the write up written by @pdxlc200 to ensure I was using the proper wire gauge size. And I think all of this is really thanks to @sleeoffroad who has a write up on their webpage, and a host of other write-ups on MUD.
From Amazon.com, I bought:
Blue Sea 187 Series 150amp Circuit Breaker
Blue Sea ST Blade Fuse Block (6 fuse version)
Cal-Hawk 120 piece assorted fuses (I only needed 1 30 amp fuse for this project)
From my local parts store, I bought:
A few feet of 4 AWG Type II cable, in both red and black
Six 4ga copper terminals
From Harbor Freight:
Marine Grade Heat Shrink (it has a special adhesive on the inside)
Eye-type wire conectors (I bought a set of 250 fittings)
Hydraulic Wire Crimper
I mocked everything up and made measurements for my wiring. After all was found to be good, I used black RTV to glue the components to the OE fuse box cover. I have been using Black RTV for years, with very good success. This stuff rules. It is shock/oil/cold/heat resistant.
I also bought myself a new Hydraulic Wire Crimper
It make great crimps!
I then coated the wire connections in the marine grade heat shrink.
Here is the finished product
Now, the reason I installed this system in the first place, was to properly power my new lights.
I had a pice of 6 strand 18 ga coated wire laying around, and figured I could install it now, and it would save me the hassle of running wire in the future when I added more accessories. Just so you know, each interior switch has 3 wires you need to worry about; a 12V ground and 12V power for the small LED inside the switch itself, and the 12V power to the relay. This means that with a 6 strand coated cable, I can effectively run 6 aftermarket accessories before I run out of wire. I began by cutting the end off the rubber nipple in the firewall grommet (Toyota intentionally places these nipples just for these type of projects), and ran the wire from my switch panel to the engine bay. I then put a dab of RTV on the grommet to make it water tight.
I tapped into the 6-wire strand from the firewall (to my switch) and ran that to a relay. I mounted the relay into an existing hole in the engine bay. I then ran my 12V power and ground from my lights to the ground and 12V 30 amp fuse in my fuse block. You can see the two wires going into the fuse block 2 pictures above this one. As I install more accessories, and gain more relays, I will come up with a new relay mounting solution. But for now, this will do.
And then a bit of split-tube, electrical tape, and zip ties:
After everything was tightened down, I started up the truck, and switched my lights on. Lo and Behold, they worked just fine!
I will keep an eye on the RTV and make sure it holds. I have been using it for years, and have yet to have any failure of any kind. I may go back and secure it with screws in the future, but for now, I didn't want to screw a bunch of holes into the OE fuse box cover.
I spliced the smaller gauge wire connections with lineman's knots, which were soldered, and encased in marine heat shrink. Most of the wires were then coated in 1/4" split tube, which was then wrapped in electrical tape, to keep with the OE Toyota look.
Last edited:
")