Biscuit's PakiTop install

This site may earn a commission from merchant affiliate
links, including eBay, Amazon, Skimlinks, and others.

Biscuit

Mars Rover Driver Emeritus
SILVER Star
Joined
Jun 5, 2005
Threads
81
Messages
940
Location
Boulder, CO
The Friday of Memorial Day weekend the Vinyl for my PakiTop arrived after a 18 month wait. (See this thread for the saga: https://forum.ih8mud.com/showthread.php?t=66851 )

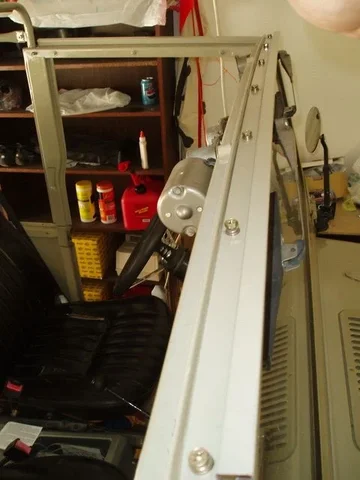
The weekend was spent cleaning up the bows and getting them ready for paint. After some sanding, I got them good enough. Tuesday they went into the paint shop, 17 hours later on Wednesday they were ready to be picked up.

P5310059.webp

P5310060.webp

It should be noted that in these pictures the center cross bow is not attached properly. The attach points on the center cross bow go on the outside of the tabs on the rear spreaders.

To get the forward spreaders (top of the door) I had to bend the tab that runs down along the windshield frame to match the windshield frame. This can be done with a nice firm thump from a mallet or your hand.

After assembling the frame, I worked on the channel that mounts on the winshield. I used a 1/4" drill bit to make the holes. The nuts in the top of my windshield were 21cm apart and 9cm from the edge of the rail. A 2x4 was used to provide backing for drilling.

P5310062-1.webp

I probably should have done the drilling prior to paint, but too late now.
P5310059.webp
P5310060.webp
P5310062-1.webp
 
After the windshield channel was drilled, it was time to install it.

The bolts I used are the bolts that I used to hold my hard top in place when it is one. I happen to have the bling ones from Specter.

P5310064.webp

With that all the top frame was assembled and I put the vinyl on based on the pictures over at Crusher's Rule (http://www.crushersrule.com/top/SoftTopInstallationPakista/index.html)

I didn't take any pics of this, but the order I installed it in was windshield channel, top of door channels, set the top over where it should be, then the side vertical channels. It is much easier if you install it with two people, I conscripted my buddy Ryan to give me hand.

At this point I discovered that the two side straps that attach to the footman loops are a little far back. I'm going to relocate the straps as soon as I locate the circular fasteners that are used to attach them to the top. The picture below shows the misalignment.

P6010071.webp

Now that the top is in place it is time to install the dreaded grommets. My tub had 4 holes in the top rail already so I used those. To mark the hole position I used a silver sharpie, put the tip through the hole, and with the side down pressed the vinyl on the the tip to make a nice small dot.

P6010065.webp

Taking some advice from another thread here on Mud I positioned my grommets 3/16" above where the hole on the tub is. This will tension the side of the top for a better seal and less flapping.
P5310064.webp
P6010071.webp
P6010065.webp
 
I went one hole at a time to install the grommets. The first one I did on each side was the hole for the twist-lock at the bottom of the thin strip by the front doors.

Since the grommet needs to be on the opposite side of the stip of vinyl for the grommets from the mark I placed earlier, I used a small Xacto knife to poke a slit and then I marked the slit with the sharpie. After positioning the grommet (found at OSH in the hard to find area) I made small slits at each of the prongs so they could pass through the vinyl. Going to the flip side, I placed the washer inside the prongs, folded them over the washer and gave each prong a firm squeeze with the pliers on my FJ Cruiser multitool.

With the grommet secured I used the Xacto knife to cut away the vinyl in the center of the grommet so the twist lock can pass through.

Quick note on the twist-locks. CruiserDan has them for much cheaper than Specter (~$5 vs. ~$8). I was excited and rushing so I got mine from Specter (sorry CDan excitement got the best of me).

You repeat this grommet procedure for each twist lock you are going to install. Below is the completed passenger side.

P6010072.webp
P6010073.webp
P6010072.webp
P6010073.webp
 
With the top all on I do have two questions still.

First, is there supposed to be a snap fastener or something in the front corners? My driver side is nice and taught, but my passenger side has a tough of a sage at the curve from vertical to horizontal.

P6010074.webp

Second, I thought that the soft tops had two seams running the length of the roof portion. Mine has one on the driver side. Seems a bit odd but that might just be the way it was/is. That and my brain can detect a lack of symmetry pretty easily.

P6030043.webp

UPDATE 4/5/07: I think I found the answer to why there is only one seam. The picture below is from birfeild.com and shows an early 40 with a single seam soft top.

1961_LC_Brochure-2.jpg


The seam was likely placed on the left side to afford more protection to the driver on the right side. It is likely that the seam wasn't switched to the right for the FJ40L variant. What looks like a seam on the right side of the vehicle appears to be a crease. I could always apply some tricks I learned in my latest grad class to do some image processing to better determine if it is a seam or a crease.

All and all it is an awesome top. The breeze blowing through the rig with shade from the sun is really nice. Definitely worth the wait, though if you get one I hope your wait is less than 18 months.
P6010074.webp
P6030043.webp
 
Last edited:
Very nice. Now how about some action pics! :D
 
Last edited:
Updated post #4 with the answer to my second question. The start of the update is in bold orange.
 
I see the second one. It just seems smoother than the seam on the left side of the vehicle.

The mystery continues. I wonder if Eshan has pics of the top he used as the original template.
 
Looks great. I wish I was installing mine...but I'm boxing stuff up.:)
 
When you ordered yours, did you have to specify what year FJ40 you were putting it on. I am looking at one but have been told there is a difference between pre75 and post 75.

I know there is a slight height difference on the center bow between early soft tops and later but would think the Paki top would still work on mine.

Thanks

When we ordered we specified the following:
Year
Rear door configuration (tailgate, block off plate, half doors)
Material & Color (canvas/vinyl, black, grey, tan/green, kahki)
 
Man... those are beautiful tops...
 
With the top all on I do have two questions still.

First, is there supposed to be a snap fastener or something in the front corners? My driver side is nice and taught, but my passenger side has a tough of a sage at the curve from vertical to horizontal.

View attachment 148220

Second, I thought that the soft tops had two seams running the length of the roof portion. Mine has one on the driver side. Seems a bit odd but that might just be the way it was/is. That and my brain can detect a lack of symmetry pretty easily.

View attachment 148221

UPDATE 4/5/07: I think I found the answer to why there is only one seam. The picture below is from birfeild.com and shows an early 40 with a single seam soft top.

1961_LC_Brochure-2.jpg


The seam was likely placed on the left side to afford more protection to the driver on the right side. It is likely that the seam wasn't switched to the right for the FJ40L variant. What looks like a seam on the right side of the vehicle appears to be a crease. I could always apply some tricks I learned in my latest grad class to do some image processing to better determine if it is a seam or a crease.

All and all it is an awesome top. The breeze blowing through the rig with shade from the sun is really nice. Definitely worth the wait, though if you get one I hope your wait is less than 18 months.

BTW thanks Biscuit for posting this up I am a still few weeks away form my top install but getting ready Paint parts peices etc


I have seen both snap and twist fasteners at the top corners of windshield frames :confused:

On my Paki soft top of Kaki canvas my one top seam is a little more centered but not quite.....

one thing that surprised me was the Quality of the Zippers USA :grinpimp: see pictures....Dusty

P1010005-6.jpg

P1010009-3.jpg
 

Users who are viewing this thread

Back
Top Bottom