Biscuit's Keeping The FJ40 - Customization/Improvement Thread

This site may earn a commission from merchant affiliate
links, including eBay, Amazon, Skimlinks, and others.

Are you supporting the engine while you have the rear motor mounts out?

Yes I am. I have a jack stand with a 2x4 as a spacer under the back of the oil pan. The engine didn't move at all when I unbolted the bellhousing.
 
I was looking at the cam plug on the back of the motor and realized that it appears to have epanded (see post 37) I'm considering replaced the plug while I'm in here. I've read that OEM is needed for proper cam spacing.


Doesn't look like I need to worry about replacing the oil galley plug, since it is non-existent.
 
Unless your cam plug is leaking, I don't see anything wrong with it. They are put in like a freeze plug, drove in and tapped in the middle. The cam thrust is controlled with the mount at the front of the cam. Yes it will rub on the plug if the plug is in too deep, or the cam rides back thrust wise, but you have lots of country on the lobes.

The oil galley plug is opposite of the cam plug, looks fine to me, bellhousing holds it in, won't allow catastrophic failure. It can't be non-existent, it looks like the stock style plug.

I'll be tackling a tranny swap soon too. My 4/73 frame appears to have the proper 4-speed cross member also, I guess I'll see if it all fits properly.
 
Biscuit it's looking good... After saline valley trip I will be pulling mine down... I liked the chain hoist I was thinking of doing the same thing... I have my floor jack to mussel it back in with I was going to fab yup a plate to set it on maybe a cradle. It would be nice to get a correct trans jack but too much $$ any how continued good luck


Sent from my iPhone
 
Biscuit it's looking good... After saline valley trip I will be pulling mine down... I liked the chain hoist I was thinking of doing the same thing...

If you want to borrow the chain hoist let me know.
 
Looking at my clutch hub I am inclined to replace it. There seems to be some significant wear where the clutch fork contacts the hub.

image-2012928818.jpg
 
Biscuit it's looking good... After saline valley trip I will be pulling mine down... I liked the chain hoist I was thinking of doing the same thing... I have my floor jack to mussel it back in with I was going to fab yup a plate to set it on maybe a cradle. It would be nice to get a correct trans jack but too much $$ any how continued good luck


Sent from my iPhone

Doug, this is Dave M. from Trail Crew. If you want to borrow a transmission jack, I have one of those. I was able to swap my transmission without a hoist. A little awkward but not bad.
 
Rear main seal is out. But that is as far as I got before food poisoning hit me.

Goal is to have the bell housing back on tomorrow.
 
I didn't get as far as I hoped on Sunday as I volunteered at Eagle Rock Brewery's fourth anniversary party.

I did manage to get the rear main seal installed. Went in easily using a soft faced hammer.

I removed the pilot bearing tonight after work using the bread method. A 1/4" drive 3/8" socket put backwards on an extension works great. I used the 1/4" drive screwdriver handle.

This is what the bread method looks like after the pilot bearing is removed.

image-3894923402.jpg
 
Biscuits Thread

VERY informative thread and all the pix are a huge help! Subscribed and looking forward to additional posts. Thanks!
 
I'm fairly certain that I messed up the pilot bearing while installing it this morning. It's only halfway seated. It is no longer freely spinning using my finger. It will turn but there is some resistance. That what I get for not using the appropriate force to install it cleanly. I probably won't get a second attempt at this until next weekend by the time I get parts, a few needed tools (5lb sledge and a torque wrench), and free time. Hopefully the 40 will be drivable by the end of the month...well I can hope
 
Last edited:
After the Super Bowl I removed and inspected the pilot bearing. It appears to be intact and freely rotating.

So I cleaned up where it sits in the crank and attempted to reinstall. This time I used a larger 1/2" drive socket backwards on the extension. Turns out the 32mm I bought to remove the nut on the 3speed output shaft fits perfectly into the crank. This gave me a nice even surface to make sure the pilot bearing was seated correctly.

A few quick hits with a 4lb hammer and the pilot bearing was seated.

image-3658794380.jpg
 
This morning I chased all the threads on the 4-speed bell housing. I figured the time spend on this would make my life easier on reinstall. I also chased the threads on the block.

For future reference:
M12x1.75
-Engine mounts to bell housing
-Bell housing to engine block

M5x0.9
-Block side of inspection cover
-Timing window cover bolt

One other detail is I painted the timing window needle white.

The 4 speed bellhousing is bolted to block. :bounce: 47ft-lb torque on all 6 bolts.

The engine settled a bit on the stand I was using, and the cheap floor jack I have is only able to extend 15" inches. I used the chain hoist again, this time wrapped around the bell housing to lift it into place. I only have one JIS 30mm M12x1.75, so there are a few DIN M12x1.75 bolts hand tightened to hold it in place for the night.

image-595304519.jpg
image-595304519.jpg
 
Last edited:
The bellhousing is now bolted to the rear engine mounts using the correct 30mm M12-1.75 bolts. The JIS bolt heads are key here to be able to get a socket on the bolts. All of the motor mount to bell housing bolts were installed with spilt washers and torqued to 47ft-lb.

I had some time to work on the transmission. The shift tower was pulled to be painted. I took the top cover off, removed the old gasket, cleaned up the surfaces the gasket will mate to and reinstalled with grey RTV.

Tomorrow the goal is to get the transmission and t-case mated before I have family obligations in the evening.
 
Last edited:
Change of plans for today. Instead of mating the cases I installed the flywheel. All bolts were torqued to 51ft-lb and lock plates folded up to lock the bolts. I used a bit of black rtv on the threads.

I did make some progress on the cases. I removed the old transfer case input bearing. Once again I used the 32mm socket backwards on an extension.

I cleaned up the remaining gasket mating surfaces with a razor blade.
 
Had some issues with the gasket for the rear bearing cover on the transmission. Nether gasket I purchased fit correctly.


The first original gasket I had. I changed donor transmissions so this probably would have worked for the other 4-speed.
image-1380925398.jpg

The SOR gasket. The bolt holes didn't even remotely line up. WTF.
image-1979664715.jpg

I finally made my own gasket this morning. I have a CNC cutter/plotter that can cut gasket material. So I scanned in the rear bearing cover, traced the gasket and made this.
image-3646675976.jpg
image-1979664715.jpg
image-1380925398.jpg
image-3646675976.jpg
 
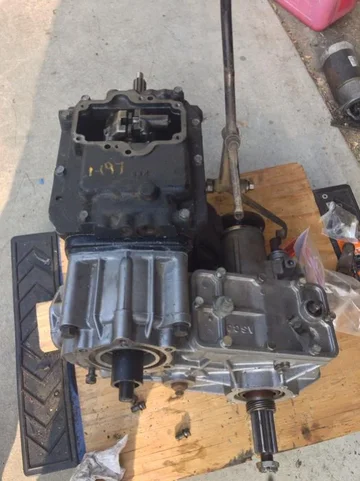
Mated the old 3-speed transfer case to the H42 today. I forgot the spacer between the input gear and transmission the first time. So I got to mate the cases twice.

All five bolts holding the cases together are torqued to the 47ft-lb spec.

image-3319604398.jpg

This week if I have time I need to sort the transfer case shift linkage. I have most of the parts, just need the longer four speed shaft for the direct shift.
image-3319604398.jpg
 
Did a quick test of raising the 4-speed/t-case combo. Found good things and bad things:
Good: The chain hoist works great for raising the combined cases
Bad: I definitely have the three speed cross member.

To overcome this problem I have two choices: 1) I drop the back end of the engine and stab the transmission in at an angle. 2) Cut out and relocate the cross member. I'm leaning toward lowering the engine, but this will impact any e-brake servicing in the future.

I've also misplaced my t-case saver. I took it off the case, cleaned it, then put it somewhere safe. So safe I can't even find it. :doh:
 
Today I surgically removed the crossmember. Using a reciprocating saw made for nice clean cuts right along the frame. Painted the bare metal to minimize future corrosion.

I attempted to install the transmission. The chain hoist worked wonderfully to lift it. I could get the transmission seated all but a half inch. I was using some spare t-case bolts as guide bolts, and still nothing.

Prior to installing the pilot bearing I made sure to hone down the tip of the input shaft so that the pilot bearing was easy to slide on and off the tip.

I've pulled the transmission and verified that I did get the clutch disk back in correctly. (I did)

Any thoughts on what could be preventing the transmission from seating?
 

Users who are viewing this thread

Back
Top Bottom