B engine compression & leakage testing along with glowplug & injector replacement

This site may earn a commission from merchant affiliate
links, including eBay, Amazon, Skimlinks, and others.

LOL!!
i have yet to see someone set the valves ona running engine.
you bring the engine up to operating temp, shut it down and adjust the valves...

Cool Wayne.

I felt sure I'd hear from at least someone that "real men" always adjust their tappets with their engines idling:D


And since "adjusting the tappets/valves" is such a common service job - I thought a lot of people would have strong individual views on how it should be done (and that I'd get a lot of ridicule for the way I did it).

I'm still not sure whether adjusting all the tappets/valves in just 2 specific crank positions (as per the FSM data in KOOTENAY KRUZER's post) is acceptable for "final adjustment" (as opposed to being just a "preliminary adjustment"). Do you reckon it is an acceptable method for "final adjustment" Wayne?

I ran searches on "adjusting tappets" and "adjusting valves" to try and see what others do and came up with nothing. (Which makes me think that most people consider it to be too simple to be worth discussing.)

the only true way to check for diviots is to remove the rocker shaft and look...

Yeah. I think you're right. But I don't really want to be getting into the engine just now. The vehicle sits out in the weather ALL THE TIME so getting on top of the bodywork should be my priority. (And the engine starts and runs just fine.)

Thanks for your input :clap:
 
yes, that is an acceptable final adjustment...
operating temp, shut down, turn to top dead centre, adjust, turn to top dead centre and adjust the other 4 as per manual...
 
And since "adjusting the tappets/valves" is such a common service job - I thought a lot of people would have strong individual views on how it should be done (and that I'd get a lot of ridicule for the way I did it).

I ran searches on "adjusting tappets" and "adjusting valves" to try and see what others do and came up with

I'm suspecting that most, like me, have been reluctant to do jobs like this which is why we all love your posts so much, Tom.

Keep up the good work as it encourages the rest of us to get on our preventative maintenance.

:clap:
 
yes, that is an acceptable final adjustment...
operating temp, shut down, turn to top dead centre, adjust, turn to top dead centre and adjust the other 4 as per manual...

Thanks again.

Heavens! That is so simple to do too!!

(LOL - I often make things extra-difficult for myself by thinking too much :D)

I'm suspecting that most, like me, have been reluctant to do jobs like this which is why we all love your posts so much, Tom.

Keep up the good work as it encourages the rest of us to get on our preventative maintenance.

:clap:

Thanks.

I'm sure a lot of people just think of me as "a geriatric with too much time on his hands" (and therefore - someone who rambles on endlessly).

And it is true that it must be age-related. Because back in 1981 when I did the last adjustment (and was 27 years younger) - I simply wrote "adjusted tappets" as the entry in my logbook. (Nothing more.) - Yet I would have had the same doubts about my methods back then! (Except I guess I didn't care so much about "getting it right" back then.)

:cheers:

PS. Had the engine running today and I imagined it was a little quieter with the smaller tappet clearances. (Probably PURE imagination though.) But I didn't have any time to really do anything more and I've got to shoot off to work now. (Visitors coming too.)
 
Is this a B diesel?

G'day Tom,

I have come to consider you the B diesel Guru, and I thought you might be able to help me here. I think I am going to part this BJ40 out, as it has loads of clean, rust-free bits (and I need the grille). I will sell the engine, but it sure would be good to know what model it is. I am very familiar with the petrol and H diesel engines, but not with the 4 cyl ones.

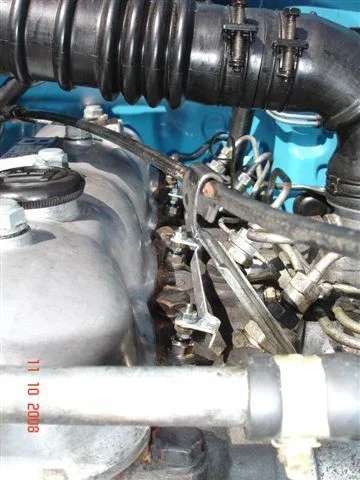
Is there any way to tell a B from a 3B at a glance? (see photo) What are the differences in the serial number? I just bought a 1980 BJ40 for parts, and the bloke who jump-started it for me at the truck depot said it was a 3B (apparently he is Cruiser expert). I know that it has a new engine in it, but the PO did not know any details, other than it had been rebuilt 3000 kms ago.

The truck has loads of power, and the engine runs very well and smoke-free. Thanks for your help.

Cheers,

Josh
Attached Images
attachment.php
 
G'day Tom,

I have come to consider you the B diesel Guru, and I thought you might be able to help me here. I think I am going to part this BJ40 out, as it has loads of clean, rust-free bits (and I need the grille). I will sell the engine, but it sure would be good to know what model it is. I am very familiar with the petrol and H diesel engines, but not with the 4 cyl ones.

Is there any way to tell a B from a 3B at a glance? (see photo) What are the differences in the serial number? I just bought a 1980 BJ40 for parts, and the bloke who jump-started it for me at the truck depot said it was a 3B (apparently he is Cruiser expert). I know that it has a new engine in it, but the PO did not know any details, other than it had been rebuilt 3000 kms ago.

The truck has loads of power, and the engine runs very well and smoke-free. Thanks for your help.

Cheers,

Josh
Attached Images

Hi Josh

From what I can see (and these computers at work are poor so I had to turn the "brightness" on the screen up to max) - it looks like a 2977cc B engine and not a 3B.

I say this because the hoses to the injector pump diaphragm cross over each other and most of the glowplug busbar sits "in the vertical plane". (I believe the hoses don't cross and the busbar is "flat" on a 3B engine.)

Other features on the other side of the engine that I believe distinguish the B engine from the 3B are:

  • a 2-bolt flange where the exhaust pipe mates to the exhaust manifold (whereas the 3B has a 3-bolt flange I believe) and
  • a sealed-unit oil cooler with both the "oil pressure gauge sender unit" and "EDIC low oil pressure cut-out switch" mounted on it (whereas I believe the 3B has a much larger cast-aluminium-alloy affair that can be opened up for servicing with the oil pressure sender unit screwing into the block instead of the oil cooler. (I don't know exactly where the "low oil pressure cutout" is located on a 3B.)
Cheers
Tom
 
just forward of the bell housing on the RHD side...there is a ID stamped into the casting...
 
I'm sure a lot of people just think of me as "a geriatric with too much time on his hands" (and therefore - someone who rambles on endlessly).

And it is true that it must be age-related. Because back in 1981 when I did the last adjustment (and was 27 years younger) - I simply wrote "adjusted tappets" as the entry in my logbook. (Nothing more.) - Yet I would have had the same doubts about my methods back then! (Except I guess I didn't care so much about "getting it right" back then.)

I certainly thought you had too much time on your hands the first time I 'saw' how clean your Cruiser was. :)

I very much like the rambling in your descriptions, thought processes, logic....it makes perfect sense to me. I'm learning/understanding what is going on far more in depth than without reading a 'blow by blow' account from you.

:cheers:
 
just forward of the bell housing on the RHD side...there is a ID stamped into the casting...

At first I thought you'd made an error here Wayne because Engine Australia asked me for my "casting number" when I ordered an overhaul kit. And that number sits on my engine's LH side (not RH side). Here it is:

blockLH1.webp

But then I decided to study the RH side just forward of my bellhousing and I did find these numbers there together with a Diahatsu symbol:

blockRH.webp

But neither set of numbers show it is a "B engine". The only lettering I have for that (that I have found thus far) is a sticker on the rocker cover here: (But these stickers often wear off.)

enginesticker2.webp

I was interested to see that Diahatsu symbol on the block though - Previously (before today) I was aware only of the one on my alloy timing cover. It certainly proves that my whole engine was made by Diahatsu. (Edit: Well. Since there's a Toyota symbol cast into the other side of the block, I guess it really just proves that Toyota and Diahatsu were working together in producing engines.)
blockLH1.webp
blockRH.webp
enginesticker2.webp
 
Last edited:
Oh. There is actually another sticker right on the front of my rocker cover that appears to say mine is a "1B" engine (which makes sense considering there are 2B and 3B engine models - although I've never heard people refer to mine as a 1B):

enginesticker1.webp

I think I prefer to call it a B-engine because 1B sounds too inferior to the 2B or 3B. Whereas B sounds almost superior!!! :D.

Reminds of when I parked the wife's Nissan Pulsar CJII next to a Nissan Pulsar CJI. I jokingly said in a toffy voice "Oh. I see yours is only a CJ one. O-U-R-S is a CJ two". And the owner really got quite angry? (I actually wouldn't have a clue about the difference in our cars - assuming there is any.)

...........but I'm rambling again.
...
enginesticker1.webp
 
try upper left side just below the head and near the firewall...
the 3B is in BIG letters there...
 
try upper left side just below the head and near the firewall...
the 3B is in BIG letters there...


Jeeeeez. Crickey! Thanks again Wayne.

Yep. I've got a big "B" in my block casting right behind the EDIC and forward of a "frost plug":

blockLH3.webp

I never noticed that before! (And how long have I owned this veeehickle?)
blockLH3.webp
 
Thanks guys, I knew I went to the right place.:) Turns out it is a B diesel, but I am really supriseb by how much power it has. It only has 3000 kms since the rebuild and it had new injectors at the time- maybe that's it.

I'll post some snaps of it on my patches site (in my sig line).

Cheers,

Josh
 
Okay then. Did some stuff on the cruiser today:

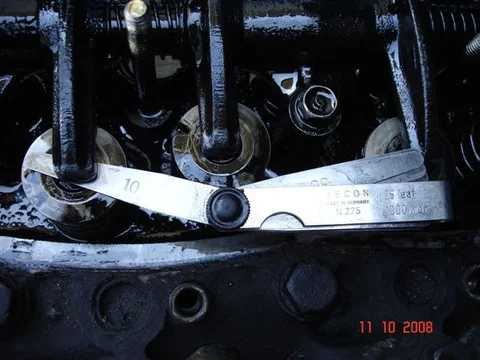
The tappets have been adjusted to within 0.001" of specification (I believe). That's within one thou of 0.008" - inlet and 0.014" -exhaust.

The engine is again hot (from a good run), EDIC is disconnected and the throttle is held open.

And my "repeat" compression readings are:

No. 1: 440
No. 2: 380
No. 3: 380
No. 4 :400

Just to try and show I didn't cheat - Here's a photo of the gauge measuring No. 2 cylinder (which previously gave the low "340 psi" reading).

CompressionNo2.webp

And I didn't add oil to the cylinder - In fact I've decided against doing any "wet testing" at all because I don't want to get black carbon-impregnated oil inside my tester. (And anyway - I already know from my blowby that compression-rings/cylinder-wear will account for most of my compression loss).

And I took these readings in the reverse order to previously (starting from No. 4 cylinder instead of No. 1) in case the starter motor was slowing down with use.

Perhaps one reason why the figures were better (besides the effect of the reduced tappet clearances) is because I may have made each cylinder perform more "compression strokes" than before. In fact when I got to the last one (No. 1 cylinder) - I DEFINITELY let it run longer just to see how high it would go. --- So you can manipulate your figures a tad in this way! (But generally speaking - I stopped when the gauge didn't look like it would rise any higher.)

Oh- Another thing I think I did different was to take more effort to avoid leaks in my connections.

Next I decided to remove the rocker cover again and recheck the tappets - but this time using just 2 crank positions (as per the FSM)

So I rotated the crank clockwise to the second notch while No. 1 cylinder was on a compression stroke and checked 1 (8), 2 (15), 3 (8) and 6 (15) tappets. (The figures in brackets are the largest feeler gauges I could slip in - in thousandths of an inch)

I'm happy with those figures :) (All within 1 thou)

Then I rotated the crank a full turn (360 degrees) to align the same notch (second notch) with the pointer again. And checked 4 (14), 5 (10) Ooops!:frown:, 7 (7) and 8 (13)

Here's me discovering No. 5 tappet is still too far "off spec":

No5Tappet.webp

So I went back and readjusted number 5 tappet again!

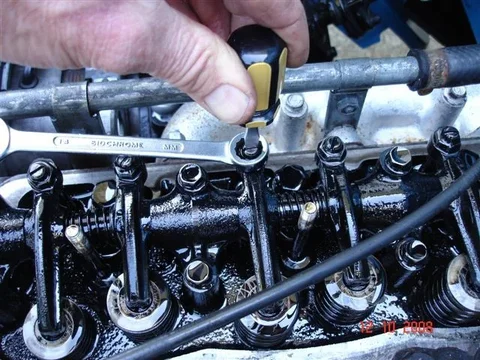
Adjusting a "tappet clearance":

tappetadj.webp

No wonder one was out! It's a fiddly job because there is less than 1/8 turn involved in getting a "20 thou gap" reduced to "8 thou". And the clearance tends to change whenever you tighten/loosen a locknut.

But this work proves ABSOLUTELY to me that the "2-crank-position tappet adjustment method" is the one I'll always use in the future.

And - I always used to worry about "hot adjustment" versus "cold adjustment". In other words, when I was halfway through adjusting them - I'd think - "Sh#t. The engine has cooled down a lot now! Maybe the rest of my adjustments will be wrong because the engine has cooled down too much?" Well this work has proven to me that there is no measureable difference in clearance between "hot" and "barely warm". So I won't lose sleep over that one again!
CompressionNo2.webp
No5Tappet.webp
tappetadj.webp
 
Last edited:
At first I thought you'd made an error here Wayne because Engine Australia asked me for my "casting number" when I ordered an overhaul kit. And that number sits on my engine's LH side (not RH side). Here it is:

View attachment 265543

But then I decided to study the RH side just forward of my bellhousing and I did find these numbers there together with a Diahatsu symbol:

View attachment 265544

But neither set of numbers show it is a "B engine". The only lettering I have for that (that I have found thus far) is a sticker on the rocker cover here: (But these stickers often wear off.)

View attachment 265545

I was interested to see that Diahatsu symbol on the block though - Previously (before today) I was aware only of the one on my alloy timing cover. It certainly proves that my whole engine was made by Diahatsu. (Edit: Well. Since there's a Toyota symbol cast into the other side of the block, I guess it really just proves that Toyota and Diahatsu were working together in producing engines.)

Oh. There is actually another sticker right on the front of my rocker cover that appears to say mine is a "1B" engine (which makes sense considering there are 2B and 3B engine models - although I've never heard people refer to mine as a 1B):

View attachment 265550

I think I prefer to call it a B-engine because 1B sounds too inferior to the 2B or 3B. Whereas B sounds almost superior!!! :D.

Reminds of when I parked the wife's Nissan Pulsar CJII next to a Nissan Pulsar CJI. I jokingly said in a toffy voice "Oh. I see yours is only a CJ one. O-U-R-S is a CJ two". And the owner really got quite angry? (I actually wouldn't have a clue about the difference in our cars - assuming there is any.)

...........but I'm rambling again.
...

Jeeeeez. Crickey! Thanks again Wayne.

Yep. I've got a big "B" in my block casting right behind the EDIC and forward of a "frost plug":

View attachment 265580

I never noticed that before! (And how long have I owned this veeehickle?)

OMG,
I can't believe how clean your engine is. Not only do I not have any stickers but it would take me hours to clean down to the bare metal so that I could see any of this stuff. :grinpimp: Maybe it is time to break out the brake cleaner and clean her up, although I'm a little worried that I might start springin' leaks.:hhmm:
 
Probably a good idea to add something here about the tools I'm using.

Here are 2 of my feeler gauge sets - Both are top quality German products. The left is "metric" (millimetres) and the right is "imperial" (inches):

Feelers.webp

The reason I preferred to use the Imperial feelers is because this set gave me 7,8 and 9 thou "leaves" together with 13, 14 and 15 thou "leaves". Whereas the Metric set would have required me to fiddle with combining leaves (blades) in order to set each gap. (Much more awkward!)

Edit: Ooops. Didn't show the 0.009" leaf in the photo. It must be stuck behind the 0.008 leaf!

I also felt guilty about using a 1/2" longreach socket on my glowplugs so I bought the correct 12mm socket together with a 27mm longreach socket for the injector bodies:

LongReach12&27.webp

Tools are expensive in NZ. They cost $73.10!

And I couldn't find a quick-connect fitting for my Leakage Tester so I got this "hose barb fitting" to connect it to my airline:

HoseBarb.webp
Feelers.webp
LongReach12&27.webp
HoseBarb.webp
 
Last edited:
Damn! Damn! Damn!

My intention today was to finish the glowplug/compression-testing/leakage-testing work so that I just had the injector-replacement job left. - But the Leakage Testingr has "stuffed me around" yet again :mad:

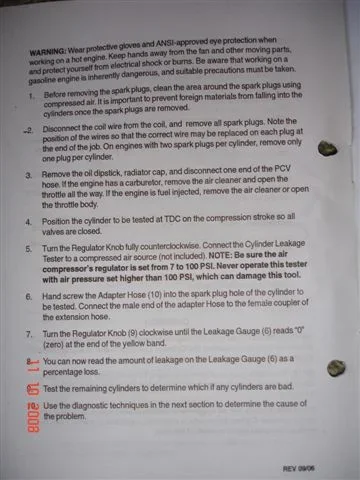
Here are the instructions that came with my HarborFrieght tester:

LeakageInstruct.webp

Note: Gauge (6) is the righthand gauge.

And here is me trying to use it:

LeakageNo2.webp

But alas - The instructions were "up the poo".

What they should have said (as far as I can work out) is:

  • Connect your air supply to the tool (80 psi is OK)
  • WITHOUT CONNECTING THE QUICKCOUPLER TO THE GLOWPLUG FITTING - slowly wind in the regulator till the RH gauge reads zero. (This will "callibrate" the tool because the quickcoupler will keep the hose "closed".)
  • Then connect the quickcoupler to the plug fitting on the cylinder you're testing to record the leakage reading on the RH gauge
Don't get me wrong - I think the Harborfreight gear is good. - The misleading/incomplete instructions appears to be the only thing wrong here!

And I've just done an Internet search that reveals that others have discovered this "instructions defficiency" before me.

So I now realise the leakage readings I took today were cr#p! And I have to ONCE AGAIN remove the rocker cover and glow plugs etc etc :mad::mad:

If I hadn't said I was going to do the Leakage Testing here on MUD I'm sure this would have been enough to make me abandon the idea. But now I feel committed into doing it!!!!!!

Here's the reassembled area of my engine (ready to be diassembled again):mad:

Note that I have refitted the busbar upside-down:

UpsideBusbar1.webp

My FSM shows photos of the busbar in both positions. And since I have to take it off again - I have yet another opportunity to decide which way I want to leave it.
LeakageInstruct.webp
LeakageNo2.webp
UpsideBusbar1.webp
 
Yesterday I removed the rocker/tappet cover again.

Now that I've repeated this exercise a few times - I've become more skilled at what to do. (Lucky I never decided to become a surgeon eh? - I'd be forever cutting open and sewing up the same patient :D)

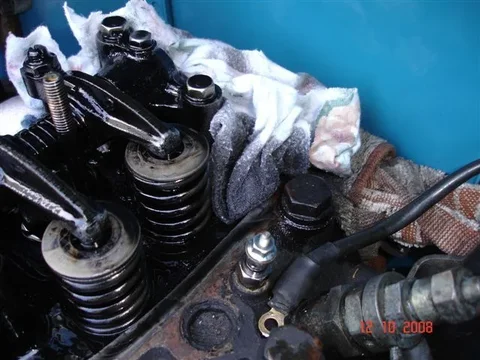
With my sloping driveway I've found that I need to stuff and old rag at the rear of the engine BEFORE removing the cover to catch the oil that flows out. (I've got stains on my driveway from my earlier efforts :frown:): (Hey - There could be an anology with soaking up blood on a sloping operating table too :hhmm:)

oilsoak.webp

And I did check for "divots" (uneven wear) where the rockers meet the top of the valve stems by comparing the clearance measured by a "dial gauge" with the clearance measured by a feeler gauge:

divots.webp

As far as I could tell, there was no evidence of this problem. (But I agree with Crushers/Wayne that removing the rocker assembly is the only REAL way to check.)


Now - On to using the Leakage Tester correctly.............

You connect your airline to the tool, and then, with the "quick-coupling" left unconnected gradually wind in the regulator till the needle on the RH gauge hits "zero" .... like so:

leakageSet.webp
oilsoak.webp
leakageSet.webp
divots.webp
 
Last edited:

Users who are viewing this thread

Back
Top Bottom