Builds Another LS swap? Really??? (3 Viewers)

This site may earn a commission from merchant affiliate
links, including eBay, Amazon, Skimlinks, and others.

I do need to tap the masses for info on coolant hoses and engine oil coolers.

I am not a fan of the corrugated universal coolant hoses, and have seen where others have found bends that work and spliced them together. Open to all suggestions though.

I am looking at a few stacked plate engine oil coolers, and will be using -10AN fittings with -10 stainless braided PTFE line for supply and return. There is limited space on the machine right side of the cooling package up front, and I would like to mount it there to make use of the fan drawing air. I am less concerned with losing a degree of AC performance than I am with keeping the 6.0 cool in the Arizona heat.
 
So....progress report..............I have admittedly been a bit worn out lately. With the New Year and work starting back up, and just being a bit thin from 3 months of hammering on this, I have been low on G.A.S. I have at least had the awareness to step away from it rather than half@ss any of the remaining details.

When I last reported, I was working on the radiator shroud, and decided a TIG welder was in the cards for me. I call it a birthday present, and after a few weeks of research, I landed on the AHP AlphaTig 201. It is not a high end welder like Blue or Red, but it was no where near the cost of Blue or Red with a great value package. I haven't TIG'd aluminum in about 8 years and it shows. I'll need more practice before laying an arc to finish my shroud.

I also got the plan together for the power steering pump reservoir. I had a frustrating experience when I discovered one of the fittings that came with it was defective, but a trip to Don's Hot Rod in Tucson solved that for a nominal cost. The company I got the reservoir from, Dan's Performance Parts, was zero help on the issue and refused to stand behind the item they sold me, but make you own assessment of them. They have a great rating online, so maybe mine was the exception. In the end, I have what I needed and the reservoir is huge, which will be nice for the capacity, and the screw on filter adds a layer of protection to the system.

Anyone who has an 80 knows there are 2 types when it comes to the heater control valve, those that have been replaced and those that will be replaced. Mine was a rotten mess when I tore it down, and I finally remembered to order one. I also picked up a bypass hose from @LandCruiserPhil , so away goes my aux heater and in its place will go the comms units, or an ARB dual compressor if I dont use the Gast unit I have.

Lastly, a fun detail finally arrived. I wanted to do something fun on the plate, and thought about several combos, but settled on something only other LC owners would get. LC nerdy, but I like it.

IMG_20190104_191921796.jpg


IMG_20190104_193458230.jpg


IMG_20190102_171338397.jpg


IMG_20190102_172240662.jpg


IMG_20190110_200203715.jpg
 
So....progress report..............I have admittedly been a bit worn out lately. With the New Year and work starting back up, and just being a bit thin from 3 months of hammering on this, I have been low on G.A.S. I have at least had the awareness to step away from it rather than half@ss any of the remaining details.

When I last reported, I was working on the radiator shroud, and decided a TIG welder was in the cards for me. I call it a birthday present, and after a few weeks of research, I landed on the AHP AlphaTig 201. It is not a high end welder like Blue or Red, but it was no where near the cost of Blue or Red with a great value package. I haven't TIG'd aluminum in about 8 years and it shows. I'll need more practice before laying an arc to finish my shroud.

I also got the plan together for the power steering pump reservoir. I had a frustrating experience when I discovered one of the fittings that came with it was defective, but a trip to Don's Hot Rod in Tucson solved that for a nominal cost. The company I got the reservoir from, Dan's Performance Parts, was zero help on the issue and refused to stand behind the item they sold me, but make you own assessment of them. They have a great rating online, so maybe mine was the exception. In the end, I have what I needed and the reservoir is huge, which will be nice for the capacity, and the screw on filter adds a layer of protection to the system.

Anyone who has an 80 knows there are 2 types when it comes to the heater control valve, those that have been replaced and those that will be replaced. Mine was a rotten mess when I tore it down, and I finally remembered to order one. I also picked up a bypass hose from @LandCruiserPhil , so away goes my aux heater and in its place will go the comms units, or an ARB dual compressor if I dont use the Gast unit I have.

Lastly, a fun detail finally arrived. I wanted to do something fun on the plate, and thought about several combos, but settled on something only other LC owners would get. LC nerdy, but I like it.

View attachment 1878179

View attachment 1878181

View attachment 1878182

View attachment 1878184

View attachment 1878185

Nicely done! Excited to see this finalized
 
If you have not figured out radiator hoses yet, go to the local parts store and ask to go through their stock. I have done this on every motor swap I have done, takes a bit of searching to find the right pair but the effort is worth it to have an off the shelf part.

The truck look good by the way, definitely better to take a break than half ass anything.
 
A couple more items checked off the list, I go the intake installed. It is all Spectre Performance items. They have an Amazon store, so I went to their website, got the part numbers and then got then all on Prime shipping.

The next item on the list is to fab the brackets to mount the engine oil cooler. I obsessed over the cooler for about 2 weeks. Do I run one, do I not? If so, how big? Blah blah blah. In the end, I figured too much was better than too little. I want this rig to stay cool in the Arizona heat, so if it cools too much, I can add a thremostat manifold in place of the open one I am using now. I also researched the debate of tube and fin versus stacked plate. Stacked plate won out despite the higher cost. There is a HUGE range of prices on coolers with near $1000 prices possible. I got this one off Amazon and I am really impressed with the quality. It is a 25 row stacked plate design and I am anticipating 1.5 quarts of additional oil to be needed to keep the whole system full and the oil pan level on target. Not yet sure how I will check the oil level as some will drain back when the engine is off. I'll figure it out in time. Until then, I'll work on nesting it in on the right side of the cooling package.

IMG_20190113_115542778.jpg


IMG_20190113_115546513.jpg


MVIMG_20190113_115057933.jpg


MVIMG_20190113_115053617.jpg


IMG_20190113_115119061.jpg
 
If you have not figured out radiator hoses yet, go to the local parts store and ask to go through their stock. I have done this on every motor swap I have done, takes a bit of searching to find the right pair but the effort is worth it to have an off the shelf part.

The truck look good by the way, definitely better to take a break than half ass anything.
Funny you say that. I talked to the Autozone down the street and they said I could raid the stock.
 
Keep it up, you need to see this through. DO you have a handle on the electrical side of this swap?
 
Keep it up, you need to see this through. DO you have a handle on the electrical side of this swap?
Brian, I went with Speartech for the harness. They came highly regarded online and from Mark's 4WD in AUS. I am suppossed to be able to connect 3 wires and turn the key to start the engine. The rest of the wiring will be slightly more in depth. Locker controls, AC , and the like.
 
Long weekend and a bit more progress. I keep thinking of this in terms of eating an elephant. Solve one problem at a time and then another, and another. Eventually, you run out of problems. I still have problems, but two less than before. I was able to get the PS reservoir mounted and plumbed. Work started with a CAD template. I sketched out the shape and kept whittling it down until it fit the space and left a little real estate for some future items if needed. I transferred that to some 3mm plate and cut it out. A little deburring, and it was ready for the bolt pattern to be transferred and drilled.

IMG_20190120_114010092.jpg


IMG_20190120_114517873.jpg


IMG_20190120_115732001.jpg


IMG_20190120_120137451.jpg


IMG_20190120_120840240.jpg
 
Last edited:
I mounted the bracket base and began another CAD template to make up the distance and angle needed to mount the reservoir plumb and on a plane to clear the tubes below. This was a bit tricky to hold the reservoir in place and take all the measurements, but I folded some shop rags to send it on to get it to the right position to find the angle and mark the template.

IMG_20190120_121029797.jpg


IMG_20190120_123038955.jpg


IMG_20190120_123657060.jpg


IMG_20190120_123715696.jpg


IMG_20190120_124925575.jpg
 
I have had to figure out how to get things done with out the ideal tool. I plan on adding a finger press kit to my press, but that will come later. In the meantime, I make due with clamping the plate between a few pieces of scrap and using a hammer to gently brake the plate along a shallow groove ground into the underside. The groove is just deep enough to ensure the bend occurs there, but not any deeper. Another check on the base plate, showed the need for some grinder touch ups to get the surface plumb.

IMG_20190120_125426021.jpg


IMG_20190120_125525087.jpg


IMG_20190120_125735825.jpg


IMG_20190120_125800337.jpg


IMG_20190120_130207218.jpg
 
Next up was the drilling of the three holes for the fasteners, and to tack in some captive nuts. I am a big fan of captive nuts. Anyone who has dealt with trying to hold a nut in place and thread a bolt, all the while leaning and reaching across an engine bay, will understand. Next I tacked the standoff to the base plate. 1 amp per thou of steel, and away with my ugly TIG welds.

IMG_20190120_144104119.jpg


IMG_20190120_145308697.jpg


IMG_20190120_150721258_BURST000_COVER.jpg


IMG_20190120_150728455.jpg


IMG_20190120_152310906.jpg
 
Install it all and cut some hoses to plumb it all in, and this small project draws to a close. I used three fasteners each on the bracket and the reservoir. I drilled and tapped a third hole on the alternator bracket to react the forces developed by having the reservoir stood off the bracket, and on the reservoir, because I thought it looked more pleasing to the eye. Truth be told, if I had it to do over again. I would not have used a reservoir this size. I like the added volume and I really like the that it has a filter, but it is at the limit of space available for it. Its done, it fits, and it will be fine.

IMG_20190120_152739452.jpg


IMG_20190120_152745793.jpg


View attachment 1886428

View attachment 1886429

IMG_20190122_212247797.jpg


IMG_20190122_212252759.jpg


IMG_20190122_212302961.jpg
 
Last edited:
Next task was to mount the engine oil cooler that I mentioned a few posts back. This is a 25 row stacked plate design and it may be a bit overkill, but I want to build this rig to function in the Arizona heat with zero issues. Yet another few CAD templates, and I had a plan. I will save you the long winded explanation, and just say that I made them much the same as the PS bracket. CAD, transfer, cut, grind, bend, drill, tack, fit, paint, install. Done. I am happy with the result. It turned out to be much more securely mounted than I expected. The weekend draws to a close, so plumbing the -10 line will be another day.

IMG_20190121_143545877.jpg


IMG_20190121_145806275.jpg


IMG_20190121_213111229.jpg


IMG_20190121_213126619.jpg


MVIMG_20190121_213103729.jpg
 
Last edited:
@ARJMN with only 24 days til southern Utah, I’m guessing this will not be the truck you are driving. Great progress and thanks for bringing us along in your posts. Can’t wait to see the finished product on the road.
 

Yeah Steve, I have conceded that I will be taking the 4Runner on the Utah trip. When I look at the remaining to do list, there is just no way I can get it all done in time and not half @$$ it all. Disappointing, but not a big deal. Thanks for the words of encouragement. This has snowballed into a much bigger and more costly project than originally planned, but it will be a killer rig when done.
 
I have had to figure out how to get things done with out the ideal tool. I plan on adding a finger press kit to my press, but that will come later. In the meantime, I make due with clamping the plate between a few pieces of scrap and using a hammer to gently brake the plate along a shallow groove ground into the underside. The groove is just deep enough to ensure the bend occurs there, but not any deeper. Another check on the base plate, showed the need for some grinder touch ups to get the surface plumb.

View attachment 1886412

View attachment 1886413

View attachment 1886414

View attachment 1886415

View attachment 1886416
Nice bends!

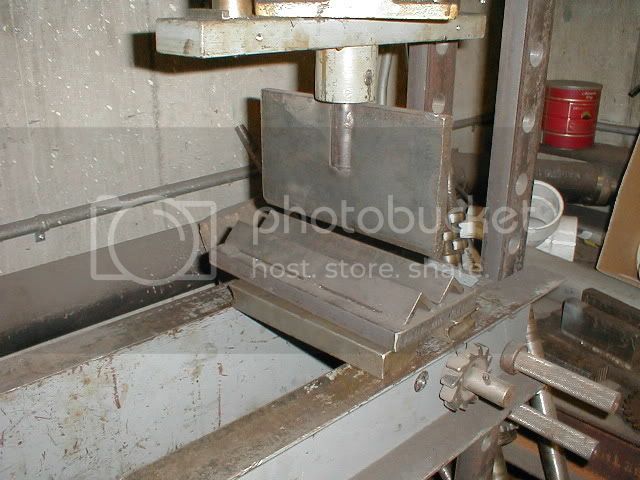
You might want to rig up something like this for bending:
Photo by Thomas Martin
Press1.jpg

Press2.jpg
 
Great find there Steve, way simpler than what I sketched up. Thanks.
I have always wanted to weld up a set of these but there never seems to be enough time during a project.

I end up beating a fold with a hammer just like you did. Heavy stuff I heat with the torch first.
 

Users who are viewing this thread

Back
Top Bottom