81 BJ42 - I have to bring it home and pass inspection

This site may earn a commission from merchant affiliate
links, including eBay, Amazon, Skimlinks, and others.

I think it's the first time I see your 45 not covered in parts!


And I have one of those too (the 45 that is). Wow! I can hardly remember when I had that much room in my garage!

View attachment 684751


This is a lot of work to "pass inspection"..... unless you're going to pebble beach?

If ever you have a spare tool bag, keep me in mind. Would look good when mine is done....

Nice work!
 
crushers said:
your clips are for the longer crank bars ...

Ok, any one have an idea what they look like?
 
Ambrew said:
I think it's the first time I see your 45 not covered in parts!

This is a lot of work to "pass inspection"..... unless you're going to pebble beach?

If ever you have a spare tool bag, keep me in mind. Would look good when mine is done....

Nice work!

You mean like this?
image-877654059.webp
 
To pass the out of provence safety inspection there can be no holes in the bodywork that can allow exhaust gasses to enter the cab. That means I must patch the holes. If I HAVE TO patch the holes then I'm gonna fix the rust. If I'm going to fix the rust then I'm gonna do it right. Its just the way I do things. If I can avoid work I will but if I can't then I will go all the way. If I do something I do it. If I don't then I don't start it.
 
aluminum tape over the holes and a skim of bondo is faster, still legal, cheaper
but
i would expect no less than this thread from you after getting to know you on Mud.
:clap:
 
Those clips are for your two-piece crank handle, not an engine crank. Each piece is about 2' long. I've never seen an engine crank on a diesel rig as new as yours.
That stepped tool is for installing your centre cap without whacking it directly with a hammer. Not sure what the other two are for.
Josh
 
I'm still here cutting and welding. I have a backlog of photos so here they come

IMG_2150.webp

IMG_2151.webp

IMG_2153.webp
IMG_2150.webp
IMG_2151.webp
IMG_2153.webp
 
set the gasket in place, looks good

IMG_2162.webp

IMG_2163.webp

on to the next door

IMG_2164.webp
IMG_2162.webp
IMG_2163.webp
IMG_2164.webp
 
IMG_2166.webp

IMG_2167.webp

can't tap the low spot from the weld out cuz I have no access so I have to put some body filler on it.

IMG_2168.webp
IMG_2166.webp
IMG_2167.webp
IMG_2168.webp
 
Just the bottom latch left to go.
IMG_2173.webp

IMG_2174.webp
its supposed to look like a mirror image of the top one here
IMG_2176.webp
IMG_2173.webp
IMG_2174.webp
IMG_2176.webp
 
Looks rough but with the latch and gasket in place it looks fine.

IMG_2224.webp

On to the drivers side door. This sticker is interesting. I haven't found any indications of a collision repair.
IMG_2179.webp
No one has ever been inside this door since it was assembled.
IMG_2177.webp
IMG_2224.webp
IMG_2179.webp
IMG_2177.webp
 
My first 40 series door tear down. It went well. got the glass and seals out pretty easy. The rust is a little more work.
IMG_2182.webp

IMG_2183.webp

I started by making some profile sections at work, kinda like I did with the back doors.

IMG_2184.webp
IMG_2182.webp
IMG_2183.webp
IMG_2184.webp
 
DO NOT FOLLOW ME LEAD HERE!!

Don't do it this way. I'll explain later. This is what I did. Don't do it this way.

I decided, without enough forethought, to cut away the inner panel rust and leave the outer panel intact. My thinking was I could use the outer panel to locate the inner one correctly. For that purpose it worked fine. So I cut away the inner panel and ground off what was left of the spot welds. I trimmed and added drain holes and spot weld holes to the patch. So far so good, right?
IMG_2185.webp

IMG_2186.webp

IMG_2187.webp
IMG_2185.webp
IMG_2186.webp
IMG_2187.webp
 
Then I flipped it over and cut away the outer panel rust. I trimmed a patch and welded it in.

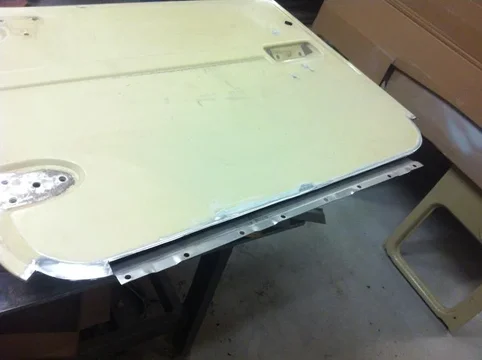
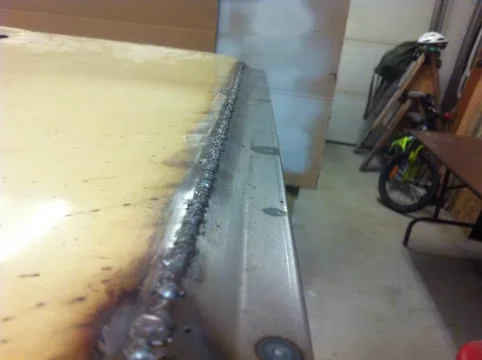
So whats wrong you ask? You can't see it well here and I stopped taking pictures cuz I was dealing with the issue. You can see a bit of it in the third pic here. The weld along the bottom of the outer skin shrank. That put a hugh oilcan effect into the door skin. It bulged up and down and up again. It was horrible.

For those that don't weld I'll attempt to explain. Welding is melting metal. Molten metal is hot. Hot things expand. The $Hitty part comes when hot things cool. They shrink when they cool. They don't shrink much but when you weld a line, even tack,tack,tack a little at a time it will shrink enough to notice. Normally I would deal with it by hitting it with a body hammer and dolly. The impact of the hammer mushrooms the weld bead and effectively stretches it back.

But I can't put a dolly behind this weld because_I_already_welded_the_inner_panel_in_place. :bang:
IMG_2190.webp

IMG_2191.webp

IMG_2193.webp
IMG_2190.webp
IMG_2191.webp
IMG_2193.webp
 
I was tired and too confident and things went from bad to worse. I started hammering and cutting and welding and things just got worse. I should have just walked away and come back later but I kept going. Worse and worse it got until I finally walked away. I am too embarrassed to post a pick of the carnage but suffice it to say there will be a skim coat of filler from the door handle down to cover my gaff.

What I should have done was cut out the inner panel and dolly the weld bead down before re-welding the inner piece in. Lesson learned.
 
I will show you the inner panel and corners finished up
IMG_2198.webp

IMG_2202.webp

IMG_2204.webp
IMG_2198.webp
IMG_2202.webp
IMG_2204.webp
 

Users who are viewing this thread

Back
Top Bottom