Navigation
Install the app
How to install the app on iOS
Follow along with the video below to see how to install our site as a web app on your home screen.
Note: This feature may not be available in some browsers.
More options
Style variation
You are using an out of date browser. It may not display this or other websites correctly.
You should upgrade or use an alternative browser.
You should upgrade or use an alternative browser.
81 BJ42 - I have to bring it home and pass inspection
- Thread starter Awl_TEQ
- Start date
This site may earn a commission from merchant affiliate
links, including eBay, Amazon, Skimlinks, and others.
More options
Who Replied?Let me know if ever you have the isatiable craving to fix more doors......
Only you would call a full restoration "cleaning it up to pass inspection".
Looks great though!
Craig.
Looks great though!
Craig.
Chamba
Too short. Too long. Just right: the 43
Now you HAVE to paint the top and front. How are you going to 'pass inspection' with that old, faded 464? What kind of Mickey Mouse operation you guy running up there letting rigs with faded paint pass inspection?
- Joined
- May 21, 2009
- Threads
- 296
- Messages
- 1,382
- Location
- Paradise Calgary Alberta Canada
- Website
- forum.ih8mud.com
While your at it check the metal integrity of the mount under the driver / passenger seat that bolt to the frame.
Mine was rotted and am in the process of rebuilding it.
Nice work on the floor plates !
How much ?
Nice work !
JMac

Mine was rotted and am in the process of rebuilding it.
Nice work on the floor plates !
How much ?
Nice work !
JMac
Hey - I hope you're not compromising that infamous Awl_TEQ quality and attention to detail for a quick pass on this inspection. 

Awl_TEQ
Supporting Vendor
- Thread starter
- #370
Only you would call a full restoration "cleaning it up to pass inspection".
Looks great though!
Craig.
Thanks Craig, I just want to do what I can now so I don't have to do ongoing repairs for a few years. Long term plan is frame off and now most of the rust issues will already be done.
Now you HAVE to paint the top and front. How are you going to 'pass inspection' with that old, faded 464? What kind of Mickey Mouse operation you guy running up there letting rigs with faded paint pass inspection?
I know right? Actually, from the back the new and old paint are real close but the front clip is real light and faded but I bet a good rub down would bring it back. I plan to remove the roof next summer and paint it all before the gutter rusts.
While your at it check the metal integrity of the mount under the driver / passenger seat that bolt to the frame.
Mine was rotted and am in the process of rebuilding it.
Nice work on the floor plates !
How much ?
Nice work !
JMac
Mine has a small hole on the drivers side and the passenger is solid. Not much left of yours!
Hey - I hope you're not compromising that infamous Awl_TEQ quality and attention to detail for a quick pass on this inspection.
I think Wayne had the best idea... aluminum tape and bondo! Coulda been wheelin two months ago!
- Joined
- Dec 8, 2006
- Threads
- 158
- Messages
- 2,974
- Location
- Greenfield, MA
- Website
- thecarpentryway.blogspot.com
Um, nice work, but wrong thread. I think you were looking for the 45 section and the thread "building more lpb beds..."
crushers
post ho
cool all the same.
i am almost tempted to buy a 45 just so i can get one of those beds PC and installed...
i am almost tempted to buy a 45 just so i can get one of those beds PC and installed...
Awl_TEQ
Supporting Vendor
- Thread starter
- #379
Ok, I think this is the right thread 
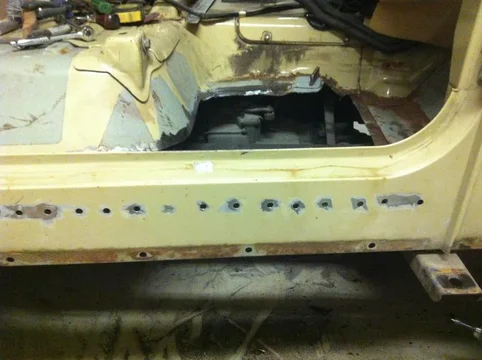
I cut out the rust on the firewall section of floor and the body mount support and welded in new metal

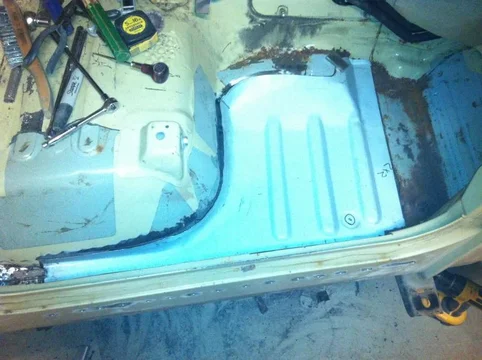
Minor complaint here about the floor pan replacement panels I got from 4wheelauto. They are half decent patch panels but are by no means a replacement panel. They seem to have been designed to just lay over top of the existing floor and weld in. I had to alter them in order to use them. That wasn't an issue for me but for most guys it likely would have been.
I had to cut 5 to 6" off of the front end because they extend well past the joint where the original panel welds to the body mount channel. To cut it off I had to first flatten it in a 60 ton press and then shear it off. I also had to flatten the outboard flange that runs down the rocker. For some reason the panels came with a flange bend upward that would cover the three holes in the rocker. Once flattened the panel was not wide enough to spot weld to the outer rocker like the original did. So I had to weld on a piece of sheet metal that was bent to provide the spot weld flange.
These panels will do what I intended but next time I will buy the CCOT panels as they are "replacement" panels rather than "patch" panels. One good thing about these panels is the "pan handle" section is full length where the CCOT panels terminate just after the curve.


I cut out the rust on the firewall section of floor and the body mount support and welded in new metal

Minor complaint here about the floor pan replacement panels I got from 4wheelauto. They are half decent patch panels but are by no means a replacement panel. They seem to have been designed to just lay over top of the existing floor and weld in. I had to alter them in order to use them. That wasn't an issue for me but for most guys it likely would have been.
I had to cut 5 to 6" off of the front end because they extend well past the joint where the original panel welds to the body mount channel. To cut it off I had to first flatten it in a 60 ton press and then shear it off. I also had to flatten the outboard flange that runs down the rocker. For some reason the panels came with a flange bend upward that would cover the three holes in the rocker. Once flattened the panel was not wide enough to spot weld to the outer rocker like the original did. So I had to weld on a piece of sheet metal that was bent to provide the spot weld flange.
These panels will do what I intended but next time I will buy the CCOT panels as they are "replacement" panels rather than "patch" panels. One good thing about these panels is the "pan handle" section is full length where the CCOT panels terminate just after the curve.


- Joined
- Dec 8, 2006
- Threads
- 158
- Messages
- 2,974
- Location
- Greenfield, MA
- Website
- thecarpentryway.blogspot.com
I was surprised you bought the panels from them, I once ordered a set and sent them back. Given the work you had to put in to get them to fit, would it have been - and i know hindsight is 20/20 - a better idea to fabricate from scratch?
And do you trust CCOT's product to fit well? at least you've got access to the kind of equipment that makes alterations a breeze, more or less.
enjoying the thread
And do you trust CCOT's product to fit well? at least you've got access to the kind of equipment that makes alterations a breeze, more or less.
enjoying the thread

Similar threads
Users who are viewing this thread
Total: 1 (members: 0, guests: 1)


