x2Stellar thread. Thanks for such careful documentation. Any updates?
Navigation
Install the app
How to install the app on iOS
Follow along with the video below to see how to install our site as a web app on your home screen.
Note: This feature may not be available in some browsers.
More options
Style variation
You are using an out of date browser. It may not display this or other websites correctly.
You should upgrade or use an alternative browser.
You should upgrade or use an alternative browser.
3FE Head Gasket
- Thread starter Rush
- Start date
This site may earn a commission from merchant affiliate
links, including eBay, Amazon, Skimlinks, and others.
More options
Who Replied?This has to be the most in depth 3FE head gasket thread ever. Makes me feel embarrassed at how I did it when mine blew. I feel so inadequate. Mine blew due to the prior owner using a fel-pro instead of a toyota gasket. Cleaned up both sides, threw in a new toyota head gasket and bolted everything back up.
- Thread starter
- #103
@TWILLY I've been itching to update and was going to wait until I had pretty pictures, but here goes.
I have 5 pistons in the block, one fell and got dented on the engine stand, and then the garage floor... don't ask. (Satisfied with the platigauge results, I was gently pushing the conrod off the crank to apply assembly lube and it shot out of the cylinder. I did the rest of them with the cylinders parallel with the floor after that.)
I got the replacement, just need to get it on the rod, do the rings, and it's in the block as well.
The main bearings (STD size) have platigauged to right around .002, with #4 at .003". The FSM calling for .001" -.0017, I shat my pants, and called them right away.
After talking to the head machinist and hearing this was intended, I'm OK. I trust the shop, they've built lots of low-RPM, pushrod inline sixes.
The conrod bearings come in at .0015" (STD as well), which I'm OK with.
The cam and lifters needed replacement, so I got the Melling 803 cam (~$220) and Toyota lifters (~$240).
It turns out the cam gear is fiber/composite, for noise reduction over the earlier F motors' steel one.
At ~200k on the existing gear, I'm spending the ~$130 for a new one.
The crank-side gear is steel, and was somewhere around $25, so I got that too.
Once I have the cam gear in hand, I'm 100% on parts and then the cam is in and I can start buttoning it all up.
I'll likely get the long block in first, and then reassemble the intake manifold -which is fresh and clean after a few days in the hot tank.
You will have photos, I assure you.
I have 5 pistons in the block, one fell and got dented on the engine stand, and then the garage floor... don't ask.
(Satisfied with the platigauge results, I was gently pushing the conrod off the crank to apply assembly lube and it shot out of the cylinder. I did the rest of them with the cylinders parallel with the floor after that.)I got the replacement, just need to get it on the rod, do the rings, and it's in the block as well.
The main bearings (STD size) have platigauged to right around .002, with #4 at .003". The FSM calling for .001" -.0017, I shat my pants, and called them right away.
After talking to the head machinist and hearing this was intended, I'm OK. I trust the shop, they've built lots of low-RPM, pushrod inline sixes.
The conrod bearings come in at .0015" (STD as well), which I'm OK with.
The cam and lifters needed replacement, so I got the Melling 803 cam (~$220) and Toyota lifters (~$240).
It turns out the cam gear is fiber/composite, for noise reduction over the earlier F motors' steel one.
At ~200k on the existing gear, I'm spending the ~$130 for a new one.
The crank-side gear is steel, and was somewhere around $25, so I got that too.
Once I have the cam gear in hand, I'm 100% on parts and then the cam is in and I can start buttoning it all up.
I'll likely get the long block in first, and then reassemble the intake manifold -which is fresh and clean after a few days in the hot tank.
You will have photos, I assure you.
- Thread starter
- #104
I just saw these, they didn't show until I'd replied!

Anyway, Thanks guys.
It means a lot to have people rooting for me (ahem, "us", as my 13yo reminds me) on this project.
It's a GIANT drag to buy a Super Reliable Toyota Land Cruiser and find half a gallon of coolant has migrated magically into the oil pan on the drive home. (I paid cash, no recourse.) And yes I checked the oil during the test drive, the guy selling it must have timed things perfectly.
Anyway, I'm glad I'm _almost_ able to drive it for the third time ever, and it keeps me moving forward on the "$100 head gasket replacement" to know others are along for the ride.")
You probably didn't find evidence of idiocy to the point of not replacing the alignment dowels/pins the last time the gasket was done... 3FE Head GasketThis has to be the most in depth 3FE head gasket thread ever. Makes me feel embarrassed at how I did it when mine blew. I feel so inadequate. Mine blew due to the prior owner using a fel-pro instead of a toyota gasket. Cleaned up both sides, threw in a new toyota head gasket and bolted everything back up.
Anyway, Thanks guys.
It means a lot to have people rooting for me (ahem, "us", as my 13yo reminds me) on this project.
It's a GIANT drag to buy a Super Reliable Toyota Land Cruiser and find half a gallon of coolant has migrated magically into the oil pan on the drive home. (I paid cash, no recourse.) And yes I checked the oil during the test drive, the guy selling it must have timed things perfectly.
Anyway, I'm glad I'm _almost_ able to drive it for the third time ever, and it keeps me moving forward on the "$100 head gasket replacement" to know others are along for the ride.
I feel you- "our" 1st Cruiser was almost by mistake... wife found it while we were saving up to get 'something else'. Was a pretty good price to purchase, but immediately was chasing the CEL/starting gremlins, replaced entire exhaust system, bought HF press to do all suspension bushings, OME suspension parts... down the rabbit hole we go!I just saw these, they didn't show until I'd replied!
You probably didn't find evidence of idiocy to the point of not replacing the alignment dowels/pins the last time the gasket was done... 3FE Head Gasket
Anyway, Thanks guys.
It means a lot to have people rooting for me (ahem, "us", as my 13yo reminds me) on this project.
It's a GIANT drag to buy a Super Reliable Toyota Land Cruiser and find half a gallon of coolant has migrated magically into the oil pan on the drive home. (I paid cash, no recourse.) And yes I checked the oil during the test drive, the guy selling it must have timed things perfectly.
Anyway, I'm glad I'm _almost_ able to drive it for the third time ever, and it keeps me moving forward on the "$100 head gasket replacement" to know others are along for the ride.
 Looking forward to spring when we can actually take her out on the trails! This 'Mud Family' has been a great resource of information and encouragement. Keep up the good work!
@TWILLY I've been itching to update and was going to wait until I had pretty pictures, but here goes.
I have 5 pistons in the block, one fell and got dented on the engine stand, and then the garage floor... don't ask.
I got the replacement, just need to get it on the rod, do the rings, and it's in the block as well.
The main bearings (STD size) have platigauged to right around .002, with #4 at .003". The FSM calling for .001" -.0017, I shat my pants, and called them right away.
After talking to the head machinist and hearing this was intended, I'm OK. I trust the shop, they've built lots of low-RPM, pushrod inline sixes.
The conrod bearings come in at .0015" (STD as well), which I'm OK with.
The cam and lifters needed replacement, so I got the Melling 803 cam (~$220) and Toyota lifters (~$240).
It turns out the cam gear is fiber/composite, for noise reduction over the earlier F motors' steel one.
At ~200k on the existing gear, I'm spending the ~$130 for a new one.
The crank-side gear is steel, and was somewhere around $25, so I got that too.
Once I have the cam gear in hand, I'm 100% on parts and then the cam is in and I can start buttoning it all up.
I'll likely get the long block in first, and then reassemble the intake manifold -which is fresh and clean after a few days in the hot tank.
You will have photos, I assure you.
No but I found enough to doubt everything the prior owner assured me of. I am coming up on a year since the the head gasket change which has been about 6000 miles and I still have my fingers crossed. I was told lies that didnt even make sense to lie about after I had already paid him. I sold cars for a living in a previous life and know all about caveat emptor so I wasnt caught off guard but I would have definitely gone through and done more preventive maintenance stuff. I bought it a year and a half ago and it has been my daily driver for 15 months and 10,000 miles. I love driving it but am hyper sensitive to little quirks and hiccups. I still get nervous on cold mornings when I see steam coming out of the exhaust.
- Thread starter
- #107
No but I found enough to doubt everything the prior owner assured me of. I am coming up on a year since the the head gasket change which has been about 6000 miles and I still have my fingers crossed. I was told lies that didnt even make sense to lie about after I had already paid him. I sold cars for a living in a previous life and know all about caveat emptor so I wasnt caught off guard but I would have definitely gone through and done more preventive maintenance stuff. I bought it a year and a half ago and it has been my daily driver for 15 months and 10,000 miles. I love driving it but am hyper sensitive to little quirks and hiccups. I still get nervous on cold mornings when I see steam coming out of the exhaust.
Yikes, glad it went that well, all things considered.
But yes, I know the feeling of dread that the motor's about to go.
- Thread starter
- #108
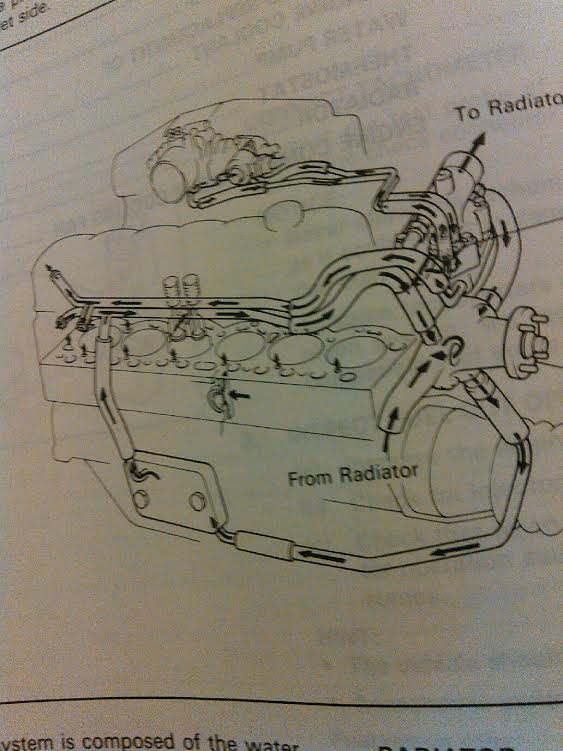
I'm finally at the point in this build that I need the little heater hoses.
In the below image there's a hose coming straight down out of the pump, around the crank pulley, and to the oil cooler.
I've had a hell of a time finding that part#, is it known?
For instance, this only lists it as "15777":
In the below image there's a hose coming straight down out of the pump, around the crank pulley, and to the oil cooler.
I've had a hell of a time finding that part#, is it known?
Does anybody sell a "set" of these hoses? If not, does anybody have part numbers for at least the two that go out of the water pump toward the heater core, and then back into the water pump from the heater?
For instance, this only lists it as "15777":
Last edited:
That hose is nothing special. Just heater hose. It appears to be 99556-30300 ($18.70). Probably $2 at an autobox store.I'm finally at the point in this build that I need the little heater hoses.
In the below image there's a hose coming straight down out of the pump, around the crank pulley, and to the oil cooler.
I've had a hell of a time finding that part#, is it known?
For instance, this only lists it as "15777":
- Thread starter
- #110
That hose is nothing special. Just heater hose. It appears to be 99556-30300 ($18.70). Probably $2 at an autobox store.
Thanks, man.
I ordered 99556-30210 - Toyota Parts Deal and recieved it, and as you say, it's just heater hose.
I'll try it today and let you know.
99566-30210 superceeds to 99556-30300.Thanks, man.
I ordered 99556-30210 - Toyota Parts Deal and recieved it, and as you say, it's just heater hose.
I'll try it today and let you know.
- Thread starter
- #112
Yes, and sorry. I neglected to explain that's why I got that one instead of the number you gave.99566-30210 superceeds to 99556-30300.
Thanks for confirming, man.
- Thread starter
- #113
All 6 pistons: in
Camshaft: in
Took a drive to @LC Parts Yard yesterday, and looked longingly at the cruisers they're parting out.
Soon.
Camshaft: in
Took a drive to @LC Parts Yard yesterday, and looked longingly at the cruisers they're parting out.
Soon.
- Thread starter
- #114
So after finally completing my last semester of grad school, I have time to work on the motor again.
Torqued the conrod caps, and after #5... the crank won't budge. The engine stand will topple, literally, before the crank will spin.
I inspected, and found a nick in the journal on the shaft. Deeep gouge in the bearing.
Out they all come, and #1's really scuffed up too, despite there being plenty of assembly lube, just no scratch.
The good news is that I'm really fast at removing pistons (with hose over the threads this time) and the crankshaft.
I'm just glad I went with cheapo ITM bearings.
I'll have it to the machinist again tomorrow, and update once I've got it back in hand.
- Thread starter
- #115
Shop said I just had two of the caps switched, no need to machine anything. The nicks on the crank came out with polishing, so I should be set to assemble now.
- Thread starter
- #116
Most everything's on/in, just playing with the misshapen oil pan now.
Then it's externals -> block and maybe a swap or something.

Then it's externals -> block and maybe a swap or something.
Curtice
SILVER Star
Looking good. Once you get the oil pan installed, would like your thoughts. I got mine bolted up and torqued, but it just didn’t feel right, especially at the arches...seems not nearly right enough to stop leaks. I torqued in a crisis cross pattern, but read it’s best to torque from the middle and work your way out. So thinking of redoing it.
- Thread starter
- #118
Looking good. Once you get the oil pan installed, would like your thoughts. I got mine bolted up and torqued, but it just didn’t feel right, especially at the arches...seems not nearly right enough to stop leaks. I torqued in a crisis cross pattern, but read it’s best to torque from the middle and work your way out. So thinking of redoing it.
Fire away, matey:
- Thread starter
- #119
On the oil pan... I went around it a bunch of times, because the neighboring bolts getting just a bit tighter did loosen them up some. The overall idea is to let the cork swell as it absorbs a bit of oil, so I'm not super concerned that it'll leak. Also, we're evidently supposed to retorque it after a couple hundred miles.
Curtice
SILVER Star
Awesome thanks. Makes me feel much better. I still think I’m gonna loosen slightly and retorque working from the middle out. But your picture looks like mine in terms of how tight.
Similar threads
Users who are viewing this thread
Total: 1 (members: 0, guests: 1)