2H with high oil pressure (1 Viewer)

This site may earn a commission from merchant affiliate
links, including eBay, Amazon, Skimlinks, and others.

Joined
Oct 13, 2015
Threads
39
Messages
195
Location
Cedar Park (Austin), TX
I have an FJ62 with a 2H (nonturbo). A couple of days ago, I noticed that the oil pressure gauge was pegged. It started happening out of the blue.

Right when I turn it on, the gauge climbs up and stays there.

I've read that I simply need to get a new pressure release valve. Is that all there is to it?

The 2H manual I have seems less than clear about where exactly it's found on the engine and what the removal/replacement steps are.

I'd appreciate any advice.

Best,

Ara
 
It's located here, behind this 22mm cover..

upload_2016-9-8_15-59-1.png


This is the part you need.. a longer valve from Terrain Tamer:

14102606_10154395061127305_8177039586037953396_n.jpg


4x4 Accessories and Parts Online in Australia for Land Cruiser, Nissan & Toyota - Terrain Tamer 4WD Parts


Terrain Tamer's part number is 15131-22010S

Getting the old valve out can be a little tricky. I've found that finding a screwdriver handle, or a wooden dowel that is just slightly oversize of the internal diameter of the valve is the way to go.. having the replacement part available so you can select the right tool is useful prior to starting this job:

  • Remove the 22mm cover.
  • The spring will be hanging there, take the spring out (it will be reused)
  • Push your chosen tool in and wedge the old valve on it and gently ease it out.
  • Install the new valve into the bore (hole) after smearing oil over it, seat it all the way in until it stops
  • Replace the spring
  • Replace the 22mm cover ensuring the brass crush washer is still in place (it should be replaced really)
  • Torque it down.. not too tight.

Others have reported alternative approaches to getting the valve:
  • Just cranked the engine over a tiny bit (dont let it start) with the 22mm cover off.. it will shoot the valve out and leave quite a mess.. I dont like this approach.
  • Removed the spring, then replaced the cover bolt and cranked the engine over.. this will force the valve forward and allow you to retrieve it.

Here's a photo of what the factory part looks like it.. you can see the wear thats occurred.. and you can see how much shorter it is than the Terrain Tamer part:

14054237_10154395061207305_2461643183190052159_n.jpg


You should probably check that your oil pressure sender wire hasnt just fallen off and is touching earth first though..

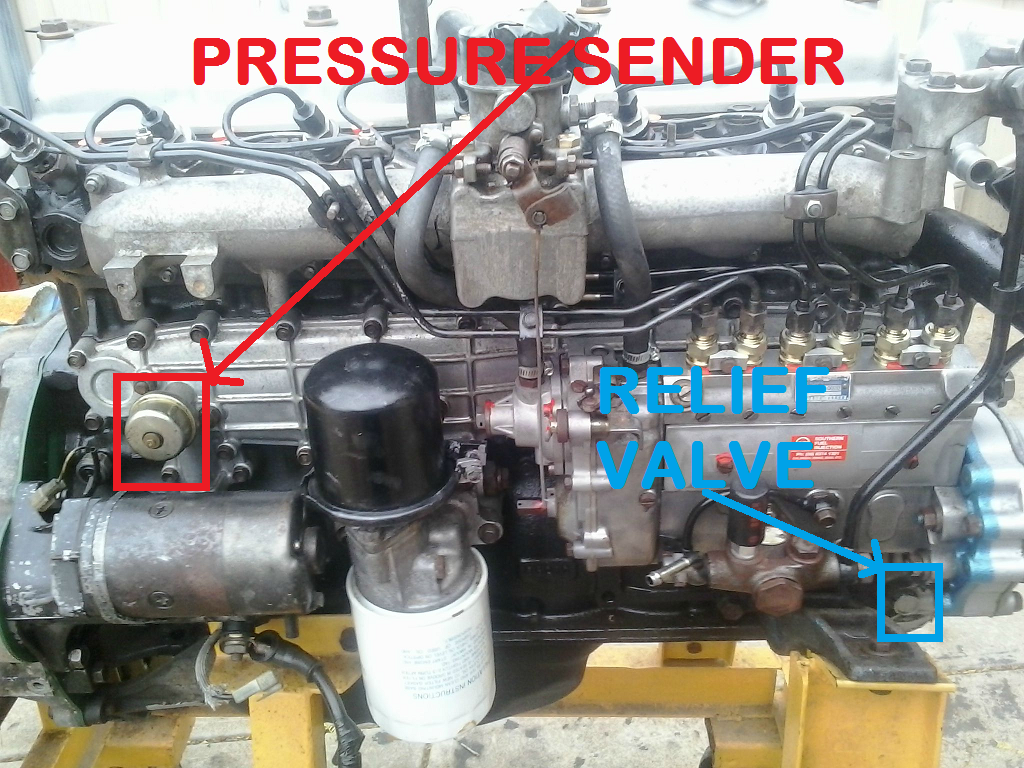
This is where the oil pressure sender is... there's a small chance its faulty as well.. but its worth changing that valve anyhow:

PITk635.png


This is the screw driver I use to fish out the old valve.. its just slightly oversize of the internal diameter of the valve.. I can force it into the valve and withdraw the valve stuck on the end of the screw driver handle:

aPiGLk1.jpg


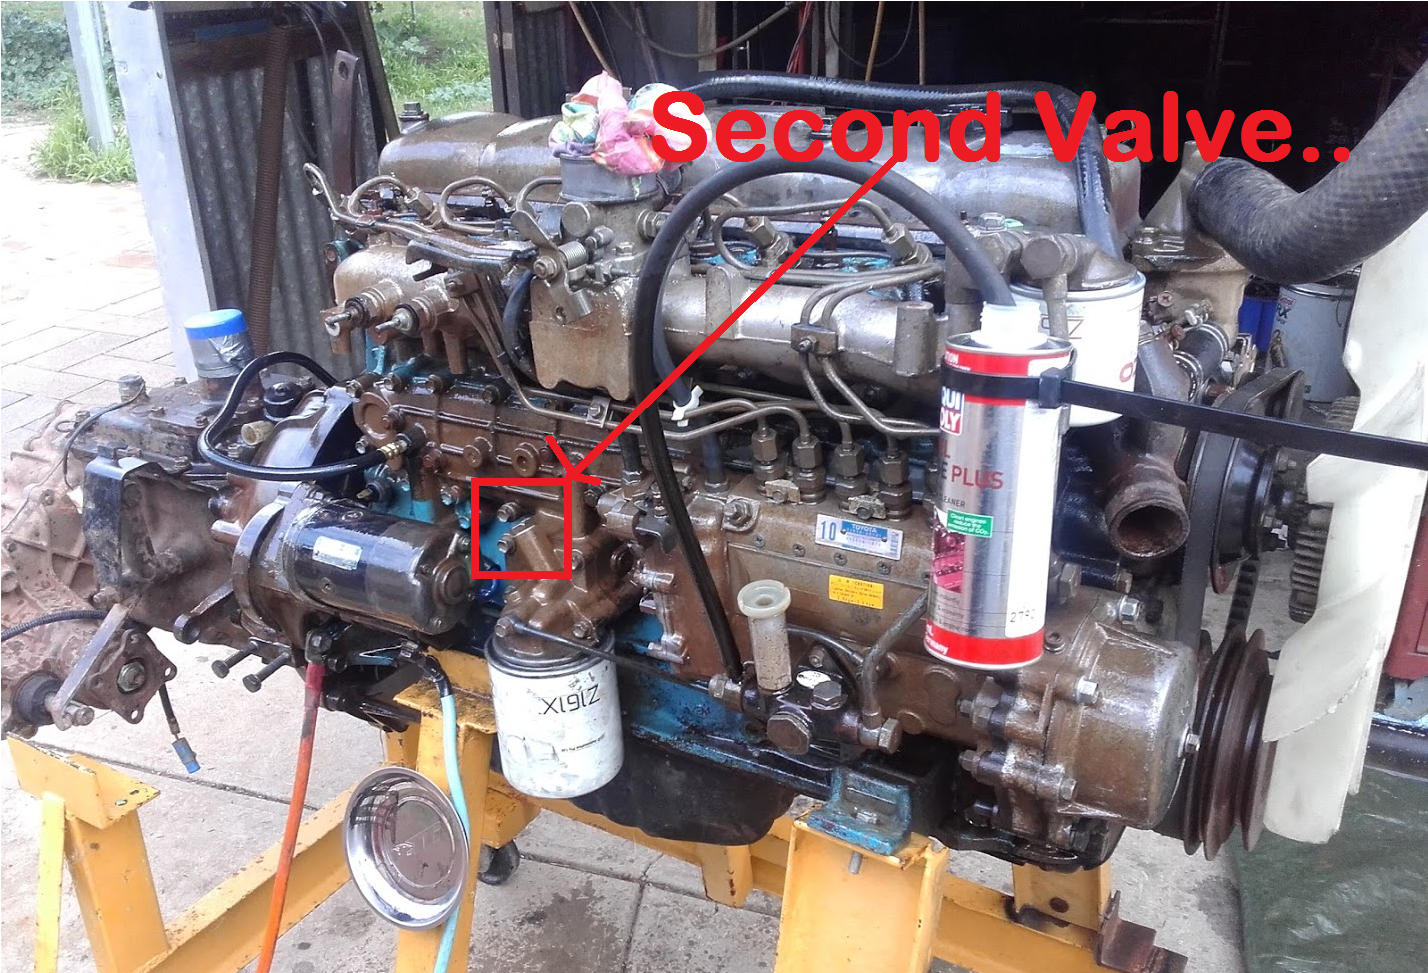
There is a second relief valve in the Oil Filter housing.. but I've never known this one to fail.. its located here..

sMvre0O.png
 
Last edited:
Great post @duncanrm FAQ material for sure ..

I'm not positive which impact would have, the longer valve ..?
 
Did you know how «high» is your pressure ? How about a mecanic oil pressure gauge ?

asdgasr.jpg


Cold, my engine oil pressure toped slightly over the FSM spec. I change the valve with a OME without any change. I stop getting scare of that for a while since the pressure drop significantly when the engine is hot.
 
Update: I pulled the wire off the old sender and the gauge went dead. I put the wire back on and the needle pinned up at H. I tested with the engine cold, off, and with the key in ACC. That makes me think the issue is the sender.

I got a new sender and put it on, which was a real bear because this thing (that I'm pointing at in the picture) made wrenching difficult (what is it?)

XbdMX2FClz3zuCPNajwAxOOkRpLCOf_-v-eMqpNe0tTJG7wcVj2WY76ohywRtqI24TN_62lKWoAU4pj2uXpvmAVglhsGH6K_rlSXZ4LrKkHzt5nBKZBJDUsi8adEFDNZTvqHxgI1imAntsoccgjLNz-eEQcj61UbnvTELeCW5XPDh7uFOBXggD3LBqwKoVXeSZz3M_OCxDbJtDPTyM_hvoJPTpgej1DipXUAYdZqcMvZRK6UJ3yjdHQtKs9_sI4snbUHv4d7rhMBps9b_exmKYvQpjDixxJSjFhi2VZpsL5tEq1Gr7e_2aamWcEiHQWNKfD93nffblQ0lGFNkwU3HGhRBZ0xYa9Ximb7fHBB4BUUyz17Rgz4S7NXeMlYgtX4G91G4r30ccd16YnubJevzo-dMXny6N6cjknC1KQRn030kEpYGhj3qKHxub3e7zMJWsOTiHee3x_oOoJ1HmbSOXpgNrM2yXHqlUW40YW6DnGVe1pjQeIsJb8v7apSOWkpLDhYwwKl4WY_PDM7Gn_wcPEL6r5zRr2jpWCXCyrKssMoi9yDtoSNpssHfKKlYSGvQB-F0GntPUbJ2WXDQSAOaOdsTEJfTk4v9jR7l2D0T_vpTZtkeg=w1914-h1437-no


Anyway, I got the new sender installed but now I'm not getting any reading, the needle doesn't move at all when I turn the key, to ACC or even when I start it.

I couldn't find a torque spec on the sender, but I couldn't fit a torque wrench back there if I wanted. I just tightened until it became pretty difficult.

I might pick up a pressure gauge and check it out. Is it a standard size thread for oil pressure senders, so that a pressure gauge from an auto parts store would fit?

Also, how do you get to the relief valve with the engine still in the car? Meaning, is it even possible without the hands and arms of a small child?

Thanks,

Ara
 
The thing you're pointing at is your EDIC Motor.. it shuts off your engine when you switch off the ignition.

I'm not familiar with accessing the front Oil Pressure Relief valve on a 60 series, there's likely a bash plate in the way? From your description, the sender does sound faulty though so you may not even need to change the valve.

One of our local Aussie Legends Allan Gray is familar with the job, maybe there's a few tips in this video

 
Last edited:
Wow. Again, I'm flabbergasted by the detail and information here. Thanks, duncanrm.

The video, at 3:08, shows exactly where the relief valve is.

This thread needs to be a sticky or saved somewhere.
 
I did this job in an FJ62 (converted to 2H) over the last two days. It was a pain, partially because I'd forgotten about this video.

Lessons:

1. Either get a stubby 22 mm wrench or buy a regular one and cut it in half. A regular length 22 mm wrench will be too long to turn because the tie rods get in the way. Also, because of the power steering pump location, a socket will not work. You can fit the socket over the bolt but you won't fit your ratchet or a wobble (or you'll get your wobble wedged in, like I did).

2. To get the plug out after removing the spring, replace the cover bolt, pop the ignition or even turn the engine on for a quick second. Then pull out the cover and hopefully the plug falls right out. If it doesn't, you'll have to leave the cover bolt off when you bump the ignition. That's what I did, and it didn't work until I finally accidentally started the motor.

3. It will be difficult to replace the cover bolt once the new plug and spring are in place. This is because you need to compress the spring enough for the cover bolt to gain purchase on the female threads on the engine block. This is difficult but doable. The only advice I have is to wipe away any grease or oil from the surrounding area and make sure your fingers and bolt are clean so that you don't slip as you're trying to seat and turn the bolt.

Also, lay a large piece of cardboard under a drain pan that you place under and beside the valve location. I dumped some oil on my plywood. I wish I'd had cardboard and a drain pan.

The service manual says to crank the cover bolt to 36 ft-lbs, but I couldn't get my torque wrench in there, so I just went as tight as I could. I'll check tomorrow for leaks.

If you start with the right tools (stubby wrench, drain pan, cardboard, headlamp), there is no reason you shouldn't finish this job in an hour. I fumbled around and it took about 2 or 3 total, and much of that was trying to unwedge my stuff.

Also, my initial test still showed elevated pressure, but I only have the dash gauge to judge. I'll try again tomorrow and see what happens when I'm actually driving.

Best,

Ara
Old thread, but how did this turn out? Did replacing the relief valve help lower the oil pressure on your dash gauge? My 60 (with a 2H) just spiked to High on the dash gauge during lunch today. When idling, it dropped down to a bit above 3/4, but as soon as you rev it climbs to the H high mark. Just started doing this, had been fine all week driving every day. Any advice would be great.
 
Replacing the valve did it for me. Do like I wrote above and you'll be all right. Don't bother with a 22mm socket, you'll get it wedged up in there and have a hard time getting it out. If you get a 22mm wrench and cut it, you'll be fine. Slip a length of pipe over the handle if you need additional leverage.

Finally, once you get the plug bolt loose, pop the ignition or even turn the engine on for a quick second, then finish backing the plug out all the way. That's the best way to get the actual valve out without making a mess on your floor.

I'm still right in the sweet spot on oil pressure six months later. Let me know if you have any other questions or concerns.

Just getting around to trying to fix my high oil pressure problem(only when cold on startup, then settles down when warmed up). Got all the OEM parts needed and a cut off 22mm wrench as instructed:
IMG_7178.JPG


But am having this problem:
IMG_7180.JPG

IMG_7182.JPG

IMG_7184.JPG

The 22mm bolt is rounded off and it now seems impossible to get that bolt off. It's very tight up in there to begin with, but with it all rounded off like that, it appears I have no space to do anything to get that bolt out. Really hoping for some encouraging advice or suggestions.
 
Oh man, that's no good. There's no clearance to get an EZ Out in there. Maybe spray it with penetrating oil for a couple of days and tapping/knocking with a screwdriver and hammer. It's just grime holding it in there, that and the pressure against the threads all these years.

If oil and knocking don't help, you could try using a small Dremel or grinder to cut a goove where your flathead screwdriver can gain some purchase, then hammer the end of the screw driver to get the bolt to move.

In this video, the guy does it with a chisel.

Something like this is probably your best bet and you won't have to buy anything else.

There are also some tools they make for this, although most as sockets that are too tall to fit in this space. There might be some box end types, though. I just googled it and saw something that Craftsman makes, but I don't know if they'll go all the way up to 22mm.

If all else fails, I guess take it to a shop and see if they have some low-clearance air tools.

Good luck,

Ara
 
It's located here, behind this 22mm cover..

View attachment 1318533


This is the part you need.. a longer valve from Terrain Tamer:

14102606_10154395061127305_8177039586037953396_n.jpg


4x4 Accessories and Parts Online in Australia for Land Cruiser, Nissan & Toyota - Terrain Tamer 4WD Parts


Terrain Tamer's part number is 15131-22010S

Getting the old valve out can be a little tricky. I've found that finding a screwdriver handle, or a wooden dowel that is just slightly oversize of the internal diameter of the valve is the way to go.. having the replacement part available so you can select the right tool is useful prior to starting this job:

  • Remove the 22mm cover.
  • The spring will be hanging there, take the spring out (it will be reused)
  • Push your chosen tool in and wedge the old valve on it and gently ease it out.
  • Install the new valve into the bore (hole) after smearing oil over it, seat it all the way in until it stops
  • Replace the spring
  • Replace the 22mm cover ensuring the brass crush washer is still in place (it should be replaced really)
  • Torque it down.. not too tight.

Others have reported alternative approaches to getting the valve:
  • Just cranked the engine over a tiny bit (dont let it start) with the 22mm cover off.. it will shoot the valve out and leave quite a mess.. I dont like this approach.
  • Removed the spring, then replaced the cover bolt and cranked the engine over.. this will force the valve forward and allow you to retrieve it.

Here's a photo of what the factory part looks like it.. you can see the wear thats occurred.. and you can see how much shorter it is than the Terrain Tamer part:

14054237_10154395061207305_2461643183190052159_n.jpg


You should probably check that your oil pressure sender wire hasnt just fallen off and is touching earth first though..

This is where the oil pressure sender is... there's a small chance its faulty as well.. but its worth changing that valve anyhow:

PITk635.png


This is the screw driver I use to fish out the old valve.. its just slightly oversize of the internal diameter of the valve.. I can force it into the valve and withdraw the valve stuck on the end of the screw driver handle:

aPiGLk1.jpg


There is a second relief valve in the Oil Filter housing.. but I've never known this one to fail.. its located here..

sMvre0O.png

Is the second valve the same as the front valve, in regards to spring size and the valve size?
 
Did you know how «high» is your pressure ? How about a mecanic oil pressure gauge ?

View attachment 1319044

Cold, my engine oil pressure toped slightly over the FSM spec. I change the valve with a OME without any change. I stop getting scare of that for a while since the pressure drop significantly when the engine is hot.

OK, It is not not because I like to quote myself...

I'm not more concerne that I was but I try to give a chance to the Terrain Tamer longer valve to see if that change something.

... Look like it did not change at all !

But I have a question to the people that have change this valve : --> did the spring remains slightly out of the block and need to be push by the plug while we screew it back ?
 
Last edited:
Yes, can be difficult to get in, but just keep trying.

Oh no ! I did not have difficulty to scew the plug. Actualy it is screwed back. I just wonder if the spring supose to fit all in or not. I was under the impression that if the spring still slightly out and screw the plug, the valve was puch to firmly in the block by the spring.
 
It's located here, behind this 22mm cover..

View attachment 1318533


This is the part you need.. a longer valve from Terrain Tamer:

14102606_10154395061127305_8177039586037953396_n.jpg


4x4 Accessories and Parts Online in Australia for Land Cruiser, Nissan & Toyota - Terrain Tamer 4WD Parts


Terrain Tamer's part number is 15131-22010S

Getting the old valve out can be a little tricky. I've found that finding a screwdriver handle, or a wooden dowel that is just slightly oversize of the internal diameter of the valve is the way to go.. having the replacement part available so you can select the right tool is useful prior to starting this job:

  • Remove the 22mm cover.
  • The spring will be hanging there, take the spring out (it will be reused)
  • Push your chosen tool in and wedge the old valve on it and gently ease it out.
  • Install the new valve into the bore (hole) after smearing oil over it, seat it all the way in until it stops
  • Replace the spring
  • Replace the 22mm cover ensuring the brass crush washer is still in place (it should be replaced really)
  • Torque it down.. not too tight.

Others have reported alternative approaches to getting the valve:
  • Just cranked the engine over a tiny bit (dont let it start) with the 22mm cover off.. it will shoot the valve out and leave quite a mess.. I dont like this approach.
  • Removed the spring, then replaced the cover bolt and cranked the engine over.. this will force the valve forward and allow you to retrieve it.

Here's a photo of what the factory part looks like it.. you can see the wear thats occurred.. and you can see how much shorter it is than the Terrain Tamer part:

14054237_10154395061207305_2461643183190052159_n.jpg


You should probably check that your oil pressure sender wire hasnt just fallen off and is touching earth first though..

This is where the oil pressure sender is... there's a small chance its faulty as well.. but its worth changing that valve anyhow:

PITk635.png


This is the screw driver I use to fish out the old valve.. its just slightly oversize of the internal diameter of the valve.. I can force it into the valve and withdraw the valve stuck on the end of the screw driver handle:

aPiGLk1.jpg


There is a second relief valve in the Oil Filter housing.. but I've never known this one to fail.. its located here..

sMvre0O.png
Do you have any idea on where I can find a valve for the 1 above the oil filter. Or is it the same as the front valve?
 

Users who are viewing this thread

Back
Top Bottom