Builds 2F Retirement/ Vortec Resto-Fresh (1 Viewer)

This site may earn a commission from merchant affiliate
links, including eBay, Amazon, Skimlinks, and others.

That's exactly what im doing with my air box.
I cut the square section off and added a 4" diameter elbow..
Im being lazy as I need to reroute my heater lines so that the rest of the air-box sits without rubbing into anything....
Im just wondering if the cheap snorkel flexhose will fit into the airbox intake without any more modifications.
I like the idea of the steam-port into the radiator. I hooked mine to the heater hoses....
Got any more pics of that rad? it looks thicker than the stock rad.
Does it mount to the stock rubber grommets ?
 
The Griffin radiator is thicker than the OEM. It fits directly in place and uses the OEM rubber mounting grommets. Make sure that if you order a radiator for the Vortec swap to have them swap the top tube and filler neck and size the necks to match the vortec as the OEM sizes are different.

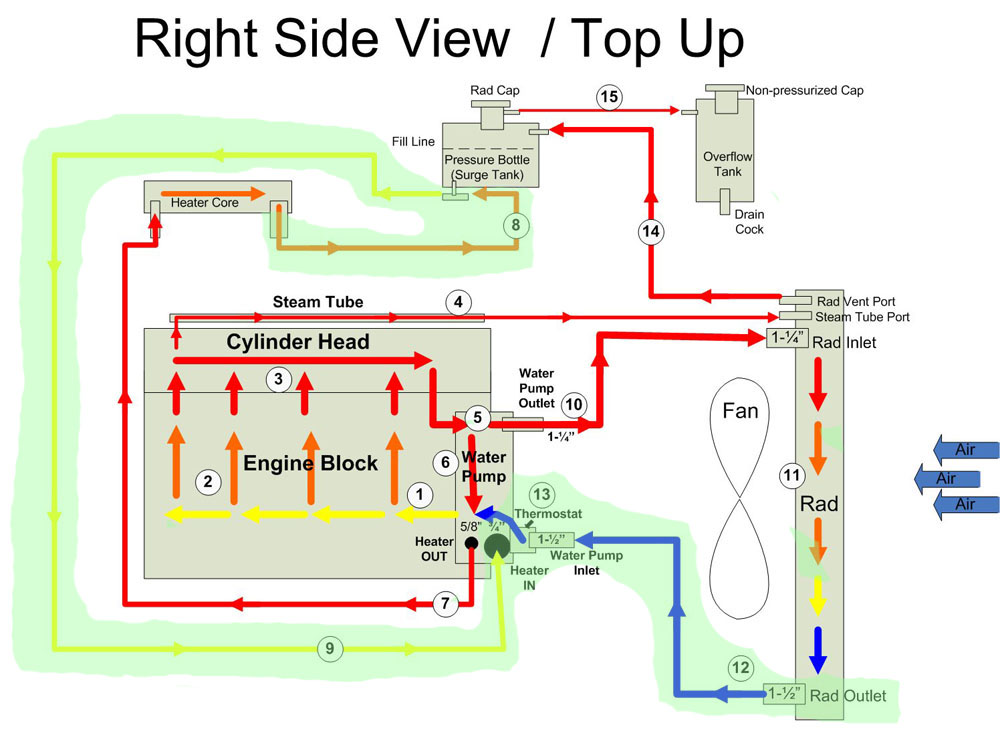
You want the steam port to dump in the top of the radiator. The purpose is to dump steam (air) in the highest point of the system. @MANUCHAO , dumping it in the heater hose will not benefit the system. That dumps the air in a part of the system that is not always flowing for one thing. It also dumps it so that it is going straight for the water pump to be re circulated.

I lifted this from an article by Bill Ansell on Pirate It is a good read http://www.pirate4x4.com/tech/billavista/Cooling/

LS%20cooling%20system%20-%20numbered%20-%20pressure.jpg
 
Thanks for that info @NCFJ .
Good read as well..
Well, guess I gots some work to do.
I'll reroute the steam port hose to the current rad....
 
Thanks guys, couple pics of the radiator

1908457_861696847194541_2159012938993298218_n.jpg

10252146_864384890259070_3341991367287574912_n.jpg
 
@NCFJ are you going to start selling that custom shroud? I know that a few of your builds I have looked at all seem to have it (or what looks like very similar). I know that my 2F will not last forever nor will gas prices under $3/gallon so something that is more economic like the Vortec will be in the works (told the wife that is what I want for my 40th and we will call it my "mid-life crisis" abatement program)
 
@gregnash I make the shrouds one off, don't even have any dimensions written down. Big problem is that the box that attaches to the ring is pretty much fixed, the ring size and location is all dependent on where the customer located the motor in the engine bay. It can be done but would be custom to each job. Custom to each job = not cheap
 
Radiator Fan Shroud Complete

Here's my solution for a radiator shroud. Certainly not as sexy as the one fabbed by NCFJ but should prove serviceable.

Followed the basic premise offered by this very useful site: Making a Custom Fan Shroud. I used 3/4" particle board for my template as the added thickness made it practical to attach some 3/4" aluminum angle for mounting to radiator.

Here's the template with fabric stretched over it and first coat of resin.
image.jpg


Wood template cut away and laying in the fiberglass. Messy, sticky process.
image.jpg


Cleaned up the fiberglass and aluminum angle attached. I cut it in half for ease of installation and future serviceability.
image.jpg


And here it is installed after a bit of filler, sanding and paint. Used some machine screws with nylock nuts to secure the two halves.
image.jpg


Happy with it. It clears everything (just barely) and now my cooling system is complete.

Next up - drive shafts!

-Ed
 
Last edited:
That is exactly how I did mine down to the aluminum frame and rivets...except no split

Yours came our SUPERB!!
Thanks! i won't lie, the split made it super easy to install.
 
Nice job on the fan shroud! The split woks well.
 
Drive Shafts Done

Picked them up yesterday and got them in this morning. Had them balance, of course, and install the new u-joints I got from Onur.

Pic of the U-joints. I'll be honest - I couldn't make any sense of the directions o_O
image.jpg


image.jpg


The drive shaft shop reduced the diameter of the front shaft slightly. I asked for 2 1/4" but they used 2 1/2" tube (stock is 2 5/8"). Said they didn't have 2 1/4" tube in stock.

Here's what I'm left with for clearance to the trans oil pan. Yikes! I'm sure there will be some rubbing but I think it will be Ok.
image.jpg
 
I'm sure you considered this but you aren't concerned about heat with that fan shroud? That's fiberglass right?
 
I'm sure you considered this but you aren't concerned about heat with that fan shroud? That's fiberglass right?

I've been running a similar fiberglass shroud on my 40 for a couple years. Never had an issue.

-Ed
 
Nice job on that shroud. A little heat and a hammer would get you a little more clearance on the front drive shaft.
 
Yeah was just going to ask if you could "massage" that area in the trans pan to give yourself a bit more clearance. And shroud looks phenomenal!!! You are having way too much fun with this.
 
Nice job on that shroud. A little heat and a hammer would get you a little more clearance on the front drive shaft.

I took your advice and massaged mine pretty good. I got impatient and skipped the heat and just left the pan attached.

It seems to have done the trick. I've tested it pretty hard with no issues.
 
Any chance of denting/damaging the oil pan with the drive shaft if you ever flex the truck/heavily load the rear? I know the axle stays pretty centered when flexed but you wouldnt want to wheel up on a rock, tap the gas and gouge into your trans pan...
 

Users who are viewing this thread

Back
Top Bottom