1985 2f engine pull and replacement thread (1 Viewer)

This site may earn a commission from merchant affiliate
links, including eBay, Amazon, Skimlinks, and others.

Great-
Your camera will be your friend during disassembly. Take way more pictures than you think is necessary of everything before, during & after removal. Then label everything very carefully.

There are a lot of specific bolts that are intended for a specific location. Don't just toss removed bolts into a bucket.

One way to be a sure that every bolt gets returned to is original location is to take a picture of it in calipers with a note next to it. Like below.

When the project drags on, it's almost impossible to remember what went where. Your camera will save you.

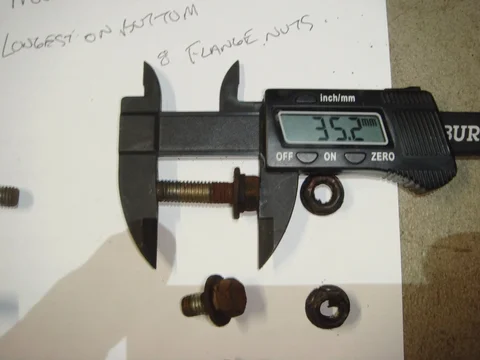
image.jpeg image.jpeg
 
Little more progress today. I know these posts are probably boring, but in my reading through this forum, the more detailed posts seem to be the most helpful. I was able to pull the radiator today, unhooked the hoses first, then unbolted the fan shroud, then I pulled the radiator, and finally got that fan shroud out. I plan on doing the fan shroud mod to make getting in there a little easier in the future.
IMG_3063.jpg

IMG_3062.jpg


After I got done with that I started cleaning up the passenger side of the engine, pulling vacuum hoses and spark plug wires. I was also able to unbolt the AC compressor and move it to the side. I've been trying to follow your advice @OSS and stay as organized as possible. I've been keeping the bolts for each part in ziplocs labeled with the part they came off of and if they are different sizes taking pictures and labeling them using markup on the iphone.
IMG_3072.jpg
IMG_3078.jpg


IMG_3080.jpg
 
Use a ratchet strap to drag the AC compressor up & forward & hold it there, then there will be just enough hose to allow moving the AC condensor in front of the bumper so it can swing down to the floor for actual engine removal.
Once the engine is out, the condensor can be rested on the front bumper to avoid stressing hoses & pipes.
 
Lessons learned for those attempting for the first time.

I decided to pull the whole combo of engine, transmission and transfer case. I had some help and I had a 2 ton hoist, so I decided why not. I want to rebuild the transfer case, as well as replace the transmission so I figured now is a good time. I don't think I would have tried it with a 1 ton hoist.

That being said, I used the FSM instructions on removing the transmission to make sure I didn't miss anything, however I couldn't figure out how to disconnect the transfer case shift lever. I removed the knob and boot so I could look down and get a better look, then like an idiot I moved on to something else and forgot to finish disconnecting the lever. D'oh! Luckily before I pulled to hard I realized why we were stuck and was able to get back under and remove it. I only dented my pride and the transmission tunnel a little bit.

I also missed one ground wire on the rear passenger side of the engine block so when i pulled out the engine it broke.

I also caught the clutch slave cylinder at the last minute before pulling the engine, I don't remember seeing this instruction in the transmission removal from the FSM, so I think that is why I almost missed it. All in all it wasn't easy, but not terribly hard either. My next steps are to to separate the transfer case and transmission, mount the engine on an engine stand and start pulling off accessories. I'm gonna take the engine to a machine shop to get checked out and while it is there I am going to attempt a transfer case rebuild.


IMG_3531.jpg
IMG_3532.jpg
 
This may or may not help....I usually get a box of zip lock bags to put bolts from a component into. I then cut up small strips of paper and label the piece of paper with the name of component and throw paper label plus bolts in a bag. Keeps things in order. I usually stack them in the order I removed because reverse order is the order for install. I usually do not write with a sharpie on the outside of the bags because it can get smudged or erased.
 
Go you! Congrats! I’m excited for you. When I pulled various parts, esp when I did the radiator, FC, WP and the hose, I tossed each into similar bags and labels them as others have said. Then when I did the head I took a cardboard file box and pushed the push rods thru in order as they came out and taped the nuts and various bolts around them. As well as lining up the valves I labelled as we pushed them thru the cardboard.
Kinda funny about the stick getting tugged, not the worst and surely your not the first.
Such a big hole all that leaves when it’s out. Totally awesome! I’ll be following, curious to see how the tcase rebuild goes.
 
This may or may not help....I usually get a box of zip lock bags to put bolts from a component into. I then cut up small strips of paper and label the piece of paper with the name of component and throw paper label plus bolts in a bag. Keeps things in order. I usually stack them in the order I removed because reverse order is the order for install. I usually do not write with a sharpie on the outside of the bags because it can get smudged or erased.

This is a good idea, I didn't think about the smudging. My bags are adding up for sure! Although in this pic it doesn't look like a lot there are a bunch piled in there.

IMG_3543.jpg
 
Labeling is good, but what happens even if you've got everything labeled perfectly is....you sometimes can't remember the order or how the heck they were installed. It seems straightforward now when you're pulling parts off, but believe me, after a month or so, that pile of parts in bags will start looking alien and you'll scratch a hole in your head figuring out what went where and in which order.
Thank goodness for digital cameras.


Agree. Using both pics and baggies is the best.
 
Agreed on the sharpie too. I have paper tape from work that I use to add labels on stuff. You can pick it up at a CVS. Or simply add label to a scrap of paper and put it in the bag. Also numbering the bags and adding the number to each page or section in your fsm is helpful too.
 
a little more progress yesterday. I got the clutch and flywheel off and was able to remove the bellhousing. This allowed me to put the engine on a stand.

Everyone was right about how heavy the flywheel was. I was able to get the clutch off by putting a screwdriver in the flywheel teeth and loosening the 12mm clutch bolts a little bit at a time. I then set the engine all the way on the ground so the flywheel was close to the ground. I piled a bunch of old rags and clothing under the flywheel and took out the bolts with an electric impact wrench. I then got my feet out of the way and tapped on the back of the flywheel with a rubber mallet and it dropped right down onto my pile of rags.

Thanks for everyone who has gone before with the harbor freight 1 ton stand, I would have never figured out how to attach the engine if it weren't for pictures on this forum. I do want to say that the bolt length matters. I had to go back out several times to get the right length of 12 x1.75 bolt. I think i ended up using 110 mm length on the top bolts and 90 mm on the bottoms.

IMG_3625.jpg
IMG_3626 (1).jpg
IMG_3624.jpg
IMG_3623.jpg


I threw the jackstand under there for the first night just in case haha
 
Chad, how’s all this going for you or are you now deep in the throes of babyhood again?
 
I suspect the flywheel is so massive because it’s an industrial engine spinning slow and the flywheel mass helps smooth out the engine at its low revs. You could probably have a machine shop turn off some mass in the flywheel and rebalance and resurface and you’d notice a small improvement in acceleration.
 
a little more progress yesterday. I got the clutch and flywheel off and was able to remove the bellhousing. This allowed me to put the engine on a stand.

Everyone was right about how heavy the flywheel was. I was able to get the clutch off by putting a screwdriver in the flywheel teeth and loosening the 12mm clutch bolts a little bit at a time. I then set the engine all the way on the ground so the flywheel was close to the ground. I piled a bunch of old rags and clothing under the flywheel and took out the bolts with an electric impact wrench. I then got my feet out of the way and tapped on the back of the flywheel with a rubber mallet and it dropped right down onto my pile of rags.

Thanks for everyone who has gone before with the harbor freight 1 ton stand, I would have never figured out how to attach the engine if it weren't for pictures on this forum. I do want to say that the bolt length matters. I had to go back out several times to get the right length of 12 x1.75 bolt. I think i ended up using 110 mm length on the top bolts and 90 mm on the bottoms.

View attachment 1713784 View attachment 1713785 View attachment 1713783 View attachment 1713782

I threw the jackstand under there for the first night just in case haha
Haha, I think everyone does that the first time, it seems sooo heavy. :cheers:. I am talking about the jack under the engine on the stand. I would never lighten the flywheel that's what makes these crawl so well.
 
Last edited:
It’s supposed to be heavy. It’s one of the reasons it works so well going slowly at low rpm. Resurface only removing as little material as possible! It’s a feature not a problem!
 
Thanks for checking in on my project @NeverGiveUpYota ! You are right, with a 3 year old and a 12 month old and a full time job and a wife who works full time it is tough to find time to work on the cruiser! However, I did find time to finish rebuilding the transfer case with the new addition of a new five speed as well. I decided to let the machine shop rebuild the long block after machining because I just don’t have time, so now I am just waiting for the machine shop to finish the engine, then I get to start putting it all back together, which I am super nervous about. (Anyone in south Denver metro area who sees this and wants to help feel free! I have beer!!) here are some pics of finishing up the transfer case.
16F6EC61-E183-44D8-8BFA-7E7B15A765EC.jpeg
FEB689E0-11A8-4E1C-A43C-00B50E3DAEB5.jpeg
1D84E3DD-AFC9-4007-9E10-BBD4DEA9F76E.jpeg
 
What shop are you using in Denver?
 
The good thing about engines is they are really simple and there are very few unique components in them. Also if the machine shop is rebuilding the long block then everything that is left is quite straight forwards.
 

Users who are viewing this thread

Back
Top Bottom