Builds '05 GX470 "build"... (1 Viewer)

This site may earn a commission from merchant affiliate
links, including eBay, Amazon, Skimlinks, and others.

I am out of my league here in this forum, but at the Indi BMW shop I once worked in, we would often remove the resonator from the exhaust system on the v8 powered vehicles. Left them with a great low grumble that would encourage judicious use of skinny pedal while remaining civilized when necessary.

Again, leaving the oem cats, and stock muffler intact, only removing a small "can" from the system and replacing with a piece of pipe, produced a more satisfying tone than most aftermarket mufflers alone on the bimmers.

Does the GX have anything like this toward the rear of the vehicle, near the muffler?

yes we do. but i thought that took a way some of the drone and resonance... that is one thing i want to avoid is resonance at specific RPM ranges... i guess i could always put it back if i wanted. but the other thing is i was thinking about going to 2.5" pipe cat-back, and then going with 3" axle back like i had on my old 4runner.
 
yes we do. but i thought that took a way some of the drone and resonance... that is one thing i want to avoid is resonance at specific RPM ranges... i guess i could always put it back if i wanted. but the other thing is i was thinking about going to 2.5" pipe cat-back, and then going with 3" axle back like i had on my old 4runner.
All I can say about it, is that I am surprised at the difference it made on the BMWs. No drone, just burbble.

And, someone's gotta try it...
I nominate you, especially if you're ready to make all those changes back there in the near future.

All about that bass ;)
 
I cut off the resonator a while back and it dumps just behind the PS rear wheel...super clearance and a nice growl when I get on it.
 
i really like the progress! thats some great info on the sliders and the trimming of the running boards, thanks for the pics! i love how your rig is coming along. im also happy to see some good shots of those ST MAXX tires in the 255 flavor. i think im gonna stick with the 285s, i kinda like a wider tire for floating on sand and snow. but those are the tires i want to run. i have heard people complain about them being loud? any validity to that. though i typically like the mud tire hum/roar, on the GX i might not, and while i do want to get a louder exhaust i dont want drone or ridiculous. but i want to hear that good V8 rumble when i get into it, other wise i was quiet around town. care to share your thoughts or input and observation?

Thanks for the kind words.

1) Cooper ST MAXX tires: They are quiet. Less 'hum' than the Duratrac's we were running on the FJ Cruiser. The width may have something to do with the quietness, but I can't imagine a 285 would be much louder.

2) Exhaust: After having the muffler on for a few weeks now (with no rear resonator) - There's no mistaking it for a stock exhaust! However, it's a great sound, and nearly no drone. You hear it when accelerating, and it's noticeable on the highway - But it's not at all annoying. Just has a good tone/rumble. I think it's maybe a little aggressive, but that really is the fun part. People don't expect that sound out of a Lexus SUV!

- Brian
 
UPDATE time...

Finally got a chance to make some progress on mounting my spare tire. I didn't want it hanging under the truck, so I got to brainstorming on how to mount it in the rear cargo area.

I also didn't want anything permanent, as I'd like to be able to use the 3rd row on occasion (like going to a Jaguars game - It's nice to get 7 people in the truck when you're paying $35 per vehicle to park!).

So I decided to use the pass. side 3rd row seat mount. It's plenty strong...

So I started with a few pieces of steel I had laying around from other projects. One was a rear bump-stop lowering bracket from a Chevy pickup (I used to have an '03 SS). It had 2 bolt holes already in it - I just opened them up, and pressed in two ARP studs (12x1.25 thread pitch, same as the truck). That's what the wheel bolts to.

The rest was made from 1" wide, 1/4" thick flat stock (I think left over from a really old garage door opener, notice the holes in it). This worked well to pass some 7/16" diameter round bar through to make a frame that would clip into the 3rd row seat mount.

Pics might explain this better:

spare-tire-1.jpg


It clips into the factory seat mount like so:

spare-tire-2.jpg

(nice and solid)

Of course, I then had to trim down the length, weld the mount onto the frame, and brace all that up with some extra 1" flat bar. Here's how it looks when installed (still mocked up at this point):

spare-tire-3.jpg


And the finished product:

spare-tire-4.jpg


...

I still need to prime and paint the whole thing...

But overall, it came out great. Takes up just a little more room as compared to the seat...and it can be removed in ~10 seconds if needed. It's almost touching the back of the rear seat, but there is some clearance. And I can still fasten the Lexus mesh-cargo-holder-thingy across the rear of the truck.

- Brian
 
That's awesome. One of the issues in my 4Runner is that it doesn't have a 3rd row so there are no handy mounting spots. I will eventually get something like that worked out hopefully. Just going to have to get more creative with the mounting. The only other alternative I have is a hitch mount which I'm not crazy about.

Build is coming along great!! Keep up the good work!!!
 
interesting idea, kudos to thinking outside of the box. Now with the weight of that spare rim/tire when offroading, is that mount solid enough not to break when bouncing around?
 
Build is coming along great!! Keep up the good work!!!


Thanks...will do!

interesting idea, kudos to thinking outside of the box. Now with the weight of that spare rim/tire when offroading, is that mount solid enough not to break when bouncing around?

I think so. The OEM bracket certainly is a strong enough base...

The mount I made is all 1/4" thick or larger, and the 'mounting flange' that the wheel bolts to is braced pretty well.

Plus, it's really only holding the wheel from moving fore and aft (preventing it from rolling), and keeping it vertical (not tipping over). The weight all rests on the floorboard, and I will use a strap to help keep it held down (the cargo attachment points are conveniently located right in the middle of the tread!).

If anything breaks, it'll probably be the little cargo tie-downs. If that happens, I'll bolt in a couple small D-rings from Lowes.

- Brian
 
Does it make the truck stink like rubber?
 
Does it make the truck stink like rubber?

It does not...

I was worried about that, too - So I drove on that wheel/tire for a week, just to get it hot a few times and try and get rid of that "new tire smell".

Since then, I haven't even noticed it back there - I've been driving with it laid down flat in the cargo area for a month or so...so the TPMS system didn't freak out.

- Brian
 
Allright, UPDATE time...

So my plan was to get this rig mostly finished (at least to the point where it it right now) before "Mardi Krawl", an annual event put on by the Louisiana LandKrewser guys. It's held in N. Alabama, at 'Hawk Pride Offroad Park'.

I got it all done, took the truck, and it performed beautifully. It's no rock crawler, but it did great given the conditions (more on MardiKrawl later).

As for the final few items that got finished:

My lovely wife whipped up a spare tire cover from some heavy duty canvas:

spare-tire-cover.jpg


I also went ahead and got an alignment. I had previously done a string alignment (I've done many of these on racecars and such in the past), and I was comfortable with the way the truck drove (plus, no strange tire wear)...but I got nervous about taking a ~1700 mile road trip. I should have listened to my gut, as it was damn near perfect...except the front left was 0.2-degrees toe'd in. Oh well, it's always nice to know the actual numbers.

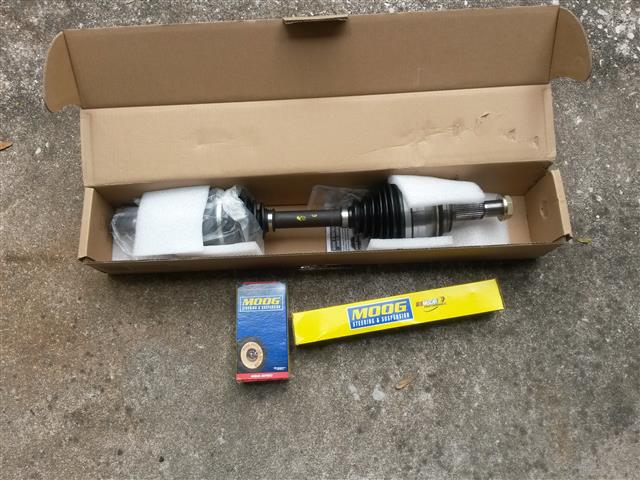
I also decided to grab some spares, just in case:

spares.jpg


One "Cardone Select" HD axle, and one each Moog inner and out tie rods. I figured that just having the parts would ward off breakage (it did!).

...

As for Mardi Krawl...here's a couple teaser pics - I'll try to post more later:

gx470-water-crossing-2.jpg


And a view of the park from across the mountain:

gx470-mardi-krawl-1.jpg


...

Stay tuned!

- Brian
 
Nice work getting her dirty, she looks good muddy! Word of caution, I know your A1 Cardone axle is a spare, but my boot ripped, so I replaced my axle with an A1 cardone axle. The A1 axle is not machined the same one on the inner joint so when I would make hard turns it would bind and cause the whole truck to shake. Since then, I rebuilt the stock axle, and put it back in and now everythings fine.
 
^^^ Thanks. And trust me, it got plenty muddy! (see below)

As for the axle - I thought maybe I read a post from you about that, maybe on one of the other forums? Sounds familiar. Anyway, thanks for the heads-up - I'll look deeper into it. One of my axles seems to be a replacement (from the prior owner), but I'll plan to rebuild the OEM one no matter what (if it ever goes).

...

As for more on Mardi Krawl: It was scheduled to rain on Thursday night, and it did. Like, monsoon rain and 50mph wind. Half the campsites were blown away, basically. I skipped the tent, and slept in the truck.

...and that North Alabama mud is more like clay. So it was *really* sloppy (and slippery) for day 1 (Friday).

One of the FJ40's got into it pretty well, and even after wheeling for the rest of the day, and several creek crossings...it was STILL packed into his wheel:

mardi-krawl-mud.jpg


He pried it out with a large stick, piece by piece. It really was just like someone had packed modeling clay into the wheel!

...

I should have known it was going to be sloppy - On the way up to the event, I ate a Clif Bar...and the "adventure challenge" printed on the back was "Get Muddy"

Challenge Accepted:

gx470-mardi-krawl-3.jpg


And one last shot of my truck after a couple days on the trail:

gx470-mardi-krawl-2.jpg


Note how packed the tires are with mud. The Cooper ST MAXX's did really well, considering anything that wasn't a dedicated mud tire could not shed that sticky clay mud.

Overall, it was a great weekend, and a great event. I pressure washed the truck for ~10 minutes before leaving the park, and some heavy rain on my ~9hr drive home cleaned some more out...but my driveway still was covered where the truck was parked (after even more rain).

Up next on the build: Not sure yet - Some armor (skids) would have been really nice, as I passed on a couple good trails for fear of dragging the unprotected underside of my truck over big rocks.

That, or buy and build an FJ60 to bomb around in without worry ( o_O ).

- Brian
 
I used these guys (CVJ Axels) to get remanufactured FJ Cruiser axels. Nice thing is they will add custom touches like extra long silicone cv boots to help prevent tears due to higher angles after you lift your rig. They were pretty easy to deal with. Maybe they have them for your GX?

http://www.cvjreman.com/offroad.php
 
You can use FJ axles in a GX, so those CVJ axles are probably good to go, I've heard good things about them.
 
I used these guys (CVJ Axels) to get remanufactured FJ Cruiser axels. Nice thing is they will add custom touches like extra long silicone cv boots to help prevent tears due to higher angles after you lift your rig. They were pretty easy to deal with. Maybe they have them for your GX?

http://www.cvjreman.com/offroad.php

You can use FJ axles in a GX, so those CVJ axles are probably good to go, I've heard good things about them.

Yep, FJ Cruiser and GX axles are interchangeable...

I looked into the 'CVJ' axles, and it seemed like they required an OEM core to be returned. My aftermarket drivers side axle wouldn't cut it. Maybe I'm remembering incorrectly...?

Anyway, since I only had one OEM axle, I kinda wrote them off as an option until I'm ready to do both axles - A "one and done" kind of repair & upgrade (and I'll just pay the core charge x2, if they're OK with it).

- Brian
 
very nice build! You have inspired me... I am planning to do the OME suspension lift and now will do the same sliders (and try to do the trimmed runner piece as well as you did). It makes me feel good to see a white mall runner rig can become a real truck :)
 
A month without an update...c'mon! :bounce2:
 
A month without an update...c'mon! :bounce2:

I know, I know...sorry guys.

Not much to report - Life has been in the way of working on the truck, and it's getting to be boating weather here in Florida...so my weekends have been spent in places other than the garage. :)

I did make a half-ass attempt at covering the burlwood interior pieces with brushed aluminum vinyl, but it's too light in color (has a blue-ish hue). So it's looks bad, and will be removed. Might try another color, might just live with the burlwood.

I have a $100 Amazon gift card burning a hole in my pocket (credit card rewards program), so I might put that towards a Rola rack (plus the extension). Honestly, I don't have a need for a roof rack, but I like the way they look on these trucks. I figure if I have it, I might use it? Or I'm a poseur. Not really sure. :p

So that's it for now...thanks for checking in!

- Brian
 
Brian, I am about to install my suspension and sliders so I hope you don't mind if I borrow your trick of trimming the step rocker panel for above the rock sliders. I might need to ask some questions along the way. I still love the way you outfitted and the look of your rig...makes me really look forward to getting mine done.

Bob
 

Users who are viewing this thread

Back
Top Bottom