wind deflector woes (1 Viewer)

This site may earn a commission from merchant affiliate
links, including eBay, Amazon, Skimlinks, and others.

Joined
May 26, 2005
Threads
29
Messages
1,676
Location
Encinitas, CA
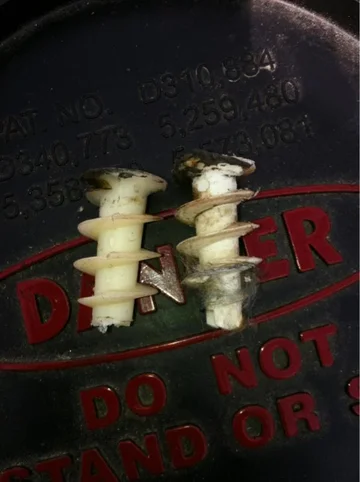
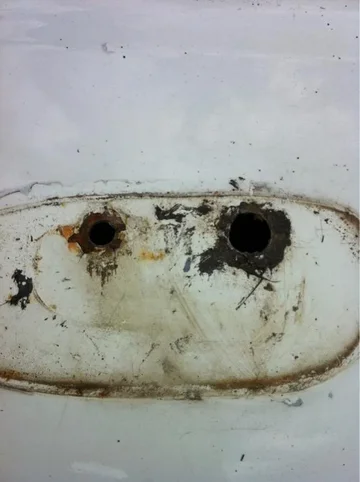
My plan was to remove the wind deflector and roof rack this weekend, as many on here have found rust under the towers or feet on these. My 80 that I purchased in Oct last year is essentially rust free, or so I thought. Last night I started to take the deflector off. The pics show what I found.

While I got 5 of the 6 screws out, one of the deflector nutserts (rivnuts) is spinning. My plan today, after searching here on MUD and elsewhere, is to try to tighten the tower back down in an attempt to clamp the nutsert. I may try a woodworking clamp on the tower to add extra pressure to the nutsert, as well as try to tighten the nutsert back up to the body (tightening the screw). If that does not do it, I will try to squeeze a scraper in there to hold the spinning nutsert from the side. After that I am planning to drill out the screw head inside the tower, then I will have better access. Some folks have then drilled out the nutsert.

Any other ideas????

As you can see from the pics, I will be attacking some rust. I am planning on welding the holes closed and repainting after repairing the rust, but I am still pondering this one.

In any case, considering some silicone sealers promote rust (the acetic acid issue), what are your specific sealer product recommendations for sealing a painted metal surface like the body with nutserts remaining.

The deflectors and roof racks were port-installed, correct?

The roof rack is next.

Thanks, Jon
IMG_9247.jpg
IMG_9248.jpg
 
The second pic looks like a confused face lol
 
Hope your not as surprised as I when removing rack.

This fastener wasn't port installed.


image-1630666446.jpg

Nor were these.


image-1548136702.jpg


One of the results


image-3544040348.jpg


Anyhow, have a similar rust issue and a local auto body paint supply suggested using a zinc coating as a long term remediation, if repainting wasn't the plan, if reinstalling the rack and spoiler.

I'm not reinstalling, but will weld the roof penetrations and probably coat before lining, or if painting, let them deal with.
image-1630666446.jpg
image-1548136702.jpg
image-3544040348.jpg
 
Unless something's wrong with the deflector, leave it. It's one less headache to deal with.:meh:
 
spinning nutsert

I had this problem when I took the deflector off my 100 series. I was able to capture the spinning nutsert with a hemostat. I think I slid a credit card or something underneath to pry it up and protect the paint. I have several of these lying around but if you don't I understand you can get one from most outdoor stores in the fly fishing section. Having a good 'stat or two is always handy around the house or truck. Good luck.
 
I had this problem when I took the deflector off my 100 series. I was able to capture the spinning nutsert with a hemostat. I think I slid a credit card or something underneath to pry it up and protect the paint. I have several of these lying around but if you don't I understand you can get one from most outdoor stores in the fly fishing section. Having a good 'stat or two is always handy around the house or truck. Good luck.
I can see it now: Nurse, Hemostat, please. Wipe Please. Scalpel.
 
Just to follow up on the Rust Bullet. You can buy it @ Rust Inhibitor Paint | Stop Rust | Rust Corrosion Inhibitor | Rust Converter. $22 delivered. I just got my second jar. My first jar sealed itself shut! So, if you use this stuff here are a few tips.

1) After use clean the lid prior to putting it back on. I used it, tapped it on like it was a jar of paint, and :mad:, could not get it off. The adhesion strength is impressive.

2) Use in a well ventilated location. Pretty intense fumes.

As a temp fix I sanded, applied rust bullet, filled with JB weld, primed and painted. So far, so good. When I get the $ I will have the proper body work done.
 
Thanks guys.

I have to fix that rust. BrotherRob, I took it off to look for the rust we keep hearing about. Before I took the deflector off, I was expecting to put it back on after painting it (purple or something). Now after seeing that rust, I plan on filling the holes and painting.

I have been using rust bullet for a couple years now (on my 60 series mostly). I will hit all the holes with it. I can add never get rust bullet on your skin...that stuff is incredibly hard to get off. I use disposable brushes, gloves, and cups. I was using a plastic bag between the lid and can, but I will clean the lid next time. I have killed a can top or two by not closing it right. Yeah...the fumes are nasty. And never drip sweat in the can.

You are right Duggy, that second pic looks like a surprised Tiki carving.

I wanted to order some hemostats the other day...I think it was Beno that said they were useful. I don't have them in hand yet. I could use them now: 2 of the nutserts are still spinning.

Delancy, that is some funky home depot drywall picture-hanging crap somebody put in there. I hate those PO surprises. I expect some rust when I take the roof rack off, but I hope nothing like what you found.

Today I drilled out the one screw that was giving me a hard time. Nothing else worked on the spinning nutsert that was keeping me from getting one tower off. After that, I was able to easily drill out 4 of the 6 nutserts, but 2 started spinning. That is where I left off. A hemostat would possible help now. When any of you drill nutserts, go as slow/light as you might need to in order to not get the nutsert spinning.

Thanks, Jon
 
Last edited:
So this is where I am at now.
IMG_9280.jpg
IMG_9278.jpg
 
So I decided to re-install the deflector.

Mostly I just like how it looks. My pilot/A&P mechanic buddy also suggested I put it back on. Since I can not get inside the hatch and coat/paint the areas post-welding I felt welding the holes closed was a non-starter (which played heavily into my decision).

I drilled out the nutserts. I used a magnet and shop vac to get all the pieces from inside the hatch. They would have rattled if I skipped this step. I used the hole for the R washer tube to access the inside the hatch for the magnet (see pics).

...
IMG_9282.jpg
IMG_9285.jpg
IMG_9286.jpg
 
I used green Frog tape to mask off a square for the Rust Bullet. The Frog tape supposedly has some special paint block stuff in it for making sharp lines. You really need at least 2 coats with this Rust Bullet, as one coat is still porous.
IMG_9302.jpg
IMG_9307.jpg
IMG_9318.jpg
 
I used the next size larger nutserts: 6mm. The original ones are 5 mm. You can see the difference in the pic.

I used the diy tool in the pic (a piece of flat bar stock with a drilled hole, some washers, and a M6 bolt/screw) to install the nutserts. You do not need a special pricey tool.

The 6mm nutserts need a 9mm hole. I ground down a drill bit to just the size needed so the holes were just large enough to fit the nutsert ridges. I coated the outside of the nutserts with more Rust Bullet immediately before I installed them, then tightened them down.
 
Last edited:
Here are the pics...:)
IMG_9325.jpg
IMG_9331.jpg
 
I painted the deflector, and over-coated the Rust Bullet on the hatch body, with Duplicolor Graphite Wheel paint and clear coat. This color is close to the bumper color on the 40th Aniv. Sage.
IMG_9335.jpg
IMG_9338.jpg
IMG_9342.jpg
 
Last edited:
Very nice work.

Will do this too. Put mine back on due to dusty roads and few branches.

Any pics of it on the 80?

Edit: what did you use to replace the sticky pad on the back of the mounts? Did you drill a drain hole in the mount? Seems some water can get in the mount and seep into the lower bolt causing rust.
 
I put Permatex medium threadlocker in the nutsert threads. This is similar to Locktite medium. I am using stainless replacement hardware, which normally requires an anti-galling compound. I did not want to use anti-seize, as I was a bit concerned about the hardware backing out, thus the Permatex.

I put Permathane SM 7108 polyurethane sealer on the body and nutserts, after masking off the area immediately around the nutserts, as this stuff is very tough to clean up. I did a ton of research on sealers (mostly because of the acetic acid corrosive properties of some silicone sealers), and landed on this stuff. Very flexible, rated for painted metal, etc. Apparently not available at HD, but is it at Dixieline.

On the bottom of the deflector towers I used RV butyl putty tape as a gasket, as the gap I ended up with between the towers and body was pretty big. This gap was due to the new 6mm nutserts sitting a bit proud. I did not want to make a rubber gasket (the old original ones were dead).

I suggest disposable gloves for these steps.

The hardware I used are stainless 6 x 1.0 buttonheads (hex head). I needed to increase the size of the holes in the plastic deflector towers to mount it up with this larger hardware (the original hardware is M5).
IMG_9346.jpg
IMG_9353.jpg
IMG_9357.jpg
 
Last edited:
Very nice work.

Will do this too. Put mine back on due to dusty roads and few branches.

Any pics of it on the 80?

Edit: what did you use to replace the sticky pad on the back of the mounts? Did you drill a drain hole in the mount? Seems some water can get in the mount and seep into the lower bolt causing rust.

Hey Rolliges,

Thanks. Here are some pics. The grey matches the bumpers pretty well and it does not look strange.

Yep, few branches out my way as well, and when I will actually be in the vicinity of low branches my 80 will probably have a big Confer [edit: Prinsu now] roof rack on it.

I will consider the drain hole. Thanks. I used a lot of sealer, including on the hardware, but a drain hole might be the ticket.

Cheers, Jon
IMG_9380.jpg
IMG_9387.jpg
IMG_9402.jpg
 
Last edited:
Here is the short-term mess I ended up with right after I tightened down the hardware (top pic). I cut the butyl putty tape with a plastic trim knife, then carefully cleaned up the Permathane sealer, pulled the Frog tape, and then wiped it all down. It cleaned up well.

With all the Rust Bullet, sealer, et al., I think water will now stay away from the sheet metal.
IMG_9365.jpg
IMG_9372.jpg
 
Last edited:

Users who are viewing this thread

Back
Top Bottom