Oil galley head plug (1 Viewer)

This site may earn a commission from merchant affiliate
links, including eBay, Amazon, Skimlinks, and others.

Trollhole

THC
Supporting Vendor
Moderator
Joined
Mar 6, 2005
Threads
1,566
Messages
21,107
Location
Mauldin, SC
Website
forum.ih8mud.com
There were a few writeups about this issue but few pics so I thought I would post some up. Please ignore the Big Gay 2f colors.

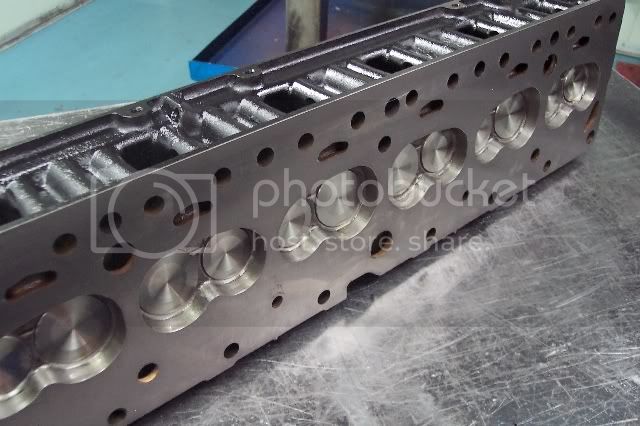
Location on head. Above and slightly to the right of the 5 plug hole from right to left (or front of block to back)

IMG_0405.JPG


DSC00009.JPG


It's a known potential problem on 2f motors that this plug can fail and fall out. It's an alumiunum plug that covers up where Toyota had to drill an oil passage so they could route the oil up to the top of the head through one of the head bolts.

If it fails it will allow oil to come out. Ususally all of it. As Mark W said "It's on the opposite side of the exhaust so usually there is no indication that it has failed since it doesn't hit the exhaust". When this happens your engine locks up and means an expensive rebuild.


The fix. Drill out the plug. I used a center punch and then drilled it with a 1/4 bit and then stepped up to a little larger size. About half way through the plug started rotating and I pulled it out with the bit. The plug is right at 7mm wide.

DSC00012.JPG


DSC00013.JPG


I have seen a few people who tap this out with an 8mm 1.25 tap. I chose a 5/16 tap just because I knew and allen set screw would be more availabe in this size. A 5/16 tap requires using a f drill bit. Where the 8mm tap doesn't require any more drilling.

DSC00015.JPG


Basically drill and tap. As a note. I have the head off. Some have done this with the head on. If you do it with the head on you want to try to keep any metal shavings out of the head. https://forum.ih8mud.com/showthread.php?t=113830

DSC00017.JPG


DSC00019.JPG

Make sure you use cutting or tapping oil. Go slow turn. Once the tap gets in a few turns and is good and centered it good to turn in a 1/4 turn and out a 1/4 turn then back in a 1/2 a turn. This will minimize a tap breaking. Then screw in the the set screw with some red thread thread locker or pipe sealant.


This is the other side of the plug. This is where a headbolt goes.

DSC00029.JPG


And the other side. This is where the oil galley to the head is. It goes into the rockers to provide oiling.

DSC00023.JPG
 
Last edited:
Nice writeup, Marshall. Note that this is the same for an "F 1/2" 1974 F155 engine.
 
Well learn something everyday, looks like my 3FE head has the same plug.

Time for Trollhole's treatment. Don't want this running out of oil. May us a tappered BSP plug though if their is one close to size if not Loktite it in.

2F-EHead3.jpg
 
Trollhole, you just knew I was gonna bite this one, fish on! Ya what matt.machines said except "Americanized" 1/16 NPT. Drill 1/4" or being snippy go on use that D size drill bit. doing it like you did using a straight thread isn't as "correct" but such a NBD that probably not worth buying a pipe tap for. And mattmachines, thanks for the pic.. Now I know what a 3F combustion chamber looks like. My rebuilt head leaked from this point when installed. My head rebuilder fixed it with a punch and hammer. Of course the aluminum plug was still in there at the time. Installing a replacement? I would recomend the same treatment (punch and hammer, tap in first using loctite green).
 
90% of all the factory plugs fail after a machine shop vat clean... its common practice to replace them as part of the rebuild... you wouldn't want that plug coming lose on a fresh motor and spoil the good feeling........drill and tap and a plug is the only way to be secure.......
 
90% of all the factory plugs fail after a machine shop vat clean... its common practice to replace them as part of the rebuild... you wouldn't want that plug coming lose on a fresh motor and spoil the good feeling........drill and tap and a plug is the only way to be secure.......

That is some good info.


For the person out there who bought my first cruiser 13 years ago. I had the head rebuilt before I sold it to you. Hope you didn't get screwed. Sorry about that.:eek:
 
For the person out there who bought my first cruiser 13 years ago. I had the head rebuilt before I sold it to you. Hope you didn't get screwed. Sorry about that.:eek:


lol:lol:.... it was probably in the undisturbed 10%.....:D
 
Now I know what a 3F combustion chamber looks like.


That's a 3FE combustion chamber with oversized Ferrea flat faced vlaves, ported and polishes and not stock:D

Lot more pics of the head on page 4 of the Mule or see links below.
 
Last edited:
I'm sorry, but that looks like a still pic from a colonoscopy:eek:
DSC00009.jpg
 
You're not supposed to know that, Ed. I was thinking pseudomembranous colitis...
 
Trollhole.........admiring your H-F digital vernier........thanks for sharing the knowledge and taking the pix..........I learned about this problem firsthand after our fj60 seized when the wife was driving it several years ago and that @#%&%$#@*&>"@# plug blew out on a very cold night in Jan. she didn't notice that there was no oil pressure and the temp redlined till it seized and about 20 minutes later when I got there was still pegged at the redline......a VERY expensive plug; the motor had about 8.000 miles on a nice rebuild:crybaby:
rsbcruiser....surprised you didn't bite on the vernier:lol:they are a lot easier to read than our old starrets...........yes, I got one also:D

Lou
 
maybe this could be a "sticky"?; it is a hell of a problem solver...........I have held a sneaking suspicion that when my head was vatted and rebuilt the plug was not changed :frown:

Lou
 
I'm sorry, but that looks like a still pic from a colonoscopy:eek:

Yeah originally I had this pic as the first one. Once I saw it I thought it might scare people away. Though kind of fitting in a gay way.:D
 
Rang Colin my engine builder this morning, yes its Monday already here:crybaby:

To ask him to drill and tap the oil gallery.

Colin
You mean the Ali one that melts and falls out when you hot tank them.

Yes

Colin
Already done it

My guy is good:D
 
Last edited:
Calipers

Oh those, Marshalls' digitals. Ya, I use a set of Starrett digitals all the time at work. I prefer the ol school dial calipers myself (no batteries). Na I didn't say anything because the ol Trollhole was using communist, I mean metric units. Started thinking you guys are making sense (maybe trusting the alu plug is not such a good idea, went out to take a look at my rebuilt head and Lou and behold. looks like Bearing Service did it for me (dang, maybe those guys know what their doing.) I was wondering Marshall, Did you drill and tap all the way through? Because the set screw will work best if it has something to bear against. And that would be the head bolt then. The loctite red should do it, hell, epoxy or jbweld. The darn thing never needs to come out again.
drillholre1.jpg
 
The fix. Drill out the plug. I used a center punch and then drilled it with a 1/4 bit and then stepped up to a little larger size. About half way through the plug started rotating and I pulled it out with the bit. The plug is right at 7mm wide.

Dumb question probably and if so bear with me as I am going to rebuild my engine as well. Is it necessary to tap the thread after the head has been cleaned or will unscrewing the old one and putting a new one with loctite enough?
 
Dumb question probably and if so bear with me as I am going to rebuild my engine as well. Is it necessary to tap the thread after the head has been cleaned or will unscrewing the old one and putting a new one with loctite enough?


The factory plug is a press fit. Tapping is the best way and not hard to do. I ignored all this advice and did mine AFTER rebuilding and reinstalling the motor. Much easier to do on the bench, but do-able in the truck.

GL

Ed
DSC01067.JPG
 
Oh those, Marshalls' digitals. Ya, I use a set of Starrett digitals all the time at work. I prefer the ol school dial calipers myself (no batteries). Na I didn't say anything because the ol Trollhole was using communist, I mean metric units. Started thinking you guys are making sense (maybe trusting the alu plug is not such a good idea, went out to take a look at my rebuilt head and Lou and behold. looks like Bearing Service did it for me (dang, maybe those guys know what their doing.) I was wondering Marshall, Did you drill and tap all the way through? Because the set screw will work best if it has something to bear against. And that would be the head bolt then. The loctite red should do it, hell, epoxy or jbweld. The darn thing never needs to come out again.

Nope just about half way. Just need to be able to get a good seal. Oh and I have a set of dial calipers I got those at Northern Tool.:D Unless it's a tool I use a lot I'm not forking cash out on it. Plus I'm not kind to my tools. I'd feel real bad if I stepped on and broke a nice tool.
 

Users who are viewing this thread

Back
Top Bottom