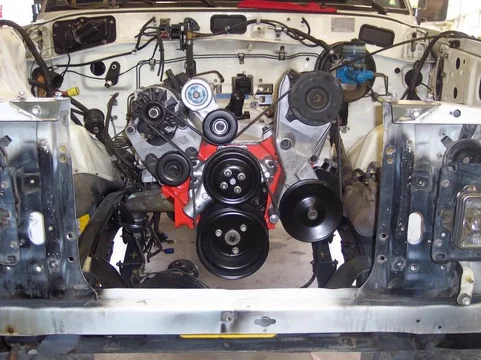
Yet Another SBC TBI into an FJ62... (1 Viewer)

This site may earn a commission from merchant affiliate
links, including eBay, Amazon, Skimlinks, and others.

Here is one that was installed in a fj60 with a 6.2 turbo diesel (I'll add, this was after the rear main seal dumped quarts and quarts of oil from high crank pressure)
60 series build 055.webp
 
Last edited:
I'm unclear here, are you spacing the stock end pieces off of the frame rails with the tube stock, or?

If you are spacing then you really want the tube sides to be parallel to the bolts (i.e. the bolts run down through the center of the tube). Unless the wall thickness is huge drilling through the sides of the tube will squash it when you tighten the bolts.
Same, btw, is true of the frame. I welded sleeves into the frame. I drilled an 8mm hole all of the way through, and then drill the outside holes, only, to 3/4" I made the sleeves from 3/4" bar stock. Bolted them in place, and then welded them to the outside frame wall only.

thanks ntsqd...

i THINK we got it figured out...

we're going to run 1X2 inch square stock underneath the sides of the stock crossmember...

motor is on the hoist and bolted to the trans-t/c which is bolted to the rear crossmember...i think a one inch spacer is going to set everything in place...

I'M PUMPED!!!
 
I'm unclear here, are you spacing the stock end pieces off of the frame rails with the tube stock, or?

If you are spacing then you really want the tube sides to be parallel to the bolts (i.e. the bolts run down through the center of the tube). Unless the wall thickness is huge drilling through the sides of the tube will squash it when you tighten the bolts.
Same, btw, is true of the frame. I welded sleeves into the frame. I drilled an 8mm hole all of the way through, and then drill the outside holes, only, to 3/4" I made the sleeves from 3/4" bar stock. Bolted them in place, and then welded them to the outside frame wall only.

yes, we ran one x two inch stock (1/16th thick) parallel to the bolt holes. it's working okay but it did begin to squash it...i think i will get some "pucks" made of one - two inch steel or aluminum with bolt holes drilled through...i'll post more pictures tomorrow but where the drivetrain ended up, i'm not sure i need any spacers at all...see pics below.

the other problem we ran in to was that the FJ62 crossemember to t/c mount is NOT the same as the FJ60...AND, i had ordered two new rear crossmember mounts, one from Summit (i thought i had ordered for a 62 but it turned out to be for the 60) and the other from Proffit's Cruisers (toyota OEM)...there were major discrepancies in both. see the pics below...the toyota OEM was 3/4" to 1" taller than the one from Summit (aftermarket)...

ALSO, neither of the mounting bolts from EITHER crossemember mount lined up to the mounting holes on the adapter...i think this is something AA should revisit. On the toyota OEM mount we augered out the holes to make it fit...then when we realized the crossmember needed to be higher, we decided to use the aftermarket mount, but had to cut it in two to make it fit (we got two bolt holes on either side of the adapter to line up)...

after all the fuss, everything lined up great...the motor is in good position and we were able to keep the stock crossmember with minor modifications...in fact, we set the rear crossemember in place, and then set everything else in front of it and it worked out great.

now i guess the fun starts, more to come...
100_1517.webp
100_1524.webp
100_1545.webp
 
Last edited:
engine looks like its sitting fairly low....do you have clearance for the front diff & exhaust?
 
Looks low to me too, but then I set mine in about as high as I could possibly make it fit.
 
yep, i think it may be a little low...but it's offset to the driver's side one full bolt hole on the AA mounts...i'll try to get pictures of the clearances posted tomorrow...looks like there's about 5-6 inches of clearance between the exhaust "y" pipe...between that and the offset i don't think i'll have any issues unless i get the suspension really tweaked.

i do have plans to add an inch with shackles after all this. i currently have the OME 2.5 inch springs but wanted to see how the thing sat after the conversion before ordering them...we also talked about adding a urethane puck under the AA motor cushions.

everything else seems to line up really nicely, so i'm pretty happy with it. we started looking at the rear drive shaft (will have to be shortened an inch and a quarter), got the shims in the rear output and started tearing apart the existing electrical...
 
not that mine is perfect but it sits as tall as we could go and get the hood to close. My mounts sit on the frame a little different ...but we ended up cutting the drivers side mount off by "one hole" if that makes sense....My engine sits in there almost square. If you plan to ever run a mechanical fan its my estimation that you want the engine to be square with the radiator to the extent possible you can make that work. At first mine engine was offset a little (was jsut easy to do that. Then later went to a mechanical fan and "squared" up engine as best we could without doing major surgery. I initally ran dual electric fans from Ford v-6 contour...but have recently swithced to fan setup off a 1999 GM SUV/Pickup.

Think about your cooling and the space between the waterpump and the radiator before you lock down your engine location.

the frame side of the mount on my truck sits welded to the frame like the letter "U"....while I think the instructions seem so show the opposite. We were just going at it (at the time) and by the time I noticed the difference it was all over. So the engine mount that attaches to the engine with the holes sites down in the "U" portion that's welded to the frame, and which makes it hard to adjust left and right...as the same piece with the holes hits the frame rails as you try to go left or right with your adjustment and you have to get creative. I don't see anything major wrong with what we did, but going the way the instructions seem to depict would be better for overal adjustment I assume.

Clean looking engine... I like the simplicity of the TBI engine and they are fairly bullet-proff and esay to work on.
 
Last edited:
not that mine is perfect but it sits as tall as we could go and get the hood to close. My mounts sit on the frame a little different ...but we ended up cutting the drivers side mount off by "one hole" if that makes sense....My engine sits in there almost square. If you plan to ever run a mechanical fan its my estimation that you want the engine to be square with the radiator to the extent possible you can make that work. At first mine engine was offset a little (was jsut easy to do that. Then later went to a mechanical fan and "squared" up engine as best we could without doing major surgery. I initally ran dual electric fans from Ford v-6 contour...but have recently swithced to fan setup off a 1999 GM SUV/Pickup.

Elbert- it sounds like we did the same thing with the motor mounts...we cut off the driver's side engine bracket one full bolt hole and the frame bracket seemed to work better upside down (we had tried it both ways)...we also had to use the scab plated provided, but more as a shim to take up the slack between the two mounts and the frame rails.

Can I ask, why did you switch from the Contour electric fan to the GM mechanical? did you have cooling issues? did you make your own shroud for the mechanical? i'm still considering my options, but i have the Contour fan ready to go...and i know the electric vs. mechanical debate is a dead horse.

also-did you use the stock Toyota radiator? because, on the motor i have no return line for the heater hose and was looking to make a fitting for the lower radiator spout (an in-line "tee," if you will) for the return line.

thanks!

100_1529.webp

100_1544.webp

100_1546.webp
100_1529.webp
100_1544.webp
100_1546.webp
 
I went with mechanical since I live in AZ. Another guy and I both did TBI swaps out here and he originally ran the Contour fans and they couldn't keep it cool at all even without ac in the summer. He switched to a mechanical and a shroud and everything is great.

I originally ran no shroud but once the a/c was hooked up the temperatures would get too high so I built a shroud and everything is perfect. I tested it at 117 in stop and go and it would stay cool with that setup. I hand built a shroud out of fiberglass and it worked great.


If you don't live somewhere that gets over 100 than its probably not that big of a deal. Its not just the air the mechanical pulls over the shroud the real differance is how much air it moves over and out of the engine bay.
 
Well it gets hot here too...humid mostly. Regular driving around ford contur works fine, but I got tired of the electrical load and I need to be able to use the winch too. So I decided to switch to get back to simplicity to the extent I can and I think the fan clutch setup is the overall best. I'm still working on the shroud business...been thinking about different options that I've not been able to test yet. So I'll have a mechanical radiator fan with fan clutch (GM Stuff). I'll also have a electric fan "pusher" in front of the drivers side radiator to use when needed (a/C).

Here is a picture showing my frame and engine mount on one side and another showing the fan shroud I plan to adapt / test.
DSC00289.webp
DSC00509.webp
 
I guess I should have turned the mount on the frame size upside down (as its shown in the pic) and fully welded it to include the hole in the center. But by the time we were at this point my friend and I just decided to let it go as it is. He is the welder and I'm the helper on that kind of stuff. So anyway it is what it is. So far I've not had any issues or failures. If I do then I guess we'll go back at again.
 
that shroud looks nearly perfect, what's that out of?

Yes...I noticed the same thing. I know many people here may have their own views but think about a "jeep" and how the layouts of the trucks are almost identical depending on model years.

This is a reproduction Jeep CJ5 fan shroud 1974-1986, I found it on Ebay 1710203 (I think thats the part number).

I got to looking at these things and I kept asking the people selling them to give me some dimisions and no-one bothered or cared, or gave me a great answer...it fits the stock truck.

Anyway here are some more pics... FYI the holes in the shroud are only a little bit off from the toyota.

Not to hijack this thread...maybe this will help OP or others.

So I just decided to order one to see...as you have noted it almost fits perfet, I also noted that it resembles the mods Rover67 did to his yota OEM shroud to make his shroud work with his engine swap.

So anyway its a reproduction of the Jeep CJ-5 fan shroud for V-8.
DSC00507.webp
DSC00508.webp
DSC00510.webp
 
in my experince so far with my swap..the lower radiator hose outlet on the radiator needs to be moved to the right about as far as you can. I'm using a fan / clutch combo from 1999 GM truck/SUV with 5.7 v-8. My fan will clear the shroud by a little bit. I'll take a pic and show that. I've not installed this thing yet so I can say what if any problems ther are, but it sure does look like it will work for a 5.7 swap and might be ok for a 5.3 or 6.0. I'll take some rough measurements and post them up in case others may want or need that info.

the pic above shows my spare radiator....it has not been mofifed...the bottom outlet is in the stock location, but you can't run it that way with the v-8 because its to close to the fan blades (it puts your hose to close to the fan blade) at least on my setup.

I think I could make it work with a few zip ties if I really wanted to make it look "custom"...
 
thanks for the shroud info! i am definitely leaning towards the mechanical at this point...but still considering. i like the fiberglass option as described here:

DIY Fan Shroud - Do It Yourself Hot Rod Kustom Website

i am assuming this is where kurtis came up with his shroud?

below are pictures of my transfer case linkage fix for the FJ62. the transfer case bracket supplied by AA does not work with the FJ62 linkage so you have to "customize" it...keep in mind, it was sunday, and there was no where to find steel, so i used the remaining scab plates from the AA kit!

obviously, i'm still perfecting my welding technique...:D...purely functional.
100_1548.webp
100_1549.webp
100_1553.webp
 
I was able to raise the engine by an inch with some body mount urethane bushings...see pics below.

i was hoping that this would allow me to remove the spacers under the rear cross- member, but i think the clearance between the t-case and the floor pan will be too tight so i'm going to find some similar bushings for that i think...

100_1554.webp

100_1555.webp
100_1554.webp
100_1555.webp
 

Updates!? I didn't think anyone was paying attention! I figured maybe this swap was old news...but since you've asked...

i had to go back to work so progress has slowed to a snail's pace...but, in the last week:

-i got the power steering hose adapted by "Tubes 'n Hose" in Loveland, CO... they were great folks and i highly recommend them.
-the rear driveshaft was shortened (1.25"), balanced and had new u-joints installed. it's now fitted in the vehicle.
-i started on the electrical and brought the "Painless" (my ass) harness through the firewall and started routing the wires.
-i had to re-do the transfer case shifter bracket to place the shifter more centered under the hole in the floorboard, i've yet to see if the new placement is going to work...see pic below

100_1556.webp

-i removed the spacers under the rear crossmember. there is about a half inch between the top of the t-case and the floorboard...i think it's okay? i guess if i start to see any rubbing or feel any knocking i'll know it's not.

100_1560.webp

-tonight i put the TBI back on the manifold and continued the wiring. i started looking at the fuel lines coming off the back of the TBI unit and realized i really don't need to keep the Toyota in-line fuel filter...i can just use any after market fuel filter along the frame rail i guess?

100_1563.webp


it seems like the list of things to do is endless and i can't seem to "finish" much yet. what i really need is another week off of work!!! and it would help if i knew what i was doing!
100_1556.webp
100_1560.webp
100_1563.webp
 
yes I would use an aftermarket fuel filter. Keep posting...as others learn and peopel may be able to offer you some good advice as you move forward with your swap.
 

Users who are viewing this thread

Back
Top Bottom