What have you done to your 100 Series this week? (58 Viewers)

This site may earn a commission from merchant affiliate
links, including eBay, Amazon, Skimlinks, and others.

Hey Sloth, man I'm needing to do this on my LX. What was involved in the swap, what size tool did you use?

Extremely easy. Just get the 02 sensors off rock auto. They sell the OE Denso ones for significantly less than everyone else. I only did the upstream ones as that's why my code indicated. Actually it just indicated upstream pass side, but it's a good idea to do both at the same time.

On my 98 these are the 02 sensors : More Information for DENSO 2344169
They're only $38 ea. Around half the price of Napa who also stocks Denso stuff.

Only other thing I got, which is not needed but makes life infinatly easier is the 02 sensor wrench. You need a 7/8" one for the 100 series upstream sensors. This is the one I bought : More Information for PERFORMANCE TOOL W84008
It's only $5 on rock auto. You just need a 3/8" drive ratchet/ breaker to use it. I used a flex head ratchet. Makes it easier to work with in tight spaces.

As far as procedure just crawl under the truck (mines lifted on 34's and im skinny which makes it easier... Locate the upstream o2 sensors. Both are located where pre-cat where the exhaust turns down adjacent to the exhaust flanges on the engine. Unclip the harness. They have a lever located on the short side of the pigtail that you depress with your thumb (on the side of the pigtail attached to the truck) while simultaneouly pulling the pigtail attached to the actual sensor. Don't worry about yanking on it since you're replacing it anyways. Then you place the 02 socket on the sensor, attach 3/8" drive ratchet or breaker and rotate counter clockwise to break it free. Mine only took about 1/4 of a turn with the socket and then I just spun it off with my fingers.

Installation is the reverse. Just make sure to use the supplied copper anti-seize on the threads prior to install.

If you have fatter arms/ hands the pass side could be difficult as you snake your arm up between a few things. Drivers side is easy access. On the pass side you could remove the pass side wheel and rubber splash guards to get easy access if you're so inclined.

Downstream sensors are similar, except they use a flange with 2 nuts that secure the sensor instead of the end of the sensor being threaded. If doing the downstream ones make sure you get the gasket that goes between the sensor flange and the exhaust pipe.
 
Last edited:
Extremely easy. Just get the 02 sensors off rock auto. They sell the OE Denso ones for significantly less than everyone else. I only did the upstream ones as that's why my code indicated. Actually it just indicated upstream pass side, but it's a good idea to do both at the same time.

On my 98 these are the 02 sensors : More Information for DENSO 2344169
They're only $38 ea. Around half the price of Napa who also stocks Denso stuff.

Only other thing I got, which is not needed but makes life infinatly easier is the 02 sensor wrench. You need a 7/8" one for the 100 series upstream sensors. This is the one I bought : More Information for PERFORMANCE TOOL W84008
It's only $5 on rock auto. You just need a 3/8" drive ratchet/ breaker to use it. I used a flex head ratchet. Makes it easier to work with in tight spaces.

As far as procedure just crawl under the truck (mines lifted on 34's and im skinny which makes it easier... Locate the upstream o2 sensors. Both are located where pre-cat where the exhaust turns down adjacent to the exhaust flanges on the engine. Unclip the harness. They have a lever located on the short side of the pigtail that you depress with your thumb (on the side of the pigtail attached to the truck) while simultaneouly pulling the pigtail attached to the actual sensor. Don't worry about yanking on it since you're replacing it anyways. Then you place the 02 socket on the sensor, attach 3/8" drive ratchet or breaker and rotate counter clockwise to break it free. Mine only took about 1/4 of a turn with the socket and then I just spun it off with my fingers.

Installation is the reverse. Just make sure to use the supplied copper anti-seize on the threads prior to install.

If you have fatter arms/ hands the pass side could be difficult as you snake your arm up between a few things. Drivers side is easy access. On the pass side you could remove the pass side wheel and rubber splash guards to get easy access if you're so inclined.

Downstream sensors are similar, except they use a flange with 2 nuts that secure the sensor instead of the end of the sensor being threaded. If doing the downstream ones make sure you get the gasket that goes between the sensor flange and the exhaust pipe.

Good write up! Also don't touch the head of the o2 sensor and make sure to disconnect the battery before install so your computer can relearn the mix the new sensors are sending it.
 
Used it to get the Kayak down to the river.
IMG_3100.jpg
IMG_3108.jpg
IMG_3111.jpg
 
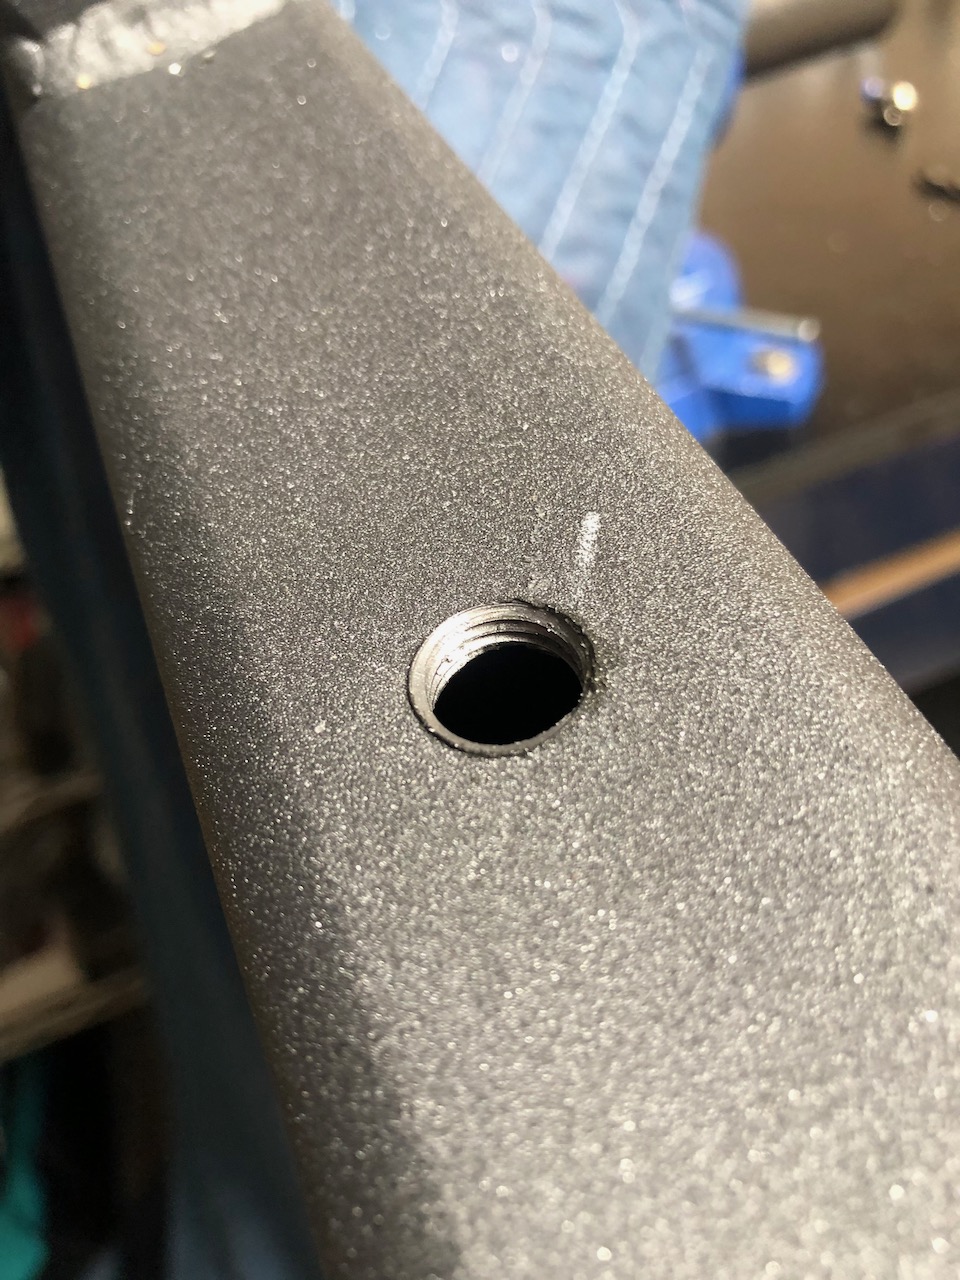
Sent my sliders off to be powder coated and took the opportunity to augment my on board air system, using both sliders as air tanks.

Drilled and tapped
sliderOBA1.jpeg


Mapped out the air line plan using bits from Amazon...front of vehicle and compressor/coupler to the right of the picture, slider "air tanks" at top and bottom, line out to rear 1 gallon tank and additional coupler to the left
sliderOBA2.jpeg


Incidentally, had to hack off a few of the old u-bolts to remove the sliders, so had a local spring shop make up some replacements.
sliderOBA4.jpeg


The final product is not very exciting, as evidenced by the attitude of my helper.
sliderOBA3.jpeg


For the record, I'm not convinced using sliders as air tanks is a good use of time or resources. Even if it does speed the time it takes for me to air up, that'll just mean more time waiting on @bushdoctor to get his compressor to work.
 
Good write up! Also don't touch the head of the o2 sensor and make sure to disconnect the battery before install so your computer can relearn the mix the new sensors are sending it.

Good call on both accounts.
 
Sent my sliders off to be powder coated and took the opportunity to augment my on board air system, using both sliders as air tanks.

Drilled and tapped
sliderOBA1.jpeg


Mapped out the air line plan using bits from Amazon...front of vehicle and compressor/coupler to the right of the picture, slider "air tanks" at top and bottom, line out to rear 1 gallon tank and additional coupler to the left
sliderOBA2.jpeg


Incidentally, had to hack off a few of the old u-bolts to remove the sliders, so had a local spring shop make up some replacements.
sliderOBA4.jpeg


The final product is not very exciting, as evidenced by the attitude of my helper.
sliderOBA3.jpeg


For the record, I'm not convinced using sliders as air tanks is a good use of time or resources. Even if it does speed the time it takes for me to air up, that'll just mean more time waiting on @bushdoctor to get his compressor to work.

Why powercoat them? If you use them as sliders the powercoat comes off just like rattle can. That's a lot of money for something that comes right off the second you slide them on a rock.
 
Why powercoat them? If you use them as sliders the powercoat comes off just like rattle can. That's a lot of money for something that comes right off the second you slide them on a rock.

A few reasons...knowing full well the first rock I hit will scratch them up just the same

1. I have a sweet deal with a local powder coating shop so the cost is very low (the real reason)
2. I had some other stuff to drop off for coating so saved myself a trip (a small consideration)
3. I'm lazy and bad at painting (wait, maybe this is the real reason)
 
In my ‘99 LC with 407 k miles, I had steering rack bushings replaced and hole enlarged with cutting torch so airlift 1000 bags could sit properly and not leak...as per suggestions by smarter mudders than I. $182 labor

420DD336-6855-4FD5-90C9-B2CB1B73D293.jpeg
 
Last edited:
Finally got new tires. I was waiting for the Michelin duelers the p/o put on to wear out but after 3 years and 40k miles they still had plenty of meat left on em. Cooper at3 xlt 275/70/18, waiting on 2865 springs and new oem shocks then I'll crank the t-bars a bit.View attachment 2296557
How are you liking them? Was gonna order KO2s and these have been catching my eye...
 
I got a deal on an Autohome Columbus CF, but it didn't do with mounting hardware. I wanted to get to it mounted to my Dissent rack asap for a trip I had planned last weekend. I talked to Ben and he said it would be about 8 weeks until He could ship some RTT bars. (I totally understand that they are busier than busy at Dissent right now. :) ) But now what do I do for the 8 weeks?!? After thinking of a bunch of different ways to mount the RTT, we finally came up with a pretty clean solution, What we did:
1. Took out 3 bolts per side that attached the rails to the tent
2. Used the Dissent mounting plates with one bolt holding them in place on the rack to through-bolt the RTT to.
3. Made 3 spacers out of 1x4 to clear the bolt heads on the rack. Cut to length and drilled 4 1-inch holes in each. 2 holes for the bolt to mount the RTT the other 2 for the head of the bolt holding the plate.
2020-05-27.jpg

4. Got the RTT mounted and looking good went for a test drive... WTH it is whistling at 30 mph and gets horrible at 60!
5. Drink a beer and eat dinner. While wounding why I thought this was a good idea, then thinking about what we could do to fix it.
6. Wedged in a piece of stiff foam between the rack and the RTT on the leading edge. Whistling is gone!!!
2020-05-27 (1).jpg

7. Enjoy
2020-05-27 (2).jpg
 
How are you liking them? Was gonna order KO2s and these have been catching my eye...

Im loving them so far, had them in mud, sand and in some hard rain they've been great.
 
completed the every other year Gummi Pflege Stift(my favorite German phrase) application on all door entries and sunroof trim. 21 year old weatherstripping still looks and feels new. And it has the best lemony fresh scent as an added bonus.
1590631821507.png
 
Began the install of my Ironman lift after about a month on back order.

Thanks to Bubba @Ironman4x4Bubba for his honest advise. He had the perfect opportunity to up sell me on the Foam Cell Pro vs Nitro Gas. I described my application and intended use and he advised the less expensive Nitro Gas would be adequate. I was prepared to purchase whatever he suggested. I truly appreciate honesty and @ironman4x4 has earned my future business.

As everyone has advised, removing the rear shocks will make a preacher cuss. Attempted to remove them normally after a night of PB Blaster soaking. Neither budged so I broke out the reciprocating saw. 3 blades later and shocks were finally on the floor. I found removing a portion of the bushing was very helpful in decreasing binding of the blade, spray bottle of water also helped keep the blade cool.

IMG_2589.jpeg


Front shocks and torsion bars will begin in the next few days.
 
Why powercoat them? If you use them as sliders the powercoat comes off just like rattle can. That's a lot of money for something that comes right off the second you slide them on a rock.
My friend rattle canned his new sliders on his 4Runner. He’s the most meticulous person I know and owns a detailing company.... I even helped him a bit, used primer, base, and several coats of clearcoat on brand new weld-on sliders. Fast forward two years and there’s rust everywhere (top of sliders, hard to reach areas near the frame, etc.) the truck sits outside maybe 50% of the time and has been driven maybe a total of 10 times in the last 3 winters.

Your point about the powder coming off when you “use” sliders on rocks is spot on, but the parts where the coating gets scraped off is usually on the outside areas of the sliders which are super easy to touch up if you’re concerned with rust forming etc. I had to touch mine up many times until I just stopped caring at some point. However if you don’t want the finish failing all around from salt environment or just humidity, Powdercoating is definitely the way to go. Plus if the powder coat is done correctly, the areas where it gets worn off should not spread anywhere near as quickly as a rattle can job, and rust should be somewhat contained to the area where the finish is missing.
 
Firestone lifetime alignment, didn't cost this time. But time is valuable anyways, should I try another location?
Just to close the loop here...
I got an alignment from dealer, they took couple of attempts with 2 test runs to get it to the spec. Dealer offered lifetime alignment for $150 (lifetime of the vehicle under same ownership). That was great.
that's good you didn't pay. i don't think they know how to change castor or camber so they didn't touch it. or anything, not even toe. i would ask for maximum castor while maintaining 0 camber. lots of people can get the castor in spec with the stock UCAs and a 2" lift. i would try a shop that specializes in off-road and lifted vehicles. failing that i would try the Toyota dealer.
Firestone said they forgot to record before readings (suspicious) and said no caster adjustments in your vehicle :). I think I understand how to adjust caster after reading the service manual pages, at least the theory. Thanks @Brandon Ryder!
 

Users who are viewing this thread

Back
Top Bottom