Builds The Clustertruck Rides Again - Refurbishing a 1975 Chevota

This site may earn a commission from merchant affiliate
links, including eBay, Amazon, Skimlinks, and others.

Last question -

Is there a trick to getting that C-clip off the back of the hub face (pictured above), so I can separate the dial and get to the o-ring, etc.?

Most came off easily, but this, and the similar one on the bottom of the hub I have not been able to figure out yet...
 
Rick, I used some snap ring pliers. I ground flat a couple extra tips I had to get to them thin ring in the groves. Once I got it started up a little I then used a thin blade screwdriver to push the rings up on the plier tips. It took a few minutes. It's like a three hand job! Jeff
 
Rick, I used some snap ring pliers. I ground flat a couple extra tips I had to get to them thin ring in the groves. Once I got it started up a little I then used a thin blade screwdriver to push the rings up on the plier tips. It took a few minutes. It's like a three hand job! Jeff

My snap-ring pliers push out on the rings, they don't pull in. I was under the impression these ones need to be pulled together, right? I thought about using two small screwdrivers to pull them together, but I was afraid I'd damage something!

How's your 40 coming along? Any luck getting the Gozzard body transferred over?
 
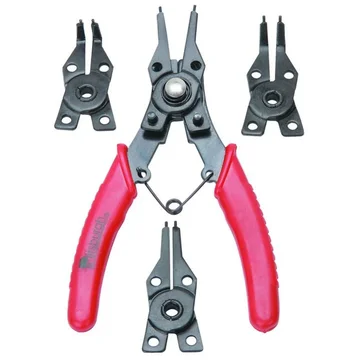
They make Snap Ring Pliers that pull in also. I think they call them reversible. A small needle nose plier might work also.

Got the frame cleaned and painted. Gozzard tub mounted temporarily and front end test fitted. I found that Trans cover you were looking for. Jeff
 
They make Snap Ring Pliers that pull in also. I think they call them reversible. A small needle nose plier might work also.

Got the frame cleaned and painted. Gozzard tub mounted temporarily and front end test fitted. I found that Trans cover you were looking for. Jeff

Awesome! Glad to hear you are making progress. That trans cover - would that be the cover plate that covers the clutch/flywheel underneath (bottom of the bellhousing)? If so I'll buy it from you if the price is right and you don't need it. Might be a little while though, gotta dump my funds into the brakes and axles right now...Shoot me a PM.
 
My snap-ring pliers push out on the rings, they don't pull in. I was under the impression these ones need to be pulled together, right? I thought about using two small screwdrivers to pull them together, but I was afraid I'd damage something! How's your 40 coming along? Any luck getting the Gozzard body transferred over?
Rick, Nice progress. I'm getting there, not much work the past two weeks.

These are the snap ring pliers that reverse - mine are similar.

image-4079517840.webp
Pliers

Not sure about your other questions, but the knuckles look clean.
image-4079517840.webp
 
Rick, Nice progress. I'm getting there, not much work the past two weeks.

These are the snap ring pliers that reverse - mine are similar.

Not sure about your other questions, but the knuckles look clean.

Thanks! Yeah I tried to squeeze in as much time degreasing as I could around the holidays. At this point, they are pretty clean. The paint arrived from Eastwood yesterday. I think I'm going to take a wire wheel to some parts, then prep and paint.

It appears the inside of the knuckles also had paint on them at one point. I'm thinking I might not paint them...I have not been able to get the grease out of all of the orifices in there (particulatly where the studs were run through for the steering arms/trunnion bearing carrier). the knuckles will be packed with grease. I'm assuming this is most likely good enough to prevent rust on the inside.

My snap ring pliers don't have the interchangeable heads/reversible option - I believe they are these ones, or similar:
671603.jpg
 
Thanks! Yeah I tried to squeeze in as much time degreasing as I could around the holidays. At this point, they are pretty clean. The paint arrived from Eastwood yesterday. I think I'm going to take a wire wheel to some parts, then prep and paint. It appears the inside of the knuckles also had paint on them at one point. I'm thinking I might not paint them...I have not been able to get the grease out of all of the orifices in there (particulatly where the studs were run through for the steering arms/trunnion bearing carrier). the knuckles will be packed with grease. I'm assuming this is most likely good enough to prevent rust on the inside. My snap ring pliers don't have the interchangeable heads/reversible option - I believe they are these ones, or similar:

The are what I have. Works fine for light stuff but heavier rings I bought a Knoppix brand plier that only expands.

http://www.acehardware.com/product/index.jsp?productId=1286443
 
Work slowly progressing. More parts (and paint!) arrived tonight!

One of the hubs is completely torn down, the other is about 3/4 of the way there.

The o-rings that go around the hub dials are pretty dry rotted and need to be replaced - very brittle. Is there a specific o-ring for the job, or should I just take the dial to a hardware store and mess around until I find one that works?

Also - I almost lost the detent ball, it flew out when I pulled the hub face off. :whoops:

I did not see the "spring" others have discussed losing, which probably means I just lost it. Could the ball have fallen out without the spring?
image-3838245816.webp
image-3230924096.webp
image-1344300013.webp
image-2271384509.webp
 
Last edited:
More cleaning - finally down to the angle grinder/wire brush attachment. The original intent was to just remove the flakey stuff, but the grinder had other ideas...Almost ready for paint!

There is a significant amount of pitting on several of the sealing surfaces. If this degree of pitting a cause for concern, and if so, is there a remedy?
image-1298169930.webp
image-2165257086.webp
image-4099559165.webp
image-2946101517.webp
image-1081569346.webp
 
An attempt at some better shots of the pitting - is this a problem?
image-305214770.webp
image-2692412993.webp
image-3889721722.webp
image-967690268.webp
 
Is that where bearings make contact?

Well, things spin around the spindle shaft, but those are fine. The pitting is all on the sealing surfaces (where the paper seals ride between parts to keep the grease in. All of the bearing surfaces OK. I posted another thread about this, and the general consensus is that the pitting, where it is, is not an issue. Apparently, this is pretty common, and more indicative that the seals are doing their job of keeping moisture OUT of the places where it would do real damage. The source is reliable (Poser) so I'm going to move forward with paint, and hope he's right!

Also note: the inner "ring" at the base of the spindle is not pitted - it's just not machined smooth. I'm talking more about the outer pitting on the machined outer ring.
 
Got up early this morning and headed down to a friend's place in Aberdeen who happened to have a 12 ton press. Traded a 6 pack of Dogfish Head 60 minute for about 20 minutes worth of press work, and the last portion of the FJ62 knuckle teardown is complete!

Once I get all the old grease and cocoons out of the hubs, they should clean up nicely. The rotors will be scrapped for new ones. There's plenty of meat left on them, but given what a pain they are to get off, I'd rather start at "zero time" on them as well.

Only loosely related - my friend in Aberdeen has found a proper use for a Jeep Grand Cherokee. He's managed to make himself a pretty impressive Truggy.

Now, it's back to my shop sometime in the next week (hopefully) to get the last of these parts cleaned up, and lay down a fresh coat of paint on everything.

To anyone planning to use these hubs in the future - do NOT try to knock the studs out with the BFH - a press is the way to go! Even used it to separate the hub from the rotor (they had rusted together)
Separated Hubs and Rotors.webp
Collins Truggy.webp
 
Last edited:
Small progress update. With the hubs separated, i knocked out the bearing races tonight. Looks like it was running Koyos!

Once I get the hubs cleaned up, I'll be moving on to paint.

When separating the hubs from the rotors, the rotors were rusted to those smooth surfaces around the wheel stud holes pretty badly. Does anyone put a layer of anti- seize or something between the rotors and hubs to reduce this, or am I over (or under) thinking things?

Found a small nick in the edge of the hub (last picture). I don't think it's a problem but insight would be appreciated!
image-3467920146.webp
image-791161159.webp
image-1163601753.webp
 
The beatings will contine until morale improves.

I enthusiastically dove into my 4th or 5th hour of wire brushing knuckle components...:rolleyes:

After removing the cocoons from the hubs, I took to them with the angle grinder for parts I could reach, then files/wire brushes for the spots the angle grinder couldn't get to.

At this point I am pretty much ready for paint/reassembly. I (think) all I have left to do is clean these parts with solvent, hit them with rust converter, tape off the parts that don't need paint, and get to beautifying!
excited.webp
Cocoon Removal.webp
hub before and after.webp
 
I also got around to installing the SB0 starter bushings I purchased a few weeks back. I had seen, in another mud member's post, this neat way to taper the bushing, to make installation easier.

I put the bushing in one of the tapered cone washer holes, covered it with a piece of wood, and tapped it with a deadblow.

Here is where things went awry - As we all know...Tie Rod Ends (and the holes they go into) are tapered. Do not attempt to install your bushings from the narrow side of the taper. Catastrophic failure results.

Facepalm moment...
tapering.webp
tapered.webp
The wrong way.webp
broken bushing.webp
 
Last edited:
The correct way

Luckily, I bought 4 SB0's under the assumption that I would do something stupid like that, so I restarted the process, and successfully installed the bushings into the steering arm.

The second steering arm I did, I didn't even bother tapering the end. I simply applied liberal amount of 3-in-1 machine oil, and pressed it in with the bench vice. It actually came out much cleaner, without pre-tapering it.

The right way - on looks a little rougher than the other, but I think it will be alright.
the right way.webp
Bushings.webp
bushings installed.webp
 
Hmm, bushings for the TREs. New info to me.

VV - Bushings are required because I am running the 60-series steering arms with the stock FJ40 TRE's. The stock 60-series tie rod ends were larger, so you put bushings in the holes to adjust the taper.

Most of the cruiser parts houses sell a steel bushing specifically for this task (for something like $13 per bushing), but many have had good luck using a Chevrolet Starter Bushing Part # SB0 (about $4.00). So I figured I would give this way a shot.
 

Users who are viewing this thread

Back
Top Bottom