Navigation
Install the app
How to install the app on iOS
Follow along with the video below to see how to install our site as a web app on your home screen.
Note: This feature may not be available in some browsers.
More options
Style variation
You are using an out of date browser. It may not display this or other websites correctly.
You should upgrade or use an alternative browser.
You should upgrade or use an alternative browser.
Tackling the doors
- Thread starter lostmarbles
- Start date
This site may earn a commission from merchant affiliate
links, including eBay, Amazon, Skimlinks, and others.
More options
Who Replied?Awesome thread Tom! I never get sick of seeing pics of your gorgeous 40.
It seems your timing is impeccable - I had to replace the cards in my door trim over the weekend and while doing so discovered some rust holes in the bottom of my passenger side (RHD) door.
Nice tip on flattening one side of the door bolt heads. I was getting a little sick of having to flip down the windscreen every time I took the doors off and put em back on again.
I think after reading this thread, I'll fully restore both doors. Mine don't lock - well, they DID lock with a central locking abomination the PO installed because he didn't have the keys to the door locks after replacing the doors at some stage. The central locking/alarm box was causing me grief so I pulled it.
I also don't have the window felts in mine which leads to a lot of rattling when the windows are down. And as an aside, my passenger side winder assembly rattles - really badly. The spline (?) rattles around in its housing - sounds like lead sinkers in a tin can. The assembly is well-greased, but I'm going to do a quick fix by squirting a little silicone into one side of the gap so I can still wind the windows up and down after I break the seal after the silicone has set. Hopefully that'll be a more or less permanent fix to the rattle.
Cheers
- Thread starter
- #83
Spent the whole of this morning finishing off the welding. (I always work late shifts which gives me the best part of every day to myself!)
Here's another rust hole in the driver's door patched:
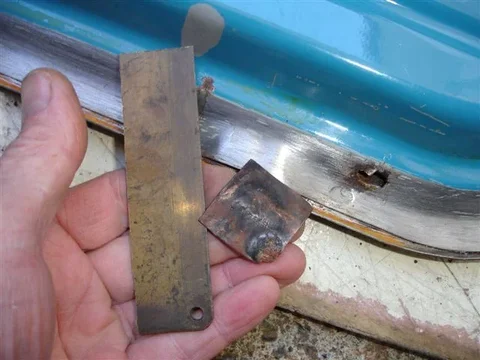
It can be useful to place a scrap of copper or brass sheet behind where you're welding to stop too much birdsh#t appearing on the other side.


Here's another rust hole in the driver's door patched:

It can be useful to place a scrap of copper or brass sheet behind where you're welding to stop too much birdsh#t appearing on the other side.

- Thread starter
- #84
- Thread starter
- #85
And here's that rusty corner I started yesterday:
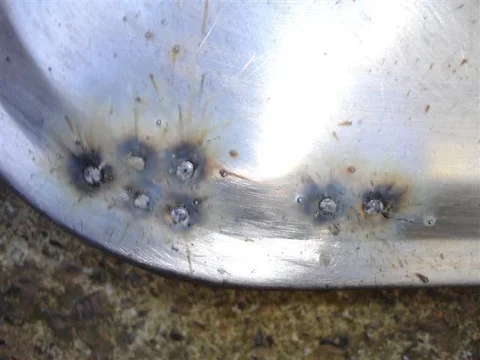
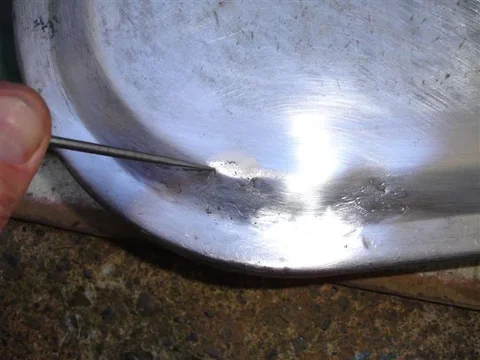
I can no longer find any weak areas where I can push the point of a scriber thru .... so I'll call that done.
I don't use any "filler" in my preparation/painting so the panels on this door will be just "steel, POR15, and Dulon". And despite this, I don't expect this area to show anything but "minor imperfections in the finish" (that few will ever notice).
And here's an inside view of that worst corner:

I know no-one can see the inside - but it has to be reasonably tidy or else the POR15 will be unable to stop rust reoccuring.


I can no longer find any weak areas where I can push the point of a scriber thru .... so I'll call that done.
I don't use any "filler" in my preparation/painting so the panels on this door will be just "steel, POR15, and Dulon". And despite this, I don't expect this area to show anything but "minor imperfections in the finish" (that few will ever notice).
And here's an inside view of that worst corner:

I know no-one can see the inside - but it has to be reasonably tidy or else the POR15 will be unable to stop rust reoccuring.

- Thread starter
- #86
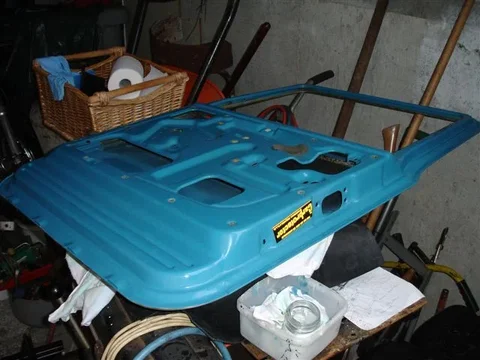
Well work is progressing on my RH door.
I'm waiting for fine weather to spray the outside but at least the inward-facing surfaces are all done now:
Incidentally the "lower window run felt" (that I claimed to be "indestructable" when I did my LH-door) ... fell to bits on removal from this door :
:

So I can't reuse it on the "vent-window-frame" (like I did with the LH-door). Instead I'll have to use some of that Rare Spares stuff (shown in the same pic above).


I'm waiting for fine weather to spray the outside but at least the inward-facing surfaces are all done now:

Incidentally the "lower window run felt" (that I claimed to be "indestructable" when I did my LH-door) ... fell to bits on removal from this door

So I can't reuse it on the "vent-window-frame" (like I did with the LH-door). Instead I'll have to use some of that Rare Spares stuff (shown in the same pic above).
Last edited:
- Thread starter
- #87
Here's a view of the new "lower window-run stuff" supplied by Toyota. It is now made mostly of rubber instead of being "all felt" (and is of similar design to the Rare Spares flexible stuff - but a bit more "sturdy"):

And these photos explain why you shouldn't ever attempt to use "flexible bailey channel" in the top section of your doors:


Because the rubber is flexible, I think it needs to be held/supported within a metal channel. And this channel is simply not present in the larger part of the door. (So you must use "metal-backed-bailey" for that.)


And these photos explain why you shouldn't ever attempt to use "flexible bailey channel" in the top section of your doors:


Because the rubber is flexible, I think it needs to be held/supported within a metal channel. And this channel is simply not present in the larger part of the door. (So you must use "metal-backed-bailey" for that.)
Last edited:
- Thread starter
- #88
I'm getting there with the RH door.
One thing I forgot to mention .... If you're going to the trouble of "degreasing and prepping" bare steel for paint, then you should use gloves if you're going to handle it before painting:

Here's a shot of the primer brushed onto the RH door a couple of days ago:

And here it is accumulating all that airborne cr@p (sandfly carcasses, pollen, airbourne seeds etc) that always add "body" to home paint jobs:

(A plague of solvent-sniffing sandflies always appears when I'm painting.)


One thing I forgot to mention .... If you're going to the trouble of "degreasing and prepping" bare steel for paint, then you should use gloves if you're going to handle it before painting:

Here's a shot of the primer brushed onto the RH door a couple of days ago:

And here it is accumulating all that airborne cr@p (sandfly carcasses, pollen, airbourne seeds etc) that always add "body" to home paint jobs:

(A plague of solvent-sniffing sandflies always appears when I'm painting.)
- Thread starter
- #89
And I'm trying to get a thicker coat of fishoiline on the upper-inner reaches of the door cavity this time by allowing it to "pool" by keeping the door horizontal for a few days as the fishoilene "congeals" (rather than tipping it vertical soon after application which causes most to immediately drain off).
This photo hopefully shows how it has been sucked into the seam by capillary-attraction which should keep the seam free of further rust (for my lifetime at least):

And, as mentioned before, I'm washing this new door-seal properly this time with the aim of getting better adhesion to the "contact-adhesive":


(Thanks to Rare Spares in Brisbane for the excellent quality seal!)


This photo hopefully shows how it has been sucked into the seam by capillary-attraction which should keep the seam free of further rust (for my lifetime at least):

And, as mentioned before, I'm washing this new door-seal properly this time with the aim of getting better adhesion to the "contact-adhesive":


(Thanks to Rare Spares in Brisbane for the excellent quality seal!)
- Thread starter
- #90
- Thread starter
- #91
- Thread starter
- #92
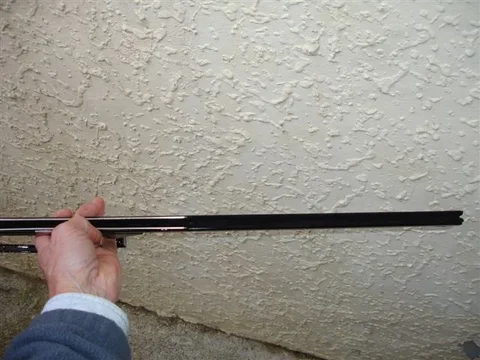
Unlike the LH- version, I used some flexible bailey for the lower part of the channel in this RH "vent-window-assembly":

But after doing it, I wouldn't recommend others to follow. - I believe this flexible bailey is now responsible for my RH window being stiffer to wind up or down than my left window. So I recommend that others use ONLY Toyota/OEM bailey!
So don't use flexible bailey (like the stuff I purchased from RareSpares) ANYWHERE at all!
(I won't fix it because the stiffness isn't so bad that it warrents the effort now.)
When gluing stuff like this I only glue the rear surface. Because if I was to glue the sides as well, I would never get it to seat properly. (It would stick to the sides before getting the rear to stick.)

And here is what I ended up with there:


But after doing it, I wouldn't recommend others to follow. - I believe this flexible bailey is now responsible for my RH window being stiffer to wind up or down than my left window. So I recommend that others use ONLY Toyota/OEM bailey!
So don't use flexible bailey (like the stuff I purchased from RareSpares) ANYWHERE at all!
(I won't fix it because the stiffness isn't so bad that it warrents the effort now.)
When gluing stuff like this I only glue the rear surface. Because if I was to glue the sides as well, I would never get it to seat properly. (It would stick to the sides before getting the rear to stick.)

And here is what I ended up with there:

I've looked at this thread so many times, I figure that there is nothing I can add but just thought I'd say thank you for taking the time.
Truly an excellent write up.
Cheers,
Doug
Truly an excellent write up.
Cheers,
Doug
- Thread starter
- #94
- Thread starter
- #95
- Thread starter
- #96
Thanks for the heads up Lostmarbles, I now have a passenger side door that opens from the outside and inside.
Edit: Yes, the lock can be removed with the glass wound all the way up and the bottom bolt removed that holds the bailey channel in place. I'm rather skilled at it now....
Cool
Thanks Tom ! Now I don't have to reference my gazillion pics/notes when I assemble my full doors
Awesome thread Tom! I never get sick of seeing pics of your gorgeous 40.
It seems your timing is impeccable - I had to replace the cards in my door trim over the weekend and while doing so discovered some rust holes in the bottom of my passenger side (RHD) door.
Nice tip on flattening one side of the door bolt heads. I was getting a little sick of having to flip down the windscreen every time I took the doors off and put em back on again.
I think after reading this thread, I'll fully restore both doors. Mine don't lock - well, they DID lock with a central locking abomination the PO installed because he didn't have the keys to the door locks after replacing the doors at some stage. The central locking/alarm box was causing me grief so I pulled it.
I also don't have the window felts in mine which leads to a lot of rattling when the windows are down. And as an aside, my passenger side winder assembly rattles - really badly. The spline (?) rattles around in its housing - sounds like lead sinkers in a tin can. The assembly is well-greased, but I'm going to do a quick fix by squirting a little silicone into one side of the gap so I can still wind the windows up and down after I break the seal after the silicone has set. Hopefully that'll be a more or less permanent fix to the rattle.
Cheers
I've looked at this thread so many times, I figure that there is nothing I can add but just thought I'd say thank you for taking the time.
Truly an excellent write up.
Cheers,
Doug
Thanks Guys.
If I'd read a thread like this before starting my doors I would have done a better job of them.

- Thread starter
- #97
OK I can wrap this up now.
My "rolling restoration" (which is probably a misuse of the word "restoration") has been going on for probably 2 years now. It started with the windshield, then cowl, then engine bay. Then I worked my way under the vehicle to the rear crossmember, and then came around the sides to the front doors. (So I have yet to complete the "barn doors" aka "ambulance doors", the inside of the tub and the hardtop.) But now that these 2 doors are done I'm going to give it a break for a while because I've finally got the rust under control and quite frankly I'm "sick to death" of painting. (I get fed up like this ... which is why doing a "body off restoration" would likely get me so fed up that I'd abandon the project half way through!) So it's now time to do much-needed work on the house (and just tinker with the landcruiser intermittently and briefly). Of course "working on the house" is really landcruiser-related anyway.... because within 2 years I want to give my BJ40 garage-space for the first time in its life!
So..... to finish off.....
I tried a different approach with the speaker in the RH door.
Used a hair drier to stretch the new plastic so that it can accomodate the speaker protrusion:


And here is the RH trim panel installed:


My "rolling restoration" (which is probably a misuse of the word "restoration") has been going on for probably 2 years now. It started with the windshield, then cowl, then engine bay. Then I worked my way under the vehicle to the rear crossmember, and then came around the sides to the front doors. (So I have yet to complete the "barn doors" aka "ambulance doors", the inside of the tub and the hardtop.) But now that these 2 doors are done I'm going to give it a break for a while because I've finally got the rust under control and quite frankly I'm "sick to death" of painting. (I get fed up like this ... which is why doing a "body off restoration" would likely get me so fed up that I'd abandon the project half way through!) So it's now time to do much-needed work on the house (and just tinker with the landcruiser intermittently and briefly). Of course "working on the house" is really landcruiser-related anyway.... because within 2 years I want to give my BJ40 garage-space for the first time in its life!
So..... to finish off.....
I tried a different approach with the speaker in the RH door.
Used a hair drier to stretch the new plastic so that it can accomodate the speaker protrusion:


And here is the RH trim panel installed:

- Thread starter
- #98
Now I think everyone is reluctant to admit mistakes. (Consequently you often have to be careful following in their footsteps.)
So resisting this tendency (of avoiding admitting error) ...If I was to be starting another set of doors now I think I would choose OEM parts with the exclusion of all else. (And you don't often hear me express such support for OEM.)
But of course ... even this statement may be putting people on the wrong track ... because the "lower window run felt" supplied by Toyoto in 2010 is entirely different from the one supplied by them back in 1979 ... So how do I know their "main door seals" (for instance) haven't changed too (and perhaps "changed for the worse")?
Anyway... To complete this ...Here are pics of things I'm not happy with in my finished result.
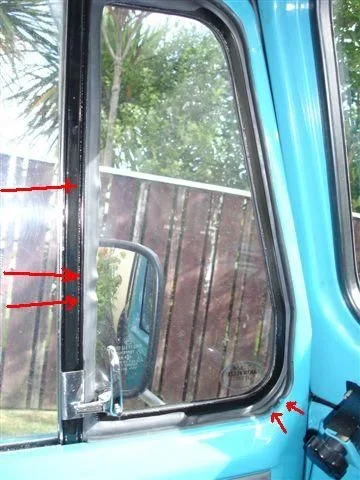
I got "crinkles" in my vent window rubbers:

The striker on the RH door is set outwards to its furterest position yet it still requires "a hefty slam" to get it to shut fully (to its "second click" position). In fact, the easiest way to shut it is to apply knee-pressure as it closes like this:

So that it......
Hopefully folk can learn from my experience here.

PS. I don't want to leave the impression that I'm disappointed in my work. That's not true. These doors are definitely in a far better shape than before I started. (I'm just anal ..that's all )
)


So resisting this tendency (of avoiding admitting error) ...If I was to be starting another set of doors now I think I would choose OEM parts with the exclusion of all else. (And you don't often hear me express such support for OEM.)
But of course ... even this statement may be putting people on the wrong track ... because the "lower window run felt" supplied by Toyoto in 2010 is entirely different from the one supplied by them back in 1979 ... So how do I know their "main door seals" (for instance) haven't changed too (and perhaps "changed for the worse")?
Anyway... To complete this ...Here are pics of things I'm not happy with in my finished result.
I got "crinkles" in my vent window rubbers:


The striker on the RH door is set outwards to its furterest position yet it still requires "a hefty slam" to get it to shut fully (to its "second click" position). In fact, the easiest way to shut it is to apply knee-pressure as it closes like this:

So that it......
Hopefully folk can learn from my experience here.

PS. I don't want to leave the impression that I'm disappointed in my work. That's not true. These doors are definitely in a far better shape than before I started. (I'm just anal ..that's all
The striker on the RH door is set outwards to its furterest position yet it still requires "a hefty slam" to get it to shut fully (to its "second click" position). In fact, the easiest way to shut it is to apply knee-pressure as it closes like this:
Well, I recently finished this on my '76 using OEM rubber, and mine are tight too. I've heard that they "squish" down before long, so, here's hoping.
- Thread starter
- #100
Well, I recently finished this on my '76 using OEM rubber, and mine are tight too. I've heard that they "squish" down before long, so, here's hoping.
Cool. Thanks for that.
I had a suspicion that OEM may perform no better than the stuff I used.
(I'm hoping for "squishing down" too.

Similar threads
Users who are viewing this thread
Total: 1 (members: 0, guests: 1)


