Spangler's 1/72 40 Build

This site may earn a commission from merchant affiliate
links, including eBay, Amazon, Skimlinks, and others.

Steeler58

SILVER Star
Joined
Nov 17, 2013
Threads
7
Messages
63
Location
Fredericksburg, PA
Here we go! I have my wife to thank for finally setting things into motion on my 40 journey. For as long as we've been married (1996), I've casually made mention of my fascination with 40's and how great it would be to own one.

In the mid 90's, on my daily commute to a previous job, I would pass by an old light blue 40 sitting quietly beside a garage on PA route 209 East of Elizabethville. Every day I'd go by and take a long glance to my left to see that truck just sitting there begging for help. At one point all those years ago, I even stopped in to ask the owner how much he wanted for it. While he was willing to sell and the price was reasonable by today's standards, I had no place to work on it and it was pretty badly rusted out. I still think about that truck today and the impact it made. Over the years since then we've spotted various non-running 40's on family vacations to northern PA. For various reasons (mainly a family, the joy of home ownership, and the lack of extra funds) I never took the leap to own one. Fortunately, my wife was paying attention all those years and the seeds were sewn.

Fast forward to early November, 2013. On a road inspection as part of her job as a pavement engineer, my wife spotted this old 40 standing guard as "lawn art" in a fairly remote part of northern PA. She sent me a message that day with the approximate coordinates and I quickly found it on Google Maps. The 40 fire was lit.
ImageUploadedByTapatalk1430307720.860116.webp
 
Last edited:
Just two days after spotting the lawn art 40, my wife (the 40 magnet) spotted this 40 for sale near Hershey. It was parked along a road that neither of us normally travel. As soon as she saw it she sent me this photo. I called the owner to set up a test drive. image.webp
 
Last edited:
looks like a good candidate for a frame off. Id like to see more pics..you are close to a great parts resource. Gary has a lot of stuff.
 
It's interesting that you mention Gary. He's about to enter the story.

So, on or about November 12, 2013 I met the owner of the green 40 above for a look see and test drive. The owner seemed nice enough and was very helpful. I believe he was asking $11,000 but said he would sell for just over $10,000. He fired her up and sent me for a drive.

The route was a four or five mile loop. The truck seemed pretty solid and the 3 speed shifted fine. At one point as I approached a slight right handed descending bend in the road at about 40 mph, my steering inputs were less than responsive and the truck stayed left and wandered into the other lane. If another vehicle had been coming the other way, the test drive would've ended badly. My excitement faded. Unfortunately, the truck sputtered going uphill on small climbs and accelerations were lagging. There were other things nagging at me and I knew I would pass on this opportunity. While the paint job looked ok, I noticed several places where the new paint was chipped revealing the true original color of the rig. I wondered what else was hiding. The owner was forthcoming and mentioned that the Weber carb needed some work. He also made mention of something called MUD and that I could get updates on my phone. I had no idea at the time what he was talking about. The owner also mentioned a guy in the coal region that bought a lot of 40s and had access to parts. He didn't remember any names but he had heard of him. I thanked the owner for the drive and drove away slightly disappointed.
 
Regardless of how things went on the test drive, my search for a 40 intensified. I searched CL and as fate would have it, there was a nice looking '72 for sale near Wagontown, PA. From the ad and the associated photos, the truck looked solid and the body appeared to be in good shape. The best I could tell the interior looked original and relatively untouched. The downside was that the ad mentioned the engine was seized. I know everyone likes pictures so here's the Dune Beige '72.
ImageUploadedByTapatalk1430328580.172658.webp
ImageUploadedByTapatalk1430328595.217741.webp
ImageUploadedByTapatalk1430328608.812653.webp
ImageUploadedByTapatalk1430328620.881970.webp
ImageUploadedByTapatalk1430328634.182241.webp
 
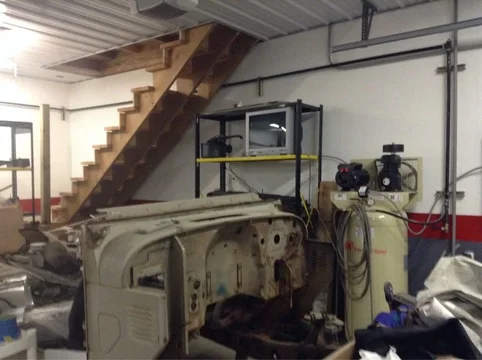
Hey Andy, thanks for the bump and the interest in my project. Unfortunately, not enough progress over Summer and this fall. However, I'm a few steps closer to getting the garage to a point where I can work comfortably. Late summer I insulated the ceilings and put up metal. I spent a fair amount of time prepping the walls for paint. I went with the typical Toyota dealer color scheme. I was finally able to get my air compressor installed and have run air lines along the side and back walls. I've been working to get my work bench configured, stripping and repainting the metal base cabinets and will be making the bench top over the holidays. I've been learning how to use my pot media blaster and recently blasted a few parts in my small cabinet using aluminum oxide media. I picked up gloss black SEM Rust Shield today so I can spray the parts I've blasted. Here's a pic of the 40, everything is stripped off of it. I've been thinking through ways to hoist the tub off so I can start blasting the frame. I've landed on using cables and pulleys from the ceiling using a winch. And, oh, yeah, have been designing a paint/blast booth out of 2x2s and luan that I can knock down.ATTACH=full]1180033[/ATTACH]


Sent from my iPad
 

Attachments

  • ImageUploadedByTapatalk1450829613.238005.webp
    ImageUploadedByTapatalk1450829613.238005.webp
    74.9 KB · Views: 162
With cold weather arriving here in Pennsylvania it's put a damper on repainting media blasted parts. Spent some time over the weekend cleaning switches. Will probably just wait to paint recessed areas at reassembly. Hazard switch image isn't recessed so will be a challenge to restore to its former self. Need to research how others have restored the chromed threaded pieces. Not sure what those are made of and the chrome plating has pretty much flaked and is gone.
20161217_122028.webp
20161217_153422.webp
20161217_104359.webp
20161217_115155.webp
 
So I guess you bought the Dune beige '72 and starting a restoration.
Its been three years since I bought the 72 and I now mark time by that anniversary date. Three years ago I never even knew about this forum but now wish that I had. I disassembled, boxed, and tagged nearly everything in 2014. All the while, she's been patiently waiting for me in a bay of my garage.

Going for a fairly stock resto. Body is in good shape. Need a new DS floor pan and rocker. Tool box will need repairs/reconstruction. Fuel tank has pinholes so will need to decide whether to send it away for restoration. Have a formerly running F.5 sitting in the other corner of the garage. The list is long.

I am in the process of a '72 build as well. We are also celebrating it's 3 year anniversary this week. Build date on mine is 12/71. Good luck on your restoration.
 
Couldn't help ribbing you a little. It looks like a good truck that you started with and I am sure it will be a great finished product. This forum is a great tool for restoration. Break it down into bite size pieces if you can, any restoration certainly takes some stick-to-itiveness. Even if you are doing a lot of subcontracting it's a lot of work and research.
 
It seems like I've been preparing for "next steps" forever. One thing on the list was to build my own rotisserie. Used the design from Red Wing Steel Works with a few mods. I really enjoy welding and learned a lot. Next up... complete the hoist system to remove the tub. My son testing some counter weight concepts.
20170408_164125.webp
Screenshot_20170320-115133.webp
 
Worked this week preparing to hoist the tub. Since I often work early in the morning and nearly always by myself, I needed a way to hoist the tub off the frame safely without a lot of help. So, rigged up unistrut, cables, pulleys, and a HF 1300 lb. hoist. Mounted the hoist to the poured concrete rear wall with 1/2" red heads. Braced the tub and the door openings with 1" tube. Lift points in the rear are the middle of each wheel well. Front lift points are the window hinge bolt holes.

20170423_110323.webp
 
Last edited:
Today was a big day. The hoist worked great. Lifted the tub about 18 inches above the frame and rolled the chassis out from underneath. Stripped the frame of the rear harness, brake lines, fuel line, shocks, and exhaust hangers. Stuck on how to remove the leaf springs and axles so need to research.

20170423_110647.webp


20170423_110718.webp


20170423_112502.webp
 
Progress! Feels good don't it. Frame looks solid. Nice work.

Did you clean the insides of your switches? I finally got around to popping the covers off a couple of mine, super simple and boy were they dirty inside.

I found a good USA made paint pen if you want to touch up your wiper switch knob. Nissen. You prime the pen, then lightly touch each groove. The paint will flow nicely from the pen and fill up the groove. Let the paint set up for about 5 minutes and then use a razor blade to (lightly) scrape any unwanted excess paint.
IMG_3669.webp
 
Last edited:
Progress! Feels good don't it. Frame looks solid. Nice work.

Thanks. The frame is in great shape with one exception. Progress does feel pretty nice. To be honest, I got a little weepy when we were finally able to slide the frame out.

Did you clean the insides of your switches? I finally got around to popping the covers off a couple of mine, super simple and boy were the dirty inside.

Didn't clean the inside as I figured I'd break those little tabs. I may try it out on an old switch first.

I found a good USA made paint pen if you want to touch up your wiper switch knob. Nissen. You prime the pen, then lightly touch each groove. The paint will flow nicely from the pen and fill up the groove. Let the paint set up for about 5 minutes and then use a razor blade to (lightly) scrape any unwanted excess paint.

Nice. I wanted to stay stock Japanese so I picked up this at the local hobby store...lol. Note the condition of the frame paint under the body mounts.

Red Rocker... as in the one and only Sammy Hagar?


20170424_055717.webp
 
Last edited:
The story of your FJ40 quest is perfect. I look forward to watching your project progress. Yah, I hit a couple milestones during my first resto where, in the words of Arnold Palmer "I was a sentimental slob".

My handle is just random, I was listening to DMB at Red Rocks when a username was needed. I do like Sammy's stuff though.

I use needle nose pliers to gradually pry those tabs. The contacts inside get cruddy, the grease gets dried out also. If you re-use your harness, be sure to clean all the terminals while it's out. I didn't and had random issues due to poor connections and/or increased resistance.
 
Nice work, looking forward to seeing more.
 

Users who are viewing this thread

Back
Top Bottom