Rear Heater Delete/Coolant Line Cleanup

This site may earn a commission from merchant affiliate
links, including eBay, Amazon, Skimlinks, and others.

Why is preventing icing in the throttle body important? I always thought it was to prevent the throttle butterfly from freezing in the open position. Cruise control would keep the butterfly stationary long enough for it to freeze open if you were on a long, flat, cold, damp road.

My mistake.

The cruise control should never be used in conditions where icing in the throttle body could be possible. There could be ice forming on the road as well.

The Cruise Control is not going to limit movement of the butterfly any less than driving without. The way I drive, by anticipating hills and lightly accelerating before the CC would, not necessarily maintaining speed as I reach the apex, there will be less rotation of the butterfly. I normally get better MPG driving this way than by using CC.
 
Bumping this back to life since I'm in process on this as a "while I'm in there" item.

@LandCruiserPhil - Since you have removed the hard lines before (or anyone else that has). Is it much easier to do with the head off?

I was tracing back the lines today and looking for anchor points and it seems like there are the two in the engine bay, another not too far back after they join up and a third near the heat shield by the catalytic converters. Then the joins with the soft lines there before they go up in the truck. Is that correct or am I missing another spot?

Yes removing all rear heater piping without removing the head I would give an "extremely difficult" label. Although I have never removed the metal rear heater lines with the head off it has to be easier.:)
 
Crap, this reminded me to order the fandangle hose from Phil ;)
 
Anybody know the gasket PN for the hardline elbow off the top of the thermostat?
  • PHH hardline top "Elbow" to heater valve (Toyota PN: 87245-60480)
 
I just wanted to give a quick picture tutorial on how I cleaned up my heater and coolant lines under the hood.

On my '93, this method reduced the number of heater hose connections from over 50, to about 10. It also makes the whole system much more simple. This method requires deleting the rear heater (obviously), PAIR system (which Toyota did on later models anyway), and the throttle body coolant lines. On colder-climate trucks, you may want to avoid deleting TB coolant lines.


Replacement parts needed:


To start off with, now is a good time to replace your Pesky Heater Hose ("PHH") and heater valve, since you're going to drain the cooling system and replace lines anyway. There are plenty of great write-ups on this portion of the procedure, so I won't include too much on that topic.

Slee - PHH (Toyota 80 Series Land Cruiser)
ExpeditionLCMajorcoolingoverhaul


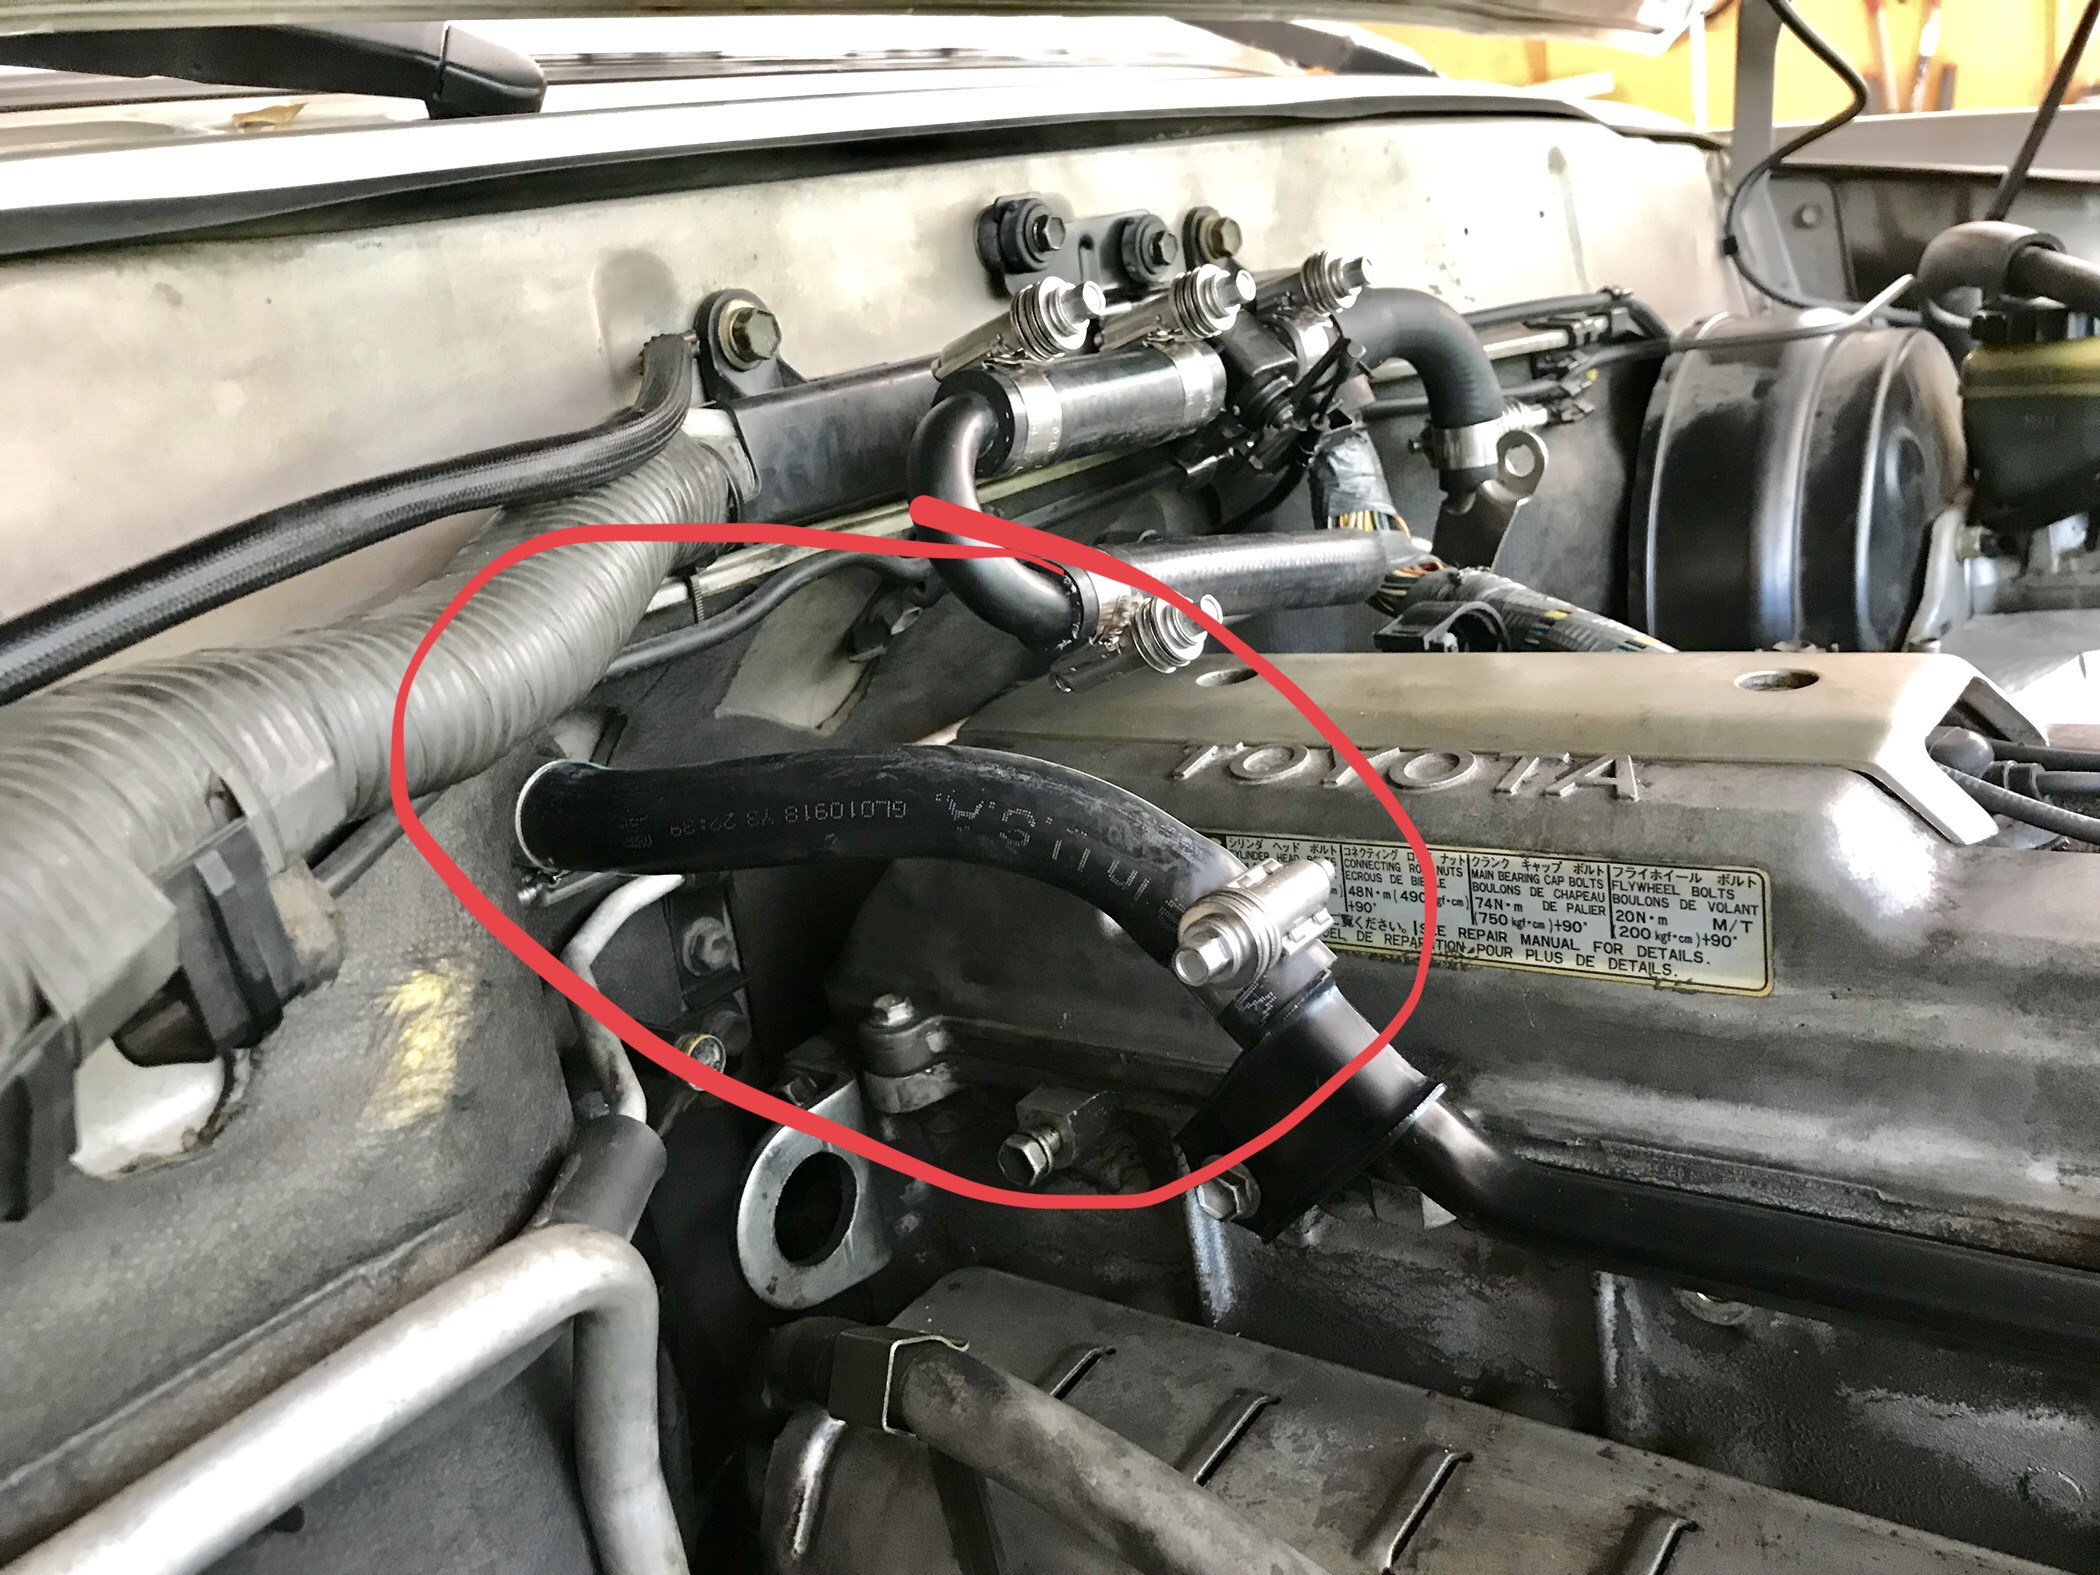
The 90* heater elbow (Toyota PN: 87245-60480) goes on top of the PHH hard line. You can bypass the hardline for even fewer connections, but I was afraid a rubber bypass line would rub somewhere and leak. Don't worry, I re-wrapped the engine harness after this photo was taken.

BD26_D5_F5_ED2_C_46_C6_946_E_00_E89_A67_AF3_A.jpg


While you're in the DS front fender doing the PHH, pull the line for the "PHH Neighbor" that routes from the head to the intake manifold hardline.

A77_AE53_D_4_A3_F_4_DD4_A112_04_D04950_F97_E.jpg


Cap the "PHH Neighbor" port with one of your 5/16" rubber hose caps.
D306_B952_DC01_48_A8_A272_82_D5_C7_F42_D34.jpg


Now move to the water pump and pull the 5/16" line coming off the top of the thermostat housing.
0229131_B_E54_E_40_F0_B871_B21_EA343_D898.jpg


Cap the thermostat port with the other 5/16" rubber cap.
989275_E8_6_F22_4_B2_D_88_E9_7_EA44_F0_D537_F.jpg


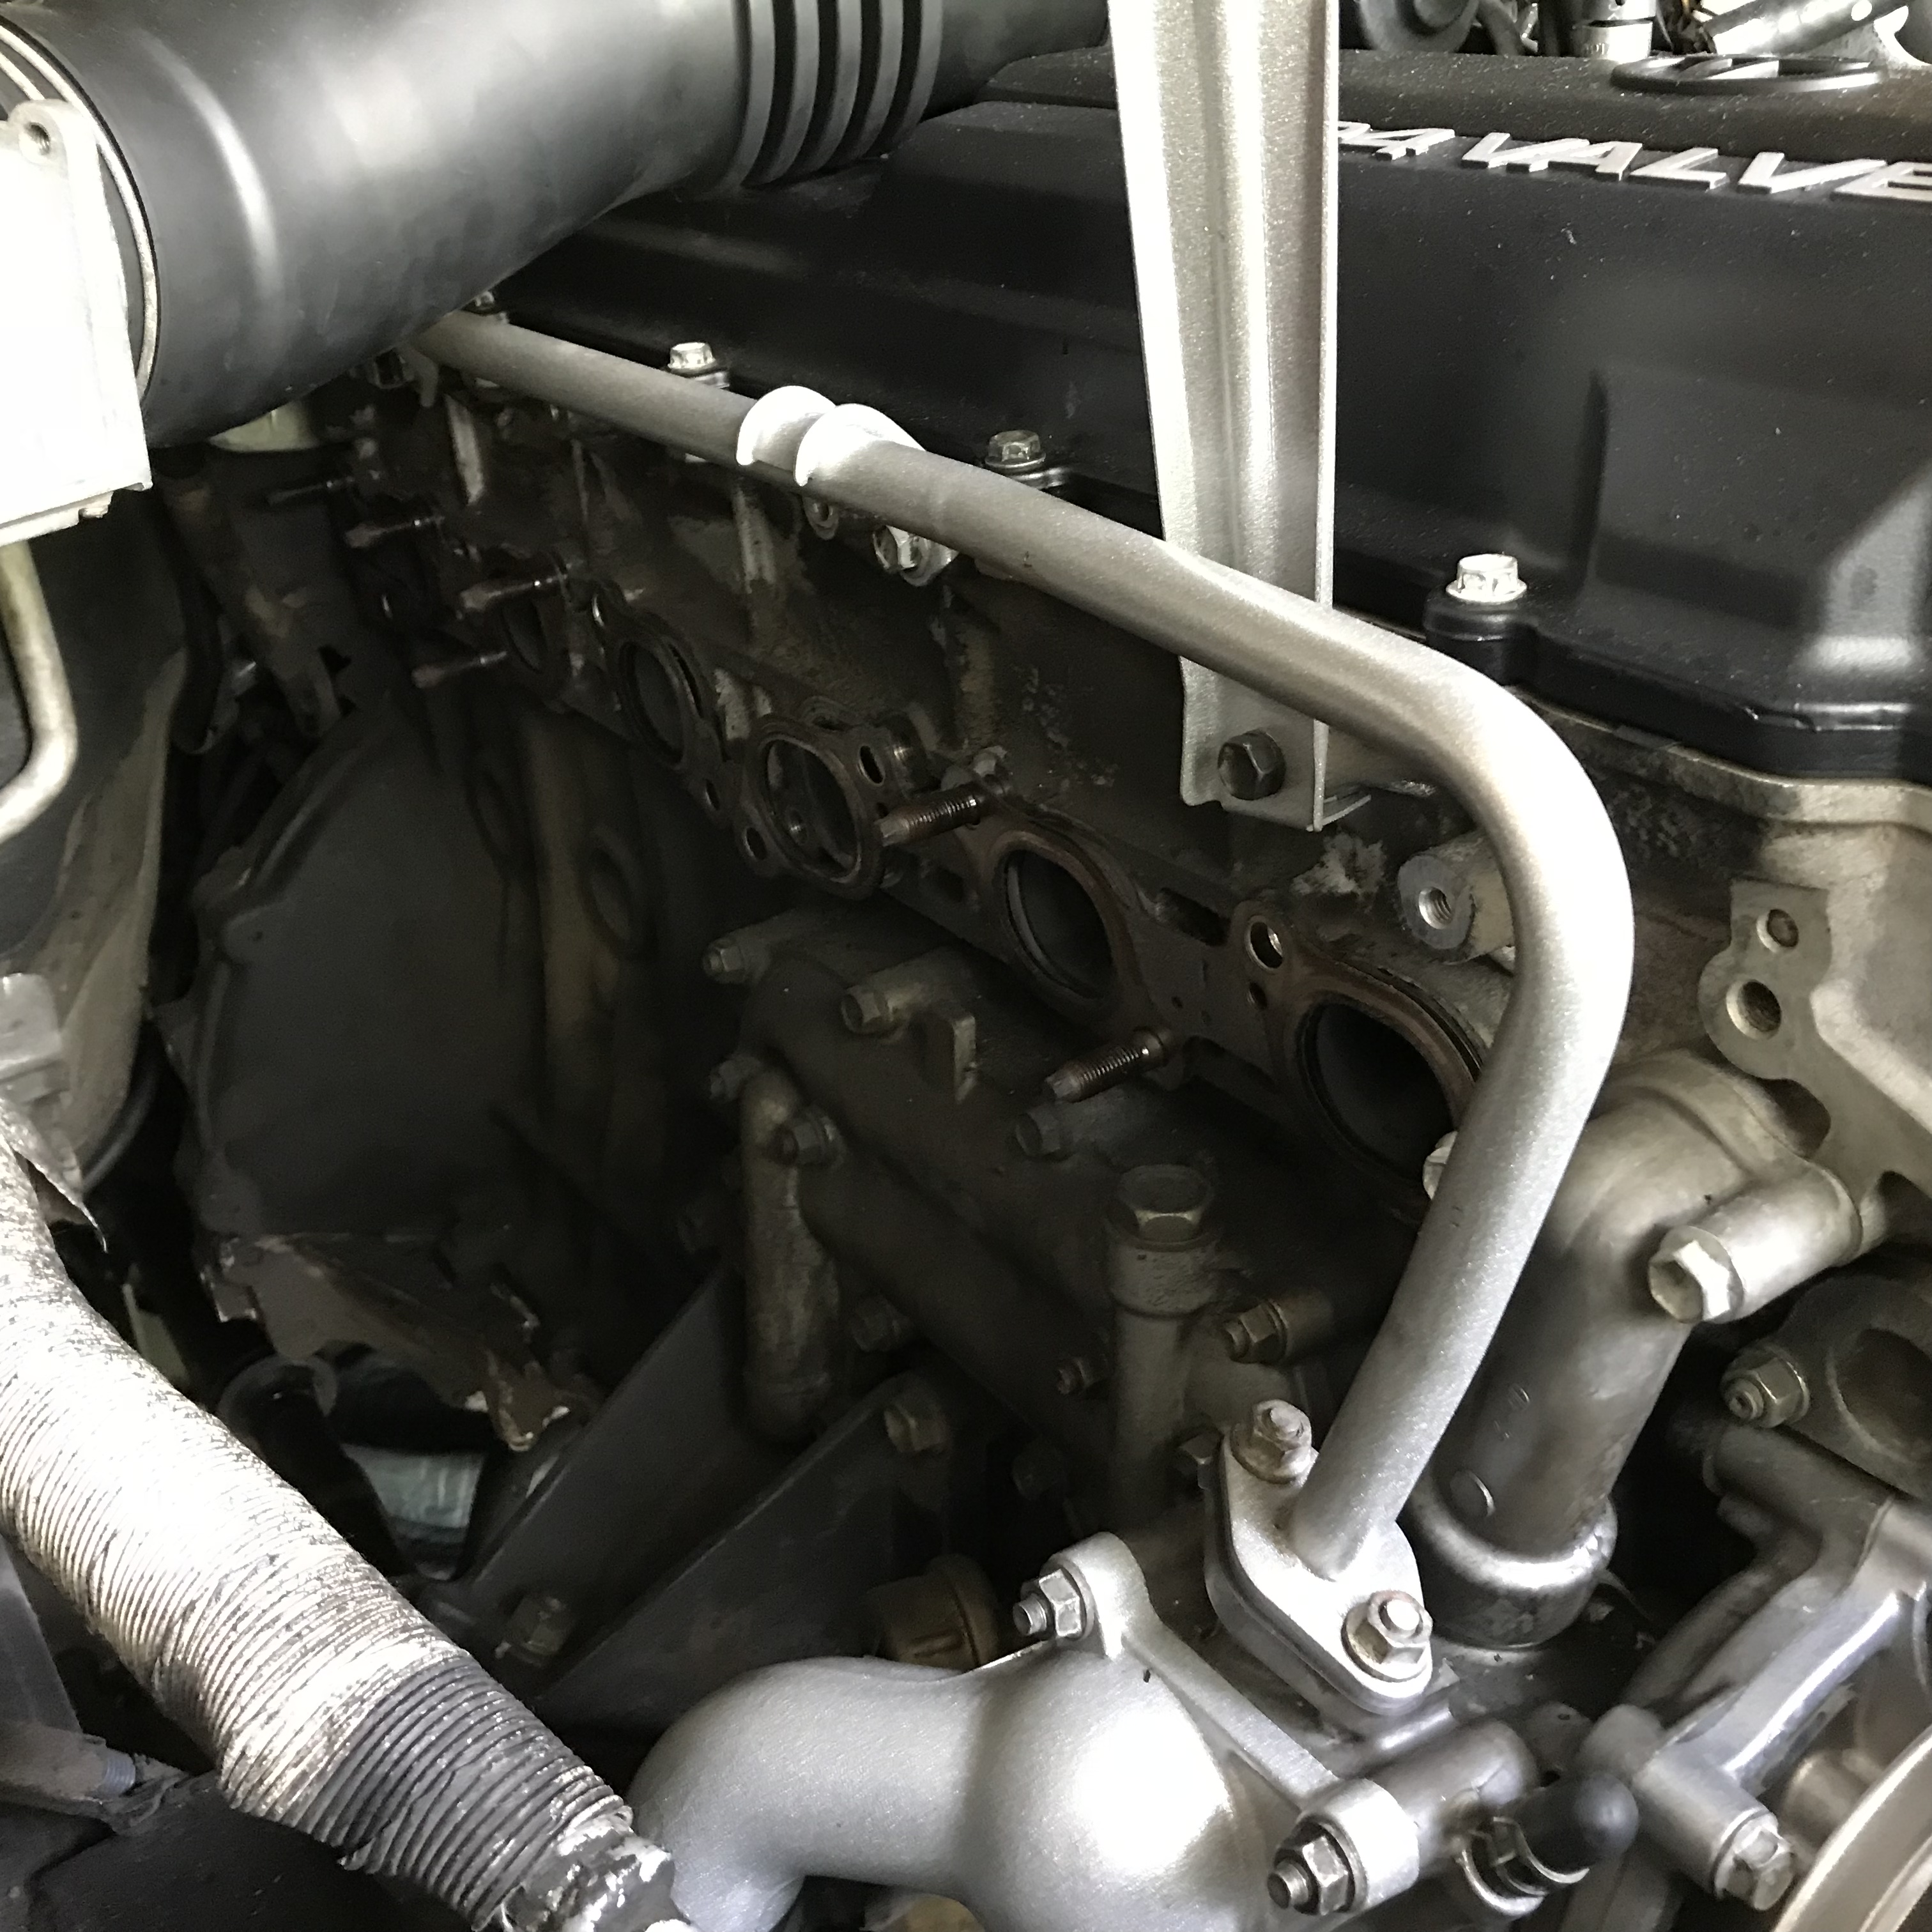
At this point you have isolated the TB and can remove all of the abandoned TB coolant lines/connections at the front of the motor and under the intake manifold.


Next, we'll move to the Firewall Heater Hoses ("FHH"), heater valve, and thermostat hardline.

I followed this excellent writeup and video tutorial for FHH (Project FJ4door: How I did my 80 series floor heater bypass fzj80 fj80 lc80 lx450). This is the meat and potatoes of the rear heater delete.

The majority of the rear heater deletes I have seen simply use a Gates 90* heater hose from a Dodge Cummins. This is what I did initially.

75_CA838_B_A4_F4_48_F4_B33_C_110526284_D48.jpg


This setup still utilizes the factory "U" shaped hard pipe and simply deletes the rear heater hard pipe on the DS with the 90* Dodge heater hose.

Member @LandCruiserPhil came up with a very clever one-piece solution from Toyota/Gates (Rear Heater Bypass Hose - Land Cruiser Products - LCP). This converts the "U" shaped hardline to a one-piece hose, and reduces the number of connections at the firewall.
9726_D174_6661_4_C17_8083_398_DFE01373_A.jpg

CF042_BB5_97_B5_4_A54_ADA5_F9_E685434_E75.jpg


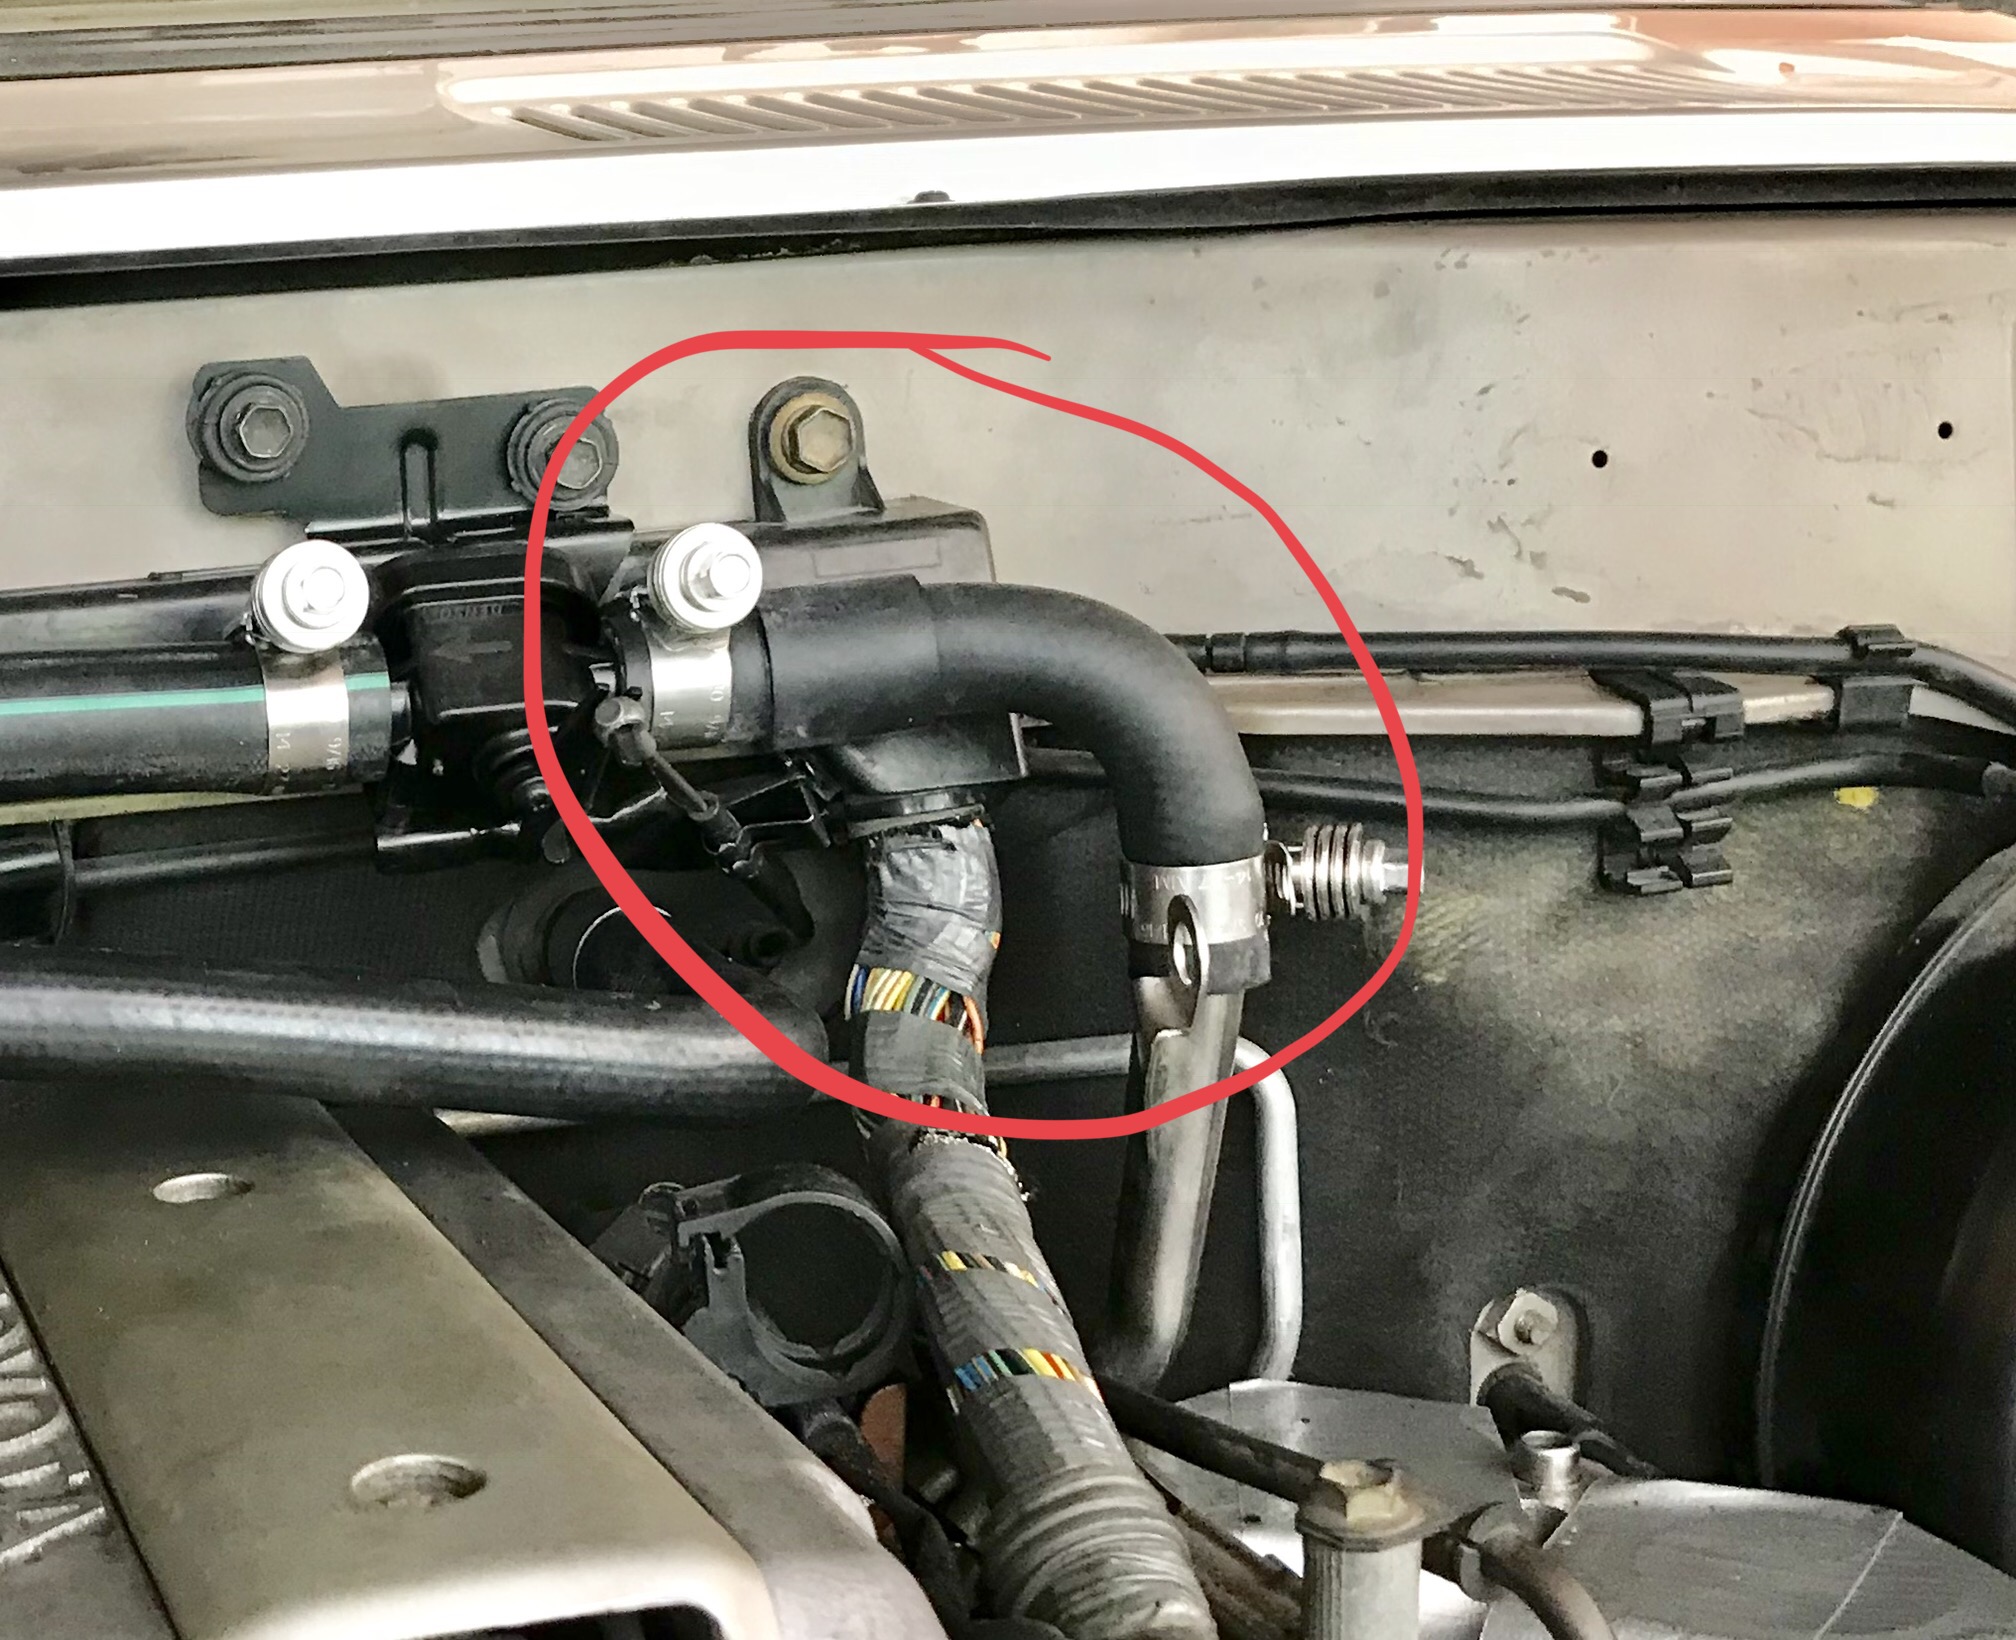
Finally, the '93 and '94 trucks had two-piece hard pipe and multiple connections from the thermostat to the firewall because of the PAIR system.

7_E78_D9_D0_C018_4070_9_D22_DEF645_C90_A4_C.jpg


If you delete the PAIR system, you can run a one-piece hardline (Toyota PN: 87208-60161) and regular Gates 5/8" green stripe directly from the firewall to the hard pipe. This also deletes the PS portion of the rear heater at the firewall.

0_DF5_B7_C8_9624_4744_91_BD_4_CB22_A2_D4_B7_E.jpg


1_DFB9_F3_E_C815_46_E5_979_D_00_FFFB6_A805_C.jpg


That's about it! Please let me know if you have any questions.
Can I get a better idea of things you removed for your cooling lines clean up?
 
Can I get a better idea of things you removed for your cooling lines clean up?

Sure.


Things I Removed:
  • Coolant Hoses
  • Coolant Hose Clamps


In all seriousness, the writeup is pretty specific. I'm not sure what further details you are looking for?
 
What did you use to patch the hole in the floor after you removed the heater under the seat? Is there a poverty pack vehicle in some market that has a rubber grommet there?

Thanks,
Andrew

I left the unit in place because I didn’t want to remove the passenger’s seat to get the rear heater out. But I think it is just a couple of hardlines that go through the floor of the truck. I don’t know the diameter, but it should be obvious once you get the unit out. Post up the dimensions and I’ll update the thread with correct grommet sizes.
 
I left the unit in place because I didn’t want to remove the passenger’s seat to get the rear heater out. But I think it is just a couple of hardlines that go through the floor of the truck. I don’t know the diameter, but it should be obvious once you get the unit out. Post up the dimensions and I’ll update the thread with correct grommet sizes.
I removed mine to get the storage space. I know on one of the threads Phil mentioned that he stores his camera and laptop down there. The hole is a 1.5" x 2" rectangle with rounded corners. No luck on McMaster Carr or my usual sites.

Thanks,
Andrew
 
I removed mine to get the storage space. I know on one of the threads Phil mentioned that he stores his camera and laptop down there. The hole is a 1.5" x 2" rectangle with rounded corners. No luck on McMaster Carr or my usual sites.

Thanks,
Andrew

I wonder if this 40 series grommet would work?

OEM Heater Lines Delete Plug for Land Cruiser FJ40

Edit: I'll measure the grommet opening on my '77 FJ40. I used the above heater delete plug.
 
Last edited:
I used the Kit from Wits End (@NLXTACY). It comes with the return hose and with 2 large pieces of aluminum backed mega stickum. I also purchased the pre-bent supply hose from @LandCruiserPhil.
I’m using my newly created space for a remote mounted GMRS radio. I’m pretty happy with the way it all came together more or less. I’m sure someone will make some kind of bracket that uses the mounting points from the deleted rear heater assembly more efficiently than I.
Hope this helps!

8EF2AE5F-1F31-4762-AC01-E03D899EF110.jpeg


639EB0EA-B0E1-46D9-888E-EA639DA33EB8.jpeg
 
I used the Kit from Wits End (@NLXTACY). It comes with the return hose and with 2 large pieces of aluminum backed mega stickum. I also purchased the pre-bent supply hose from @LandCruiserPhil.
I’m using my newly created space for a remote mounted GMRS radio. I’m pretty happy with the way it all came together more or less. I’m sure someone will make some kind of bracket that uses the mounting points from the deleted rear heater assembly more efficiently than I.
Hope this helps!

View attachment 2288948

View attachment 2288949

Thanks for the support!
What will you use the new found space for?
 
Took piece of sheet metal from a bracket I made, cut it to cover the hole size then took high temp rtv and stuck her down and went over the edges to seal it completely off.
4E8612B8-9651-492C-9EB6-90AB92DD6355.jpeg
 
EDIT

Thanks for the support!
What will you use the new found space for?

I’m waiting for one of you design badasses to design and sell me some sort of bracket or series of brackets for the remote mounting of radios and other awesome goodies. Here is my feeble attempt. I’m satisfied with it but there wasn’t really enough space to also mount the Cobra 75 which went on a @LC4LIFE Hudd Expo ABS module bracket.

23A223E7-65C6-4F38-AB69-F06E5C4E382F.jpeg


B025CC73-7E43-4198-AB3F-AADA90DBDF76.jpeg


6F4DEE0E-B4C6-40CB-98DC-C52452852A68.jpeg
 
Last edited:
Haven't seen it mentioned, but with the cats underneath the passenger seat floor, it gets pretty toasty on long drives. It would be a good idea to put some heat shielding material under the carpet for anything you plan to install or store there. The OEM cat shield riveted to the underside of the floor helps and there is some material that Mr. T put on the cabin side of the floor, but it still gets damn hot - just sayin'. I tried running my Harrop e-locker wires out that hole left by removing the heater core, but when it started melting (mostly under the floor) the wire looming jacket, I rerouted the wires. Even the exhaust pipe is scortching hot. @LandCruiserPhil may store his camera and laptop there, but I bet he's insulated it. I would not install a radio or any electronic device there for that reason. Just an opinion.
 
Haven't seen it mentioned, but with the cats underneath the passenger seat floor, it gets pretty toasty on long drives. It would be a good idea to put some heat shielding material under the carpet for anything you plan to install or store there. The OEM cat shield riveted to the underside of the floor helps and there is some material that Mr. T put on the cabin side of the floor, but it still gets damn hot - just sayin'. I tried running my Harrop e-locker wires out that hole left by removing the heater core, but when it started melting (mostly under the floor) the wire looming jacket, I rerouted the wires. Even the exhaust pipe is scortching hot. @LandCruiserPhil may store his camera and laptop there, but I bet he's insulated it. I would not install a radio or any electronic device there for that reason. Just an opinion.

I do and will store my camera and laptop but only when stopped to keep things out of sight. I do agree with high temps when driving.
 
:meh:
A common question I get "Do you use constant torque hose clamps".


We use Breeze A-liner SS clamps. They use the same smooth concentric clamping system without the constant torque feature. We found 99% of the people that purchase Constant Torque clamps do not understand how to properly install. Without proper installation, you lose the feature and ended with A-liner clamp in the end at 1/3 of the cost. We truely believe the constant toque clamp is an excellent clamp WHEN they are installed correctly but it rarely happens. In the end we believe you should use the clamp that makes you comfortable.

BREEZE Constant-Torque Heavy-Duty Clamps
These clamps are found in sizes ranging from 1" to 9 1/8" in size. The torque value for this HD clamp is 90 in. lbs. Let’s take a minute to stress how important it is to use a torque wrench on the constant-torque style clamps. These are designed with a Belleville spring that allows the clamp to expand and contract with temperature fluctuations to prevent cold leaks. They only work properly when they are installed at the proper torque specification.

HTH
cleardot.gif
 

Users who are viewing this thread

Back
Top Bottom