Navigation
Install the app
How to install the app on iOS
Follow along with the video below to see how to install our site as a web app on your home screen.
Note: This feature may not be available in some browsers.
More options
Style variation
You are using an out of date browser. It may not display this or other websites correctly.
You should upgrade or use an alternative browser.
You should upgrade or use an alternative browser.
Builds Purchased: 1994 LC. The project begins
- Thread starter jdeitch
- Start date
This site may earn a commission from merchant affiliate
links, including eBay, Amazon, Skimlinks, and others.
More options
Who Replied?- Thread starter
- #62
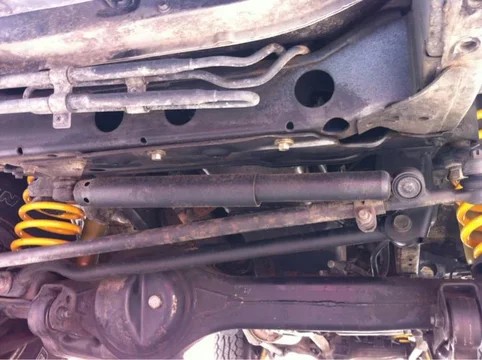
I just installed the last piece of theTJM 2.5" lift kit: the steering damper. It wasn't too bad. It took two different pullers to get both ends of the old one free. (anti-seize on the new hardware.) Quick test drive confirms what other MUD threads have said. New damper helped to remove some of the vague steering feeling.


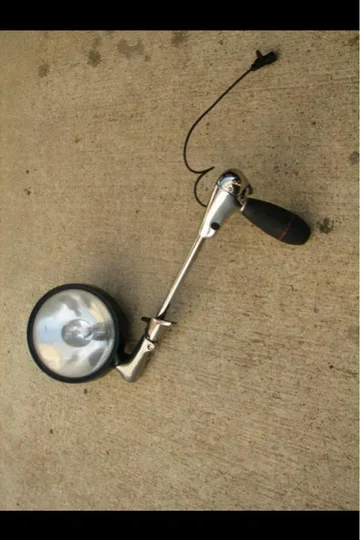
jdeitch said:The e-Bay spot light arrived as did the new mounting kit from Unity. Maybe this weekend I'll get it installed.
Always wanted to install one of these.
There is a Fj cruiser thread of an install.
Subscribed.
Sent from my DROID3 using IH8MUD. typos extra
- Thread starter
- #67
Started the spot light install tonight. I bought a new mounting kit from Unity specific to the Land Cruiser. (#27) The kit came with excellent instructions, all necessary mounting hardware and drilling templates.
I used the correct template to center punch the two mounting holes. And then I drilled the two 1/8" mounting holes per the instructions.
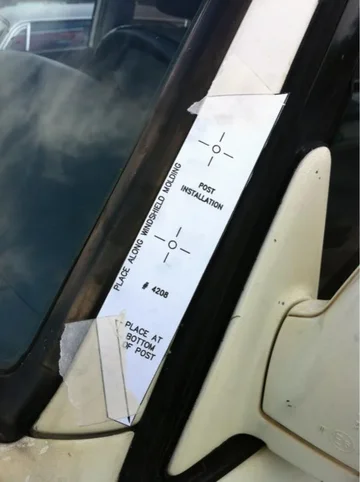
After drilling the two mounting holes, attach the exterior mount. The mounting kit includes a drill guide that is used to aim/hold the 1/2" bit used to drill the main hole.

After drilling the large hole through the external sheet metal I removed the mounting bracket to inspect the internals of the A-pillar.

I was aware there was a wiring harness and sun roof drain in the A-pillar that I did not want to damage. After drilling the first 1/2" hole I could see that a black tube was in the direct path of where I needed to drill. I used two small screw drivers to move the tube out of the way while I stuffed blue shop towels in the A-pillar to hold the tube out of the way. When I was satisfied the tube would not be hit, I reinstalled the mounting bracket/drill guide. Before drilling through the interior sheet metal I also lifted the headliner away from the inside of the A-pillar so that it would not get wrapped around the drill.

Here's a shot of all of the holes after drilling. I did clean up the large hole with a round file after this pic was taken. Main hole is oblong due to the angle held while drilling.

UPDATE: When I left for work at 3am this morning I noticed several things were NOT working. (dome light, ignition key light, clock, sunroof) Despite my efforts it appears that I have damaged the wiring harness in the A-pillar. I will now have to figure out how to access/repair the harness.


I used the correct template to center punch the two mounting holes. And then I drilled the two 1/8" mounting holes per the instructions.

After drilling the two mounting holes, attach the exterior mount. The mounting kit includes a drill guide that is used to aim/hold the 1/2" bit used to drill the main hole.

After drilling the large hole through the external sheet metal I removed the mounting bracket to inspect the internals of the A-pillar.

I was aware there was a wiring harness and sun roof drain in the A-pillar that I did not want to damage. After drilling the first 1/2" hole I could see that a black tube was in the direct path of where I needed to drill. I used two small screw drivers to move the tube out of the way while I stuffed blue shop towels in the A-pillar to hold the tube out of the way. When I was satisfied the tube would not be hit, I reinstalled the mounting bracket/drill guide. Before drilling through the interior sheet metal I also lifted the headliner away from the inside of the A-pillar so that it would not get wrapped around the drill.

Here's a shot of all of the holes after drilling. I did clean up the large hole with a round file after this pic was taken. Main hole is oblong due to the angle held while drilling.

UPDATE: When I left for work at 3am this morning I noticed several things were NOT working. (dome light, ignition key light, clock, sunroof) Despite my efforts it appears that I have damaged the wiring harness in the A-pillar. I will now have to figure out how to access/repair the harness.
Last edited:
Nice work so far. Sorry to hear about the harness.
Is there any larger access hole on the inside pillar??
What model light did you get from ebay??
Good luck
Is there any larger access hole on the inside pillar??
What model light did you get from ebay??
Good luck
- Thread starter
- #69
Otamiway said:Nice work so far. Sorry to hear about the harness.
Is there any larger access hole on the inside pillar??
What model light did you get from ebay??
Good luck
I will fix the harness. I will disconnect the harness from whichever end is easier and pull the harness out through the A-pillar. I'll repair the wiring (solder/heat shrink, etc.) and pull it back through an re-terminate. It's not going to be easy but I want it fixed right.
The A-pillar is an important structural piece and I believe it's a solid tube from top to bottom.
I wanted a black light housing not a chrome one. The hardware, shafts, etc. are chrome regardless. Unity mfg. is the main manufacturer of these lights since the '50's. Parts and mounting kits are readily available. I ordered my mounting kit directly from Unity. Land Cruisers use mounting kit #27 for the driver's side.
I got my light used from e-Bay. The item number was 200746476268. I paid $27 total. I believe the seller had more lights. Plenty to choose from on e-Bay. Make sure you get the proper light for driver's or passenger's side. They ARE different.
On a happier note, I wired the light in this afternoon and it works perfectly. More pics soon.
Last edited:
JD,
Thanks for the info and tip. Loking forward to seeing your final pics.
Thanks for the info and tip. Loking forward to seeing your final pics.
UPDATE: When I left for work at 3am this morning I noticed several things were NOT working. (dome light said:Check the main fusebox under the hood. All the items you listed are correlated to one fuse. You may have just grounded one wire and burnt the fuse.
- Thread starter
- #74
Loud hissing from below intake manifold and coolant leaking on the ground... I think my PHH just blew. ;(
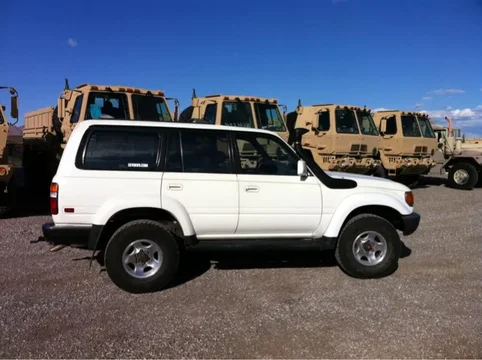
I have been out in the Mohave desert at a military shooting range since Tuesday. I am so glad this did not happen out there. I'm not far from home now. Going to let it cool down completely while I meet my wife for dinner then limp home with a close eye on the temp gauge.


I have been out in the Mohave desert at a military shooting range since Tuesday. I am so glad this did not happen out there. I'm not far from home now. Going to let it cool down completely while I meet my wife for dinner then limp home with a close eye on the temp gauge.

Last edited:
- Thread starter
- #75
93yotasr5
Come and take it
wow that thing has had an awesome transformation!!!
- Thread starter
- #79
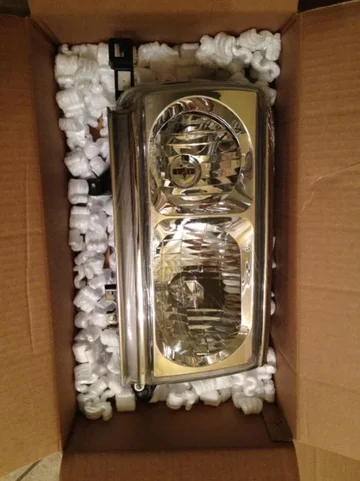
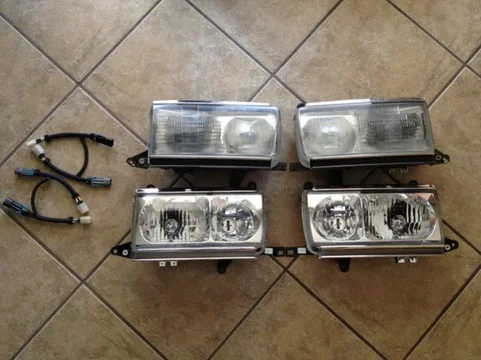
The headlight housing on the driver's side has been starred since I bought this car. The other night the low beam bulb went out on the passenger's side so it's time to finally install the DEPO housings I bought months ago.

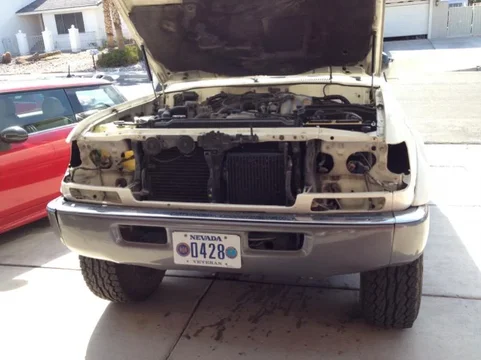
Can you tell which lights are the new ones?
Harness adapters from Innovative are nicely made.
Sylvania SILVERSTAR bulbs. I have used these stock wattage bulbs in other vehicles. They are very bright and white.

Test fit. Housings fit like OEM and the bulbs work perfectly.


Can you tell which lights are the new ones?
Harness adapters from Innovative are nicely made.

Sylvania SILVERSTAR bulbs. I have used these stock wattage bulbs in other vehicles. They are very bright and white.

Test fit. Housings fit like OEM and the bulbs work perfectly.

Last edited:
- Thread starter
- #80
Similar threads
Users who are viewing this thread
Total: 1 (members: 0, guests: 1)

