Builds Nomads GX460 build - DIY, hands on (1 Viewer)

This site may earn a commission from merchant affiliate
links, including eBay, Amazon, Skimlinks, and others.

I used nylon, but had the settings wrong for the fill so the hanger hook in the rear is weak. The 3D printed pieces are just outer plates with a through hole. I sprayed them brown with some paint I had.
The weight is held by the M6 bolt into a steel threaded tab I made that is held vertical by a C-shaped tab so the weight hangs off the body sheetmetal.
The bolt holds a steel tiedown ring that the paracord is tied to. I can lift myself out of the vehicle on it. I can re-tie some handles and spray them light tan to match interior. I couldn't find any M6 allen heads at HD so for now they are phillips.
20221003_083204.jpg

Like I said, proof of concept, not perfect but do-able.
I may try a setup for the front A pillar grab handle, just need to make some different plates as they are odd shaped. I have a few ideas.
 
  • Like
Reactions: r2m
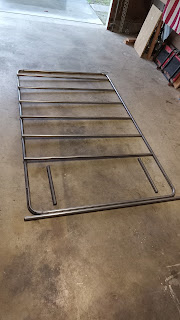
Time for a new project. This time, Roof Rack.
Full platform rack, low profile, DIY welded.
My first method will be to test out mounting it to factory roof rails for lowest profile mount and removable.
I plan to get it mounted that way while I work on the roof brackets. I like the idea of a light use platform mounted on the roof rails only, super low and with 4 mounting clamps it'll be very secure. I'll probably end up with more permanent mount brackets but its an idea I'd like to explore. An easily removable low profile rack for lighter duty than rooftop tents.
DIY Roof Rack
20230323_183544.jpg
20230323_140020.jpg
 
Last edited:
Don't forget some pic's when it's done, both before mounting on your rig and when it's on!
 
Had another productive day. All tacked together. Walked along the top and only had deflection with all weight on center of a single bar.
A few mistakes along the way, lots of measuring and squaring and deciding... But its in its rough draft shape now. I may adjust an element or two once I look at the roof fit up tomorrow.
I tried hard to use only the steel I bought. I technically could do without 4 of the side tubes connecting the cross braces but figured I liked the symmetry and strength it gives. 1/8" plate will be added for the feet to mount on.
Yeah, tongue in cheek, I copied the Gamiviti, sorry, love the look. I think they are great but I'm not a customer in that market anyhow.

20230325_181805.jpg
 
I too am a fan of the Gamiviti style, hence having purchased one.
I designed and built a rack for my first overland rig. DId it on CAD, laid it out, bent all the tubing and tacked all together with a MIG welder.
Then paid someone to do all the nice round tube welding. I know my MIG (splatter welder) wouldn't look good.
It's the full over the shell design and powder coated red.
IMG_2812(1).JPG

IMG_2812.JPG

IMG_4045.JPG

IMG_4048.JPG
 
Looks great Nomad! I would love to know what the weight is when you are done. I might have to try this roof rack build too.

Keep the updates coming.
 
Pretty extensive rack there! I like the OBS Ford.
Yeah, my welds won't look the best and I'll make some mistakes along the way I'm sure; but there's no other way for me to get better other than to weld more!
I'll swap to thinner welding wire and jump around as I weld. Then, grinder and paint!

I kicked out the front extension to a 45* angle and will see how it looks fit up. I may kick the fairing mount out even further to follow the windshield angle.
I may not end up able to use the stock rails due to the size of the front extending down, I would have had to make it so small or leave it just a platform. I could certainly pop some tack welds and try it.

As fro weight, so far its 3 sticks of 20' 1" .060 wall which has a weight of just under 13# each, so 40# so far? I have to add the 1/8" mounting plates so that'll add about 5# to the rack. Then 6 mounts for the roof so maybe 50# total?

I was going to try a 1.5" platform originally for the beefier look, would have been a lot heavier.
 
Last edited:
Had another productive day. All tacked together. Walked along the top and only had deflection with all weight on center of a single bar.
A few mistakes along the way, lots of measuring and squaring and deciding... But its in its rough draft shape now. I may adjust an element or two once I look at the roof fit up tomorrow.
I tried hard to use only the steel I bought. I technically could do without 4 of the side tubes connecting the cross braces but figured I liked the symmetry and strength it gives. 1/8" plate will be added for the feet to mount on.
Yeah, tongue in cheek, I copied the Gamiviti, sorry, love the look. I think they are great but I'm not a customer in that market anyhow.

View attachment 3282229
This is seriously so cool and impressive. Your fabrication work is awesome. Back in the day, my dad was able to do similar kind of work and would build his own race cars. Sadly, he is no longer able to do this kind of work and I was never able to learn from him. The amount of skill and thought that went into your project is so awesome.
 
2 inches total height above the stock rails. It'll mount to the stock rails with 6 total mounts. The front nearly matches the windshield rake and the rear nearly follows the rear window.

Cutting up tube was the easy part, making it all fit together properly and make the lowest mounts for the stock rails took a good bit of time. I had to redo some measurements, cut tack welds and reposition but didn't have to buy any extra steel.

I'd do mounts differently if I did it again, and I still want to work out the permanent mounting option after I get it finished.
Tomorrow I'll add the mount plates and start finish welding the rack.
20230329_104819.jpg
Even though I had a tube cutter, cutting out the radius's or the round tubes to Tee into each other cleanly was a bit of a job when I built mine.
I have a jig that sets up into my floor drill press which made things easier, but still needed a wee bit of filing to get rid of any gaps.
 
Yes, very time consuming, I def have gaps. I tried to use a jig I had for a hand drill but I couldn't get it to be strong enough, and clamped securely enough to use the hole saw I got, it bit in too much.
I drilled small holes to release the gasses when welding to avoid blowout, and filled with a rivet when done.
I added the mount plates today and welded it all up. Because of the thinner wall thickness stacking tacks was the way to go. I started on the inside so here were fewer mistakes along the visible outer edges. They should smooth out ok.
By end of today I hope to put a coat of primer on it.

Huge appreciation for the fabricators that make these. Its a lot of work. I have the time and wanted the project, but I can see its definitely worth the money to just pay the price for a finished item. You are getting your money's worth in labor.
Back to work!
 
Last edited:
When it's all laser cut and jigged up, it makes it a lot easier.
 
Decided to get it mounted for now, will work on a fairing this weekend.
I will make some new mounts for it and I have tabs and gussets to weld on in the future.
For now, it'll do nicely for regular loads. And completely removable.
20230407_185504.jpg
 
Decided to get it mounted for now, will work on a fairing this weekend.
I will make some new mounts for it and I have tabs and gussets to weld on in the future.
For now, it'll do nicely for regular loads. And completely removable.
20230407_185504.jpg
PM me know if you want a template of the fairing. I believe I still have the template
I made one for mine on SolidWorks with the correct roof arc.
I have it as a PDF on three 11' x 17" sheets that you print out at 100", then splice them together.
Go to my build thread starting at post #70: Builds - R²M 2013 GX 460 Overland Build - https://forum.ih8mud.com/threads/r-m-2013-gx-460-overland-build.1104719/page-4
I detail how I made mine.
 
Thanks, I measured out a full coverage fairing, made a big difference in sound. Nearly silent. The cantilevered front is vibrating at 70 so I'm going to add the 3rd set of mounts first, then make any needed changes to the fairing such as adding the trim that seals the 1/4" gap at the bottom of the fairing. If it still vibrates I'll add a tension leg at the front end of the rack like 4runners. I think the third set of mounts will be fine

20230409_145709.jpg
 
Last edited:
  • Like
Reactions: r2m
Thanks, I measured out a full coverage fairing, made a big difference in sound. Nearly silent. The cantilevered front is vibrating at 70 so I'm going to add the 3rd set of mounts first, then make any needed changes to the fairing such as adding the trim that seals the 1/4" gap at the bottom of the fairing. If it still vibrates I'll add a tension leg at the front end of the rack like 4runners. I think the third set of mounts will be fine

View attachment 3294859
Are you able to fit a light bar behind the Fairing? (Albeit, you'd need to change out to a clear fairing...)
 
A single row should fit if I weld on some tabs and use a clear fairing.
I'll probably try a few different fairing setups after adding the center rack mounts.
 
  • Like
Reactions: r2m

Users who are viewing this thread

Back
Top Bottom