Builds New Mexico JDM BJ74 Build

This site may earn a commission from merchant affiliate
links, including eBay, Amazon, Skimlinks, and others.

Joined
May 12, 2009
Threads
21
Messages
416
Location
Catalina Wine Mixer
Hello all! First i want to start out, and thank everyone...this site is a GREAT resource! Been a reader for a while, but now its time to get involved! So a little background, I found this truck in my home town! Awesome! I knew Toyota had some great stuff, but never thought i'd own one! LUCKY ME!

Here's what i've done:
  • Pioneer stereo with IPOD hook up. PO gave me several 24v=12v reducers, not quite happy with the location so still needs some work. 6x9s in the rear...I wasted an afternoon installing the dash speakers - there disconnected and im getting ready to do door speakers. I'm going to use the dash speakers for the CB so not a total waste of time.
  • Autometer Pyrometer and boost gauge mounted to a custom bracket connected to the windshield frame bolt. Gives it the "A" piller look! It actually looks pretty clean! The Pyro probe is not quite mounted, should be done this Friday. The PO had a manual boost controller installed, but no boost gauge, i removed it to get some stock numbers. It will most likely go back on here soon.
  • It's a two seater! Rear seat removed in preparation for drawers.
  • The PO had a beat up Recaro seat, an FJ40 bumper-welded to the carcus of the stock bumper, and a FJ40 rear tire carrier bumper...didnt work for me it had to go. I do want to thank rick_d for the replacment seat. Hes a stand up guy! Really helped me out and arranged some really inexpensive shipping. THANKS!
Here's whats in store for the future:
  • OME lift and move the axle forward. Fit 35's.
  • Replace the worn out exhaust with 2 1/2" no muffler.
  • Front door speakers.
  • Build drawers.
  • Modify the front seat for a bit more leg room.
  • Build bumpers - front and rear and sliders. I have the PTO and going to attempt to get it nice and tight for a good approch angle.
  • CB install.

Thanks for the read! Ill post PIC's as soon as a graduate from rookie status.
https://forum.ih8mud.com/attachment.php?attachmentid=343842&stc=1&d=1248920475

See thats why I'm a rookie!
Jarred
 
Congrats Mate,

You've been bitten by the bug!!!!
Can't wait to see what you do with your ride.

More pics, we love pics/cruiser porn:)

Cheers:beer:

Gav.
 
[/LIST]
Here's whats in store for the future:
  • OME lift and move the axle forward. Fit 35's.
  • Replace the worn out exhaust with 2 1/2" no muffler.
  • Front door speakers.
  • Build drawers.
  • Modify the front seat for a bit more leg room.
  • Build bumpers - front and rear and sliders. I have the PTO and going to attempt to get it nice and tight for a good approch angle.
  • CB install.

Thanks for the read! Ill post PIC's as soon as a graduate from rookie status.
https://forum.ih8mud.com/attachment.php?attachmentid=343842&stc=1&d=1248920475

See thats why I'm a rookie!
Jarred

Get OME springs -

2x CS017RA
2x CS017RB

You'll need some shock mounts altered in the front. Rears are no problem.

I'll fill you in on the rest when I make a post about it...


~John
 
if you want Jarred, send the pics over to me and i'll post 'em here for you. swilliamsffpm@msn.com
and yes it is a purty thing in person! right hand drive even!
 
Where did you find this one? And what was the importation process like? Yours is considered 25 years old now right, so it was probably just a few pieces of paperwork and a 2.5% fee?
 
As promised... more pics!!!!!

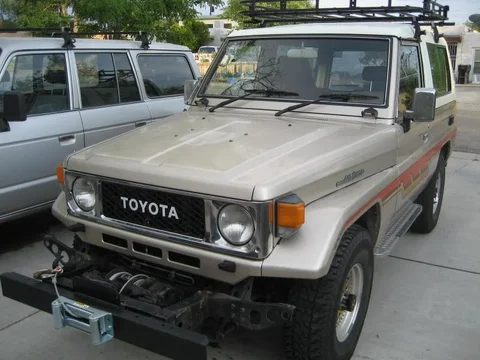
Delivery day - front and rear driveway shots.
IMG_0077.webp
IMG_0080.webp
PTO winch, front & rear bumpers, and roof rack removed, planning stages for bumper. I am going to try and keep the PTO, but still have an appropriate front end.
IMG_0086.webp
Progress: replaced fluids, repaired the rear pinion seal, and fixed the fresh air lever on the HVAC controls. Still has some friction, any ideas for freeing it up a bit?
IMG_0077.webp
IMG_0080.webp
IMG_0086.webp
 
I envy you , I can only wish to see one in person, much less own one. Dude, you must me one of the few people in the U.S. with a 70's LC
 
Slowly but surely... I was able to get some time this weekend to wrap up a few projects. Finished the gauge install and the dash cover was made (NM sun is brutal).

Pics of the gauges installed and the dash cover. I did the pattern then took it to the dash saver factory outlet. It turned out nice! Gauges are Auto Meter brand Z-Series 12v hooked up to the 24v=12v reducer. Replaced the bulbs with 24v bulbs and wired it to the cruisers lights.
IMG_0010.webp
IMG_0005.webp

Pyrometer probe install - decided for post turbo. Several reasons: ease of installation, I'm not tuning it to maximum levels, and IMO i feel the numbers are all relative... have to realize what you have and what you seeing, as numbers go.
IMG_0002.webp

Speaker install should be finished today, exhaust installed next week. I'll post up some EGT numbers.
IMG_0010.webp
IMG_0005.webp
IMG_0002.webp
 
Hi Jericho,

I have the same set up as you almost. I have the pyro probe in the same location:
PyroProbe.jpg


Here are my gauges:
PyroandBoost.jpg


So far my EGT's are:

Town 500 - 600F
Highway on the flat 600 - 800F depends if accelerating.
Short hill no load 800F max
Highway hill with trailer 925F max

Pretty good numbers I think. Well under the 1050F max for post turbo.
I have read that 1050F is max you want to go post turbo so I that is my bail out point.

What sort of number are you getting Jericho?
 
Im liking how your dash mat goes to the edge then folds down the side
This pic is just another idea for your boost gauge its not very clear but you get the idea its in a turbo rhd 75 troopy
DSC00056.webp
 
Hi Jericho,

I have the same set up as you almost. I have the pyro probe in the same location:

So far my EGT's are:

Town 500 - 600F
Highway on the flat 600 - 800F depends if accelerating.
Short hill no load 800F max
Highway hill with trailer 925F max

Pretty good numbers I think. Well under the 1050F max for post turbo.
I have read that 1050F is max you want to go post turbo so I that is my bail out point.

What sort of number are you getting Jericho?
Im getting slightly higher numbers, maybe 50-100 more. Boost is at stock 8psi. I have a boost controller that I took off to get some stock numbers, exhaust at the end of the week, then the boost controler goes back on. Im using the same max limits, but try to stay closer to 950.
Great Cruiser mate! :steer:


Try to install the PTO Winch again, maybe on new bumper :wrench:


:beer: :cheers:
I'd like to keep the PTO! New bumper is on the list! It should work out just fine!

Im liking how your dash mat goes to the edge then folds down the side
This pic is just another idea for your boost gauge its not very clear but you get the idea its in a turbo rhd 75 troopy

Thats a nice spot, what size guage?

love the dash carpet!@
Thank you! It turned out well, the dash shop owner was skeptical at first, I guess he gets some doozies of patterns.
 
Im getting slightly higher numbers, maybe 50-100 more. Boost is at stock 8psi. I have a boost controller that I took off to get some stock numbers, exhaust at the end of the week, then the boost controler goes back on. Im using the same max limits, but try to stay closer to 950.

Good news Jericho, Thanks.

I was looking for a bit of conformation on my numbers from someone who installed the Pyro i the same spot as me.
My stock boost was 8psi to. Your numbers should come down a bit with the boost cranked up to 12psi.

950 sounds like a sensible number to bail out at.

Cheers and happy modding.

Gav.
 
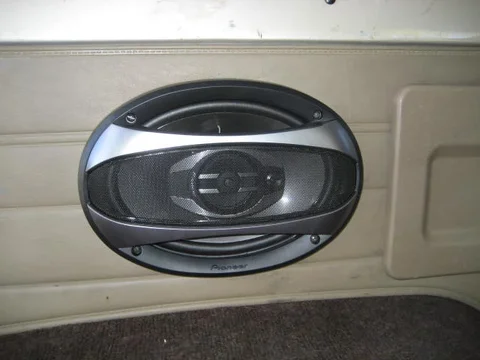
Several more things checked off the list! Stereo has been installed for some time , needed to finish up the speaker install: two 6x9's in the rear and two 5 1/4's in the door. Sounds nice, rear speakers were a snap to install - the fronts weren't bad...just needed some careful measuring. Factory tool box in the back was removed for the left rear, not sure what I'm going to do with it.

Door speaker pic
IMG_0004.webp

Rear speaker
IMG_0016.webp

Stereo install with pocket. Like so many stereo trims, it was broken, i found a new replacement online from Toyota Parts - ToyotaPartsCenter.net. I plugged the part number in and they had it in stock! I've been using the EPC and that site to check on available parts, its been working out fairly well. 12v power from a 15A reducer mounted on top of the glove box. The cig lighter was converted to 12v ,and the old 24v key on power is now switching on the relay.
IMG_0017.webp

Another big item to check off... the exhaust. WOW! Awesome mod. I went 2 1/2 from the turbo following the factory route, minus the muffler. EGT's are approx. 100-150 degrees lower, but the biggest thing that i have noticed is the recovery time. The stock exhaust took a while to cool down, the new stuff drops the temps fairly quickly. Sounds real good, and its a quick way to drop a 100lbs. That stock double walled tubing is heavy! Pics to follow.
IMG_0004.webp
IMG_0016.webp
IMG_0017.webp
 
Another clock with 5 buttons makes me very jealous :D looking good mate i see no mufflers on that exhaust that make me very happy the turbo must whistle like a old man on a rocking chair
 

Users who are viewing this thread

Back
Top Bottom