Need subwoofer

This site may earn a commission from merchant affiliate
links, including eBay, Amazon, Skimlinks, and others.

I watch movies on long trips on my head unit, so I'll take all the boom I can get.

I'm sticking with two subs that are only 6.5 inches compared to the original 5 inch subs. That's only 30% more sub. I'm keeping some of the original port opening to some extent, so I really just need to find some extra port space and make sure I've accounted for anything I take from the original port. Two ports, in the corners, should do it.

Why do you think I need double the air space?
 
Looking at the spec sheets for the subs, comparing sealed vs ported

Also aren't they 4"?
 
Last edited:
I have seen different spec sheets, some say 4.5, some say 5+. Crutchfield swore they were 5's today when I asked them via chat. Not sure what to believe, but I don't think mine are simply 4. Just pressing my hand against the speaker, I'd guess 4.5. Not sure what the precise ratio is of port to sub is, but I can see plenty of ways to get ventilation into the box. But to your point, there is no scenario where I think it would be wise to have less port space, just that you have a lot more options than you first realize. For starters, I was strongly considering yanking out the ash trays and widening the front end, since I don't want the kids in my back seat smoking :);) That alone would eliminate any port space issue, my take was always what was the bare minimum cutting I needed to do, and I won't really know that until I have the two new subs thrown in. It's hard to visualize, but my assumption from the beginning was that I would need to completely revamp the front plate that is exposed to the vehicle.

Just as an aside, I added Yamaha studio monitors to a desktop workstation this month, so I've been playing this dicey balancing act trying to eliminate distortion. I'm more worried about that at this point..
 
But just in case you're keeping score at home, here's what I've purchased thus far:

1. Two JL Audio Subwoofers 6w3v3-4. approx $320
2. Two JL audio SGRU-6 speaker grills. approx $25
3. Two pieces of 1/8 inch plasting sheeting from parts-express for the ultra low price of $10 or so(it's late, sorry)
4. We'll need at least two 12x24 pieces of MDF approx $20.

If we can use the MDF board to attach to the original enclosure and house the new subs as they protrude out further due to the new subs, our problem will be making the sides of the MDF board and plastic sheeting blend in with the plastic LC molding. But rubber weather stripping might be a good solution for that...we shall see..
 
Last edited:
The holes for the subs measured essentially 4" (between 4 1/16" and 4 1/8") . . .
 
At the top of the sub? Thanks...In my mind, I think the wood will make the expansion and fitting to the old enclosure straight forward. Assuming I don't destroy anything that is. With grills and plastic, I think I've got a start on building something straightforward face plate for two new subs, but I'm gearing up for the challenge of making it fit seamlessly with the opening in the plastic..

Therein lies the trickiness of not having a ghetto look..
 
I can understand you saying that:) But Matserelli has already pulled off two, with the same JL sub, so I'm confident I(or a pro) can replicate his achievement, but my goal is to have a cleaner look. No guarantee of that obviously.

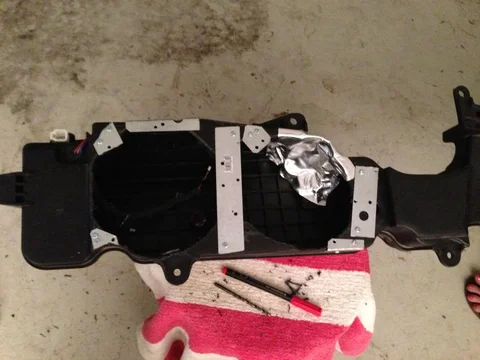
On a positive, the mesh covered plastic grate has enough room north to south. If the assumption is the cupholder stays, there is only 13 inches and yeah, two would be a tight fit. However, ditch the cupholder and ash tray and there is enough width and then some. It might be that we simply need a deeper mesh covered grate. This challenges my assumption that I need a wide base plate and rather we might be able to adapt the current mesh covered grate to handle a deeper sub. I'm curious as to how detachable that mesh covered grate is and how it's secured.

One of two things will be the outcome. a)Sticking with the original plan, I'll build a base plate that sits outside the grate and covers the original opening and makes up for any difference in size. b) We'll modify and recover the base plate, making it deep enough to handle the new sub.. We have found a replacement mesh, but modifying the grate will be the challenge.

I'm hoping to get the plastic grate out tonight or tomorrow. If I can begin modifying that, then it will speed things up enormously...and the more I look at it, it's the entire issue here. Modification of the rest of the parts is relatively straightforward. It seems absurd, but replacing two and sticking to the same wiring helps quite a bit.

Apologies that I'm painfully methodical about this, but I want this to be a repeatable solution to what's obviously been a challenge for many.

Now that I've figured out a few of the logistical challenges, I'm convinced that I'd have gotten the shaft in price and quality from a stereo shop.
 
Apologies that I'm painfully methodical about this, but I want this to be a repeatable solution to what's obviously been a challenge for many.

Now that I've figured out a few of the logistical challenges, I'm convinced that I'd have gotten the shaft in price and quality from a stereo shop.

No need for apologies. If successful - or even just partially successful - you'll have found a way to fix this for many of us on this board.

Let me know if I can provide any additional info., etc. I'm excited to see what you come up with.
 
I'm excited to see what you come up with.

Who is masterelli?

Poster who replaced his sub, search on the name, user only has five posts, could very well be someone pushing something, but it certainly proved that my particular amp would work and lo and behold a car audio shop recommend the same sub. But take a look at his posts and let me know your take..

8/10 of the battle here is getting the damned sub out! Luckily, someone before us has blazed that trail..I believe that's mtnracer and he did a hell of a job documenting removing and replacing the sub. For Smooth and I, the hold up is we have unique preferences regarding what product replaces the stock.
 
Last edited:
No need for apologies. If successful - or even just partially successful - you'll have found a way to fix this for many of us on this board.
Let me know if I can provide any additional info., etc. I'm excited to see what you come up with.

Much appreciated. Your photos helped me quite a bit. It's unusual that I'm not traveling for the holidays, so I have a bit of time to figure this out and come up with a seamless solution. I removed the third row seats, cleared the area and have removed the seat belt attachments, but I need sunlight and more room in the garage tomorrow.

The Eureka moment will be when I can get the mesh covered grate from the plastic molding...
 
. . . that's one long box! Thinking that I will need to finish Dynamatting that side before I put something back there. My LC has a ding right by the gas tank inlet and never finished the project thinking that I'd get it fixed/repair. (Not my photo).

BEFORE---Back-Left-View.jpg
 
Yeah, I saw that thread on DIYmobile audio as well, thanks for posting that. That one photo was really really helpful. Really great work and he didn't kid around. Sort of opens your eyes to the possibilities doesn't it? Did he quote a cost on that? I couldn't find it. Apparently the other poster did all the work(Bing?) and he took it up with his sub box.

After I complete this, I'd like to replace the cargo area carpet with a rubber padding akin to a truck rug, so I suspect I'll do the dynamat and ensolite route then. That being said, if I knew how much I could minimize outside sound back there, I'd probably be on a mad dash.

That dynamat/ensolite is sold as a kit and it's not expensive, any idea what glue he used?
 
I didn't see a cost in the thread or any mention of what type of glue he used (2000 Toyota Land Cruiser Sound Proof / Audio System Install).

When I started to soundproof my LC a couple of years ago I used two boxes of Dynamat Extreme to complete the tailgate and up to the front of the second row seats. Like Ken & Bing, I doubled up on the wheel wells and that seemed to make the most difference. It seems to have reduced the most unwanted, intrusive noise.

My rig . . .

dynamat-land-cruiser-jpg.718809
 
Last edited:
Wow I just read that install thread and it's quite impressive. Unfortunately It's quite a bit larger than I'd want in my truck. I still want the ability to recline the second row, and to use the third row seats. I'm having trouble understanding why they used two amps with one sub as well... can't wait to see what you guys come up with!
 
Yeah, that install thread and a few threads here address just about everything. I emailed Ken/Bing but have not gotten a response. Wanted to understand their wiring obstacles, if any. My assumption is that I can use Matserelli's approach, but build a different enclosure..

Smooth, what other adhesives and such did you buy besides Dynamat? Did you use Ensolite as well?
Sound system upgrades are good ones for the early LC's. Let's face it, they were built before the automotive industry caught on to the dot .com mania. Since then, the automotive industry spent all it's efforts putting flat screens in the dashboard, which is pointless, but hey, that's our opportunity. Living in a sunbelt state means I can't see a screen 6 mos out of the year, so I'm more interested in good sound and a solid wiring layout. But I'm wary of doing too much to disrupt the stock wiring. I have dual batteries that could power a few devices, but the key is to update without disrupting.

I've found what I believe is the tan material for the mesh grill. I really need my plastic sheet and a few parts to arrive so I can put all of the pieces under one microscope and start building.

In an ideal world, I'd use fiberglass molding to build a grill that fits nicely into the stock opening and is deeper, but that would jack the price up significantly..but we'll see either way..
 
Smooth, what other adhesives and such did you buy besides Dynamat? Did you use Ensolite as well?

There are two sides to the Dynamat Extreme. From their web site:

Dynamat Xtreme is a black butyl based core with 4 mil aluminum constrain layer, and craft paper release liner.​

xtreme-fan-300.png


The black butyl is very sticky/tacky and will adhere to almost anything with which it comes into contact. It looks like the RAAMmat that Ken and Bing used on that 100 series is an older version of what's available now (RAAMmat BXT II).

They mentioned in that thread that they used Ensolite as a finishing layer, whereas I used Dynaliner:

Dynaliner is the perfect ultra light weight insulator to use on top of Dynamat. This durable crush and tear resistant material has the highest heat blocking properties available in a single layer synthetic foam-type material.​


1-8-dynaliner-thumb.jpg


It has a "self-adhesive with a high-temperature acrylic adhesive".

From the RAAMAudio web site, it appears Ensolite comes with a "peel and stick" layer or as a "glue on" version that can be applied with an adhesive (V&S Spray) purchased from their web site.

The reason I went with Dynamat/Dynaliner is because the shop I purchased my audio system from gave me a good deal. No doubt RAAMmat/Ensolite works just as well.

Prep for either is pretty simple. Clean and wash the deck with Dawn dish soap mixed in hot water (if necessary) followed up by isopropyl alcohol.
 
Last edited:
Thanks for the detail on the Dynamat. Now that I have the plastic off, I realize it would be wise to see if I can cover that wheel well while the plastic is up. I'm glad I didn't take it to a stereo shop. They would get rich building an enclosure and face plate. Plenty of opportunity to improve upon 3rd party offerings here..
SubwithGrate.jpg SubwithOldSub.jpg TwoSubs.jpg

Photo#1- New sub(s) sitting on the grate from the plastic. It will fit! (Twice, hold your comments) But there will be cutting on that plastic it will be a challenge..
Photo #2- Old vs. new sub. JL Audio 6w3v3-4. It's quite a bit heavier I might add.
Photo #3- Photo from great post in another thread(not mine), but it gives you a feel for modifying the enclosure. I commend the DIY effort and I think that's a good approach.

Here's the key: The more difficult task here is modifying that plastic grate. It has to come out a bit to accommodate just about ANY new sub. Sure, there are subs you can pop out and just replace, but I don't think it's worth the effort.

One could ditch the stock enclosure and build their own and I'd by lying if I didn't say I'd given it serious thought. The pros of the stock enclosure are that it's durable plastic and the mounts are already drilled. If you still wanted your own enclosure, I'd suggest stripping that enclosure of everything but keeping a flat frame of the mounts and building that into the enclosure.
The cons are that it's designed to fit a really, really crappy subwoofer. This enclosure & sub are bad design. Too small to be of use and then too intricate to fit the part to be modified.
 
Last edited:
Just a heads up, you'll have to upgrade two wiring legs while doing this...

Connections:
The connection from the head unit to the amp with 8 gauge wiring
The connection from the amp to the sub woofer with 16 gauge wiring

g. Wiring Upgrade.jpg


By this in 25-50 foot increments, it's cheap..
Also, I think I'm going to search for some sort of flame retardant material to line against the wall of the vehicle. One erroneous spark from the subwoofer(unlikely, but still) and you've lit your gas tank.
 

Users who are viewing this thread

Back
Top Bottom