My WARN 8274 rebuild part 1..... (4 Viewers)

This site may earn a commission from merchant affiliate
links, including eBay, Amazon, Skimlinks, and others.

Well the guy I got it from was TasselsDesignLTD on Pirate.
Pirate4x4.Com Bulletin Board - View Profile: TasselsDesignLTD


Another guy could also try is Pat98TJ also on Pirate, He is from
[url=http://www.pirate4x4.com/forum/member.php?u=23629]Pirate4x4.Com Bulletin Board - View Profile: Pat98TJ


He post deals all the time on Pirate.

He was able to get me my 9.5Ti for $887 to my door.

Just PM them and ask, and if you don't have the #'s here they are.

Warn Part #'s
9.5XP motor #68608
Pinion gear #15879
XP Control pack #68609


Thank you Sir,

That will be very helpful.
 
Absolutely one of the best write ups I have ever seen of the Warn 8274, my compliments. I am in the process of rebuilding mine after seeing your write up, just one question; I am stuck on getting the main brake shaft out of the casing without bending or cracking the aluminium casting. How did you get this shaft out?
 
I am in the process of rebuilding mine after seeing your write up, just one question; I am stuck on getting the main brake shaft out of the casing without bending or cracking the aluminium casting. How did you get this shaft out?


For visual reference go back to posts 37 & 42.

The easiest (and perhaps only) way...is to drive the brake shaft out using a brass drift punch. You'll want to confine your strikes to the area shown.

It does require a bit of effort. You are actually driving out the lip seal, the bronze bushing and the brake shaft all at one time. Like you, I initially had concerns. The case is not very thick....but apparently it is stronger than it appears. Once the seal is driven out, the rest comes out without as much effort.

Of course, this is not possible unless you lift the lock-plate up into the position that exposes the "large" hole for the brake shaft to travel through.

Use a clamp to hold the lock-plate in the "unlocked" position.

_________________________________________________________________


When reassembling, I again used a pair of vise grips to lightly clamp the lock-plate in place (unlocked position). This leaves both hands free to place the other parts in the case.

Next... you will hold the intermediate gear inside the case while guiding the brake-shaft assembly through the bushing bore (without bushing or seal in place).

The splined cam gear will mate with the splines of the intermediate gear and the tail of the shaft will go into the needle bearing that resides in the case housing (grease the bearing).

At this point, push the lock plate down until it locks in the grooves on the drum and brake-shaft. You are now ready to reinstall the bronze bushing. The bushing should be tapped into place until it just protrudes into the inside of the case.

The bushing acts a thrust bearing for the intermediate gear (keeps it from rubbing the case).

Next, you'll want to install the lip seal. Lightly grease it and tap in place.

Bottom end is done at this juncture. The brake/clutch assembly is best left to be assembled last.
 
Wow what a fast and as per the rest of the thread precise and detailed reply... I'll give it a further go, it won't be until Monday now but I'll let you know how I get on,. Thanks again.
 
Flint:

Got my 8274 yesterday!:bounce::bounce2:

Hooked up to a battery everything seems to work ok.
I'ts a little banged up from shipping but I think I can tweak and bend things back i shape.

2 questions.
How do you get the top of the case off? Iv'e taken the alan heads off and whacked it, pulled and even tried a thin putty knife to loosen the halves?

How much play should be in the drum, looking at the front of the winch should it move up and down and front to back kinda wiggle? When not mounted to anything.

If that is normal then I may not need to split the case. I took the clutch palte off carefully to look at the oil. It was kinda thick but medium honey brown. Saw a splined shaft on the motor too!:clap:

Here are the numbers from the top maybe you'll know what Iv'e got. 284832 Date code GE6. Motor (M-mrv-b-4) (N-15877) (S-0785)

Thanks
James
 
2 questions.
How do you get the top of the case off? Iv'e taken the alan heads off and whacked it, pulled and even tried a thin putty knife to loosen the halves?

How much play should be in the drum, looking at the front of the winch should it move up and down and front to back kinda wiggle? When not mounted to anything.

If that is normal then I may not need to split the case. I took the clutch palte off carefully to look at the oil. It was kinda thick but medium honey brown. Saw a splined shaft on the motor too!:clap:


To separate the case halves I used a thin wedge shaped gasket scraper.

The case halves incorporate a tongue and groove feature that prevents the case from moving laterally (shearing), meaning the top half must go up. This also provides an excellent surface to apply the sealant….which is just what they did at the factory.

You will need to pry at the reinforced areas ONLY (see illustration). Do not do any prying from the motor side!

concoction.jpg


Just another view:

tophalf.jpg


If you are fortunate, your motor will have the 20 spline shaft and motor gear.

This is the preferred set-up because it offers two things: Increased contact area between the shaft and gear and compatibility with newer replacement motors (no need to buy a new gear).

motorgear.jpg


To answer your question about the drum fitment, there is a certain amount of play present (even with new bushings), but I can not say how much is “too much” except that at some point you would develop a leak where the drum enters the case. If your case is not presently leaking…then I would leave that area alone.

If you decide to venture into the gearing for any reason, you will find that “tolerances” are most generous, do not be alarmed. If it were possible to pick up an 8274 and shake it, it would sound like a couple of pebbles in the bottom of a Coke Can.

Still, they work very well…and have proven themselves reliable over the long haul.


Let us know how it goes.

Flint.
 
Last edited:
Thanks for the write up post. I am doing a rebuild of an 8274 as well.

I cannot get the brake assembly off. The keys on the shaft seem to have fused with the shaft. I remove the retaining clip and it did not come apart. I used about a pint of pb blaster and wd 40 on it and it will not come loose. Any suggestions?


Two suggestions:

1. Stop using the penetrating oil, clearly its not helping.
2. See posts #36-37 of this thread.

I do not live in the "rust belt"...so mine came off quite easily, but others might require the use of a 2 or 3 jaw puller to persuade it.

A worse case scenario would involve splitting the case, driving the brake shaft out and putting it in a press.

I would think a "small" amount of heat and a puller would make short work of the job for most folks.

Let us know how it goes.
 
Flint-I notice this is part 1. What is coming in part 2?

Looking forward to it.:D
 
Flint-I notice this is part 1. What is coming in part 2?

Looking forward to it.:D


Yeah, it kind of grew.;)

Of course, I took pics. when I did mine, but I never really intended to do a write up.

Originally, I thought I'd just show all the parts cleaned up (part 1)....and maybe a few stages of the reassembly (part 2).

I really just wanted to help others who might have an 8274 in need of service.

God only knows... how much of Woody's bandwidth I used up.:whoops:
 
Clutch mechanism assembled:

clutchmech.jpg

You wouldn't happen to know the thread size for the clutch knob shaft, would you? I am trying to source a new knob and as you probably know Warn doesn't make the 8328 knob any longer.
 
Hi SB,

I didn't take the knob off when I coated mine, so I don't know the thread size/pitch.

The shaft itself is 3/8"....so I'm guessing the knob would be 3/8-16 (coarse thread) assuming it screws on.
 
Flint
I just took my knob off. It's 3/8 course 16.
The knob is brass on the inside.
You probably could find one at your hardware store if it that has all those bins with drawers with all special wierd parts and pieces. I know mine has knobs, might even have the right one.

Just a thought
James
 
Flint
I just took my knob off. It's 3/8 course 16.
The knob is brass on the inside.
You probably could find one at your hardware store if it that has all those bins with drawers with all special wierd parts and pieces. I know mine has knobs, might even have the right one.

Just a thought
James


And there is the answer.


Thanks James.
 
No problem gotta give a little back to those who give so much.

Flint what do you think of a fill hole at the fill level on the side of the case and a drain further down maybe on the bottom radi? That way you could fill the case like you do other things, when it's full it dribles out. Also drain it like your oil pan.

James
 
No problem gotta give a little back to those who give so much.

Flint what do you think of a fill hole at the fill level on the side of the case and a drain further down maybe on the bottom radi? That way you could fill the case like you do other things, when it's full it dribles out. Also drain it like your oil pan.
James


Unfortunately, we are somewhat limited as to where we can put the fill and drain plugs… owing largely to the arrangement of the gears inside the case.

I like your idea of having a fill hole at a point on the case that the lubricant spills out when at correct capacity.

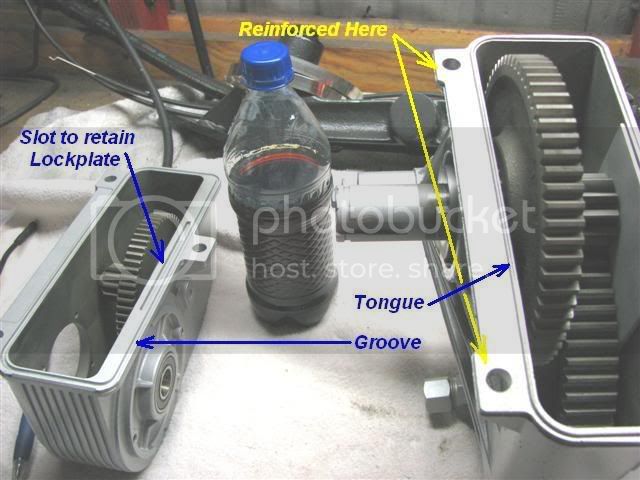
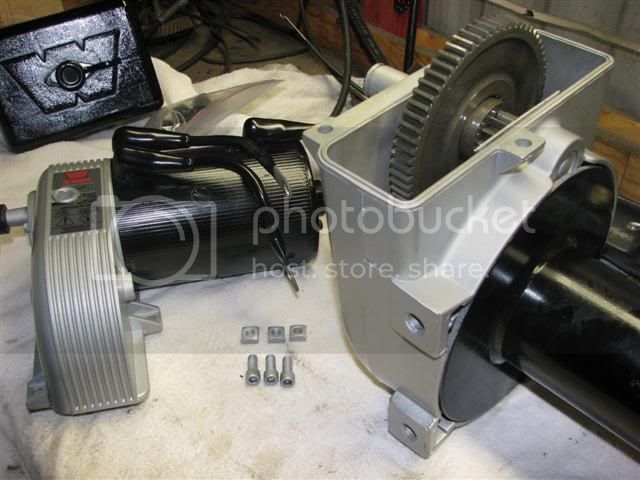
The only problem is…. finding a place to put it. As you can see in the pic. below….the lower part of the case is heavily reinforced with ribbing limiting what we can do there.

finishedIII.jpg


We can’t go to the motor side for obvious reasons…and the front of the case would likely be covered by the mounting bracket… so we are left with only the clutch side to work with.

The level of the oil if filled per factory recommendations (6 fl. ozs), barely covers the bottom of the main gear. I fear that putting a hole that far down on the case (unless very small) would place it too close to the drain hole…thus weakening the case.

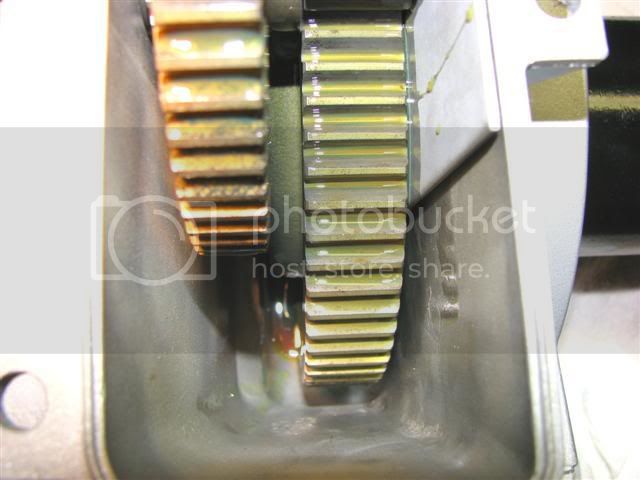
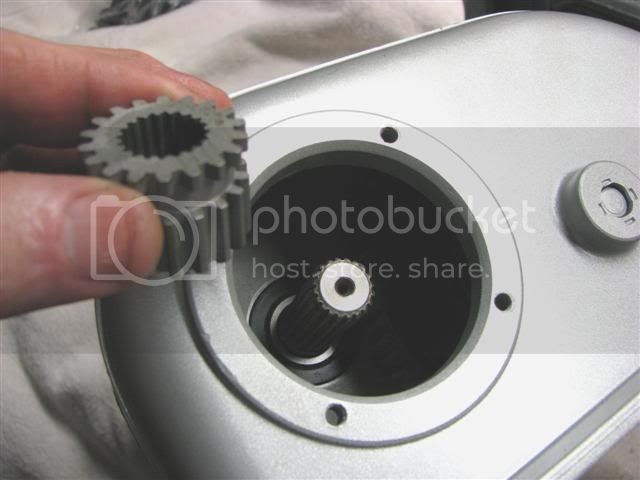
Here is a pic. looking straight down into the lower case with 6 ozs. of lube in it. As you can see, it is barely detectable.

filllevel.jpg


At this level, leakage from the drum seal is highly unlikely because it just barely reaches the seal. I put a new seal in mine and about 12-14 ozs. of a mixture of Synthetic Gear Lube & Marvel Mystery Oil and have had no leaks.

Even if I develop a leak at a later date…the problem will be self correcting. It will simply leak down to the recommended level. Of course….this doesn’t take into account off camber angles your vehicle is subjected to, so additional oil loss is possible if you have a leaky seal.

Regardless of where you put your fill/drain holes and what size you choose…I would recommend that you stay away from any radius on the case, so as not to compromise its integrity. Aside from the reinforcing ribs, the radii are sources of strength.

My drain plug (while unsightly) allows me to place a 3/8" tube inside the fitting as soon as the cap comes off. This way I can drain the lube away without making much of a mess.

But, I'm sure there are at least a half dozen ways to do it.

Let us know what you come up with. I am always eager to learn.

Flint.
 
I don't even know what the proper fill is, 6 oz didn't seem like enough, so I have 8-10 oz of gear oil. That's a great pic of how little oil 6 oz actually is!

I think your idea of filling to the bottom of the seal is pretty sound. You should drain it out and see how much that is in ounces.
 
You wouldn't happen to know the thread size for the clutch knob shaft, would you? I am trying to source a new knob and as you probably know Warn doesn't make the 8328 knob any longer.

Found one but not round,T shaped. Hardware stores that carry Hillman products with all the little bins of odd stuff.
$3.90.
Might do a search on Hillman I don't have the part number.
Good luck
James
 
Found one but not round,T shaped. Hardware stores that carry Hillman products with all the little bins of odd stuff.
$3.90.
Might do a search on Hillman I don't have the part number.
Good luck
James


Yeah, he can find something for it pretty easily.

I'd be surprised if the current "T" shaped knob for the newer 8274-50 isn't a direct replacement.

He may want a round one however.
 
Hi flintknapper,

Another question: Is there an easy way to remove the drum from the gear inside. I have tried a wedge between the housing and the gear inside, but that sucker is on there. I don't want to damage the housing. Any suggestions? Again, your help is greatly appreciated.
 

Users who are viewing this thread

Back
Top Bottom