My WARN 8274 rebuild part 1..... (3 Viewers)

This site may earn a commission from merchant affiliate
links, including eBay, Amazon, Skimlinks, and others.

Flint,
Thanks for the link to the brake rebuild. I've been fighting the brake assembly on my winch for over two weeks. I've had a 5-ton three jaw puller on it for over a week and can not get anything to budge. I've tried heating the outer brake hub while it's under pressure and still can not get anything to budge. I doubt that I heated it up enough. I'm concerned of warping the hub.
I'm considering at punch point and a BFH on the drift keys. That's the only thing that I can think of to get something moving in the assembly to get this thing to come apart.
Any ideas from any others??? I'd like to be able to put this thing on the truck, but can get it apart to finish the rebuild.
Thanks for any advise.


Wow!

Sorry yours is being so "contrary".

You have taken all reasonable steps and precautions, so now its time to drift out the keystock. Either they are rusted to the shaft and disc or they have a nick or something on them jamming them.

If you can find a bronze/brass drift punch (instead of steel) that won't "swell" the end of the keystock when you hit it...then that is what I'd try next. Moderate heat applied the disc beforehand may help some, but it sounds like a rust issue...and direct force to the keystock is your answer.

Keep us posted. I know it must be frustrating.
 
Last edited:
Thanks Flint',
I'll pick up a brass punch. The punch that I had in mind is steel. I wasn't considering the damage to the drift key.
I'm almost to the point of drilling out the drift key if the BFH does not work.

Thank for all the advise.
 
I damn forgot to put my bushing it, (This is Ohrly?)

Anyways, my reverse function on my controller doesn't work. Will power wind it, but will not power wind-out. I have three wires coming out of my controller, and 3 wires going into the winch.


-support the antidisestablishment of manterianism.


Any ideas guys?
 
Reverse solenoids dirty or malfunctioning.
 
Any ideas guys?

Well....on the 8274 it could be a number of things, but lets start with the simple stuff and systematically diagnose it.

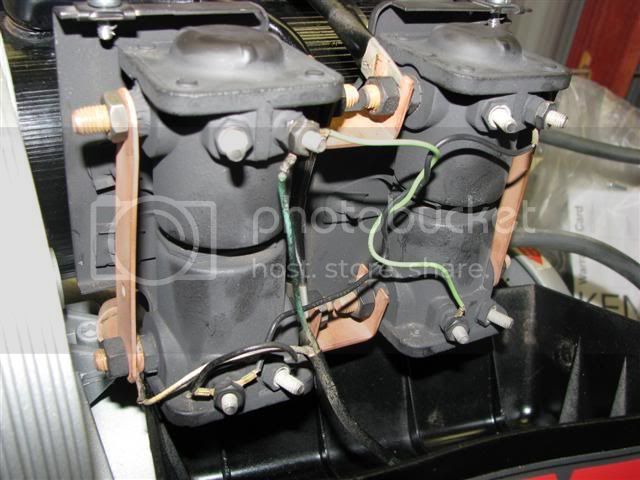
First, pull the solenoid pack cover and make certain that all connections are clean....and that the wiring is routed like this:
connectionleft.jpg


After you have completed that task, if you still have the problem (won't power out), then we need to check your hand controller (a common problem item).

The easiest way to check the hand controller is to borrow a "known to be good" unit from someone, hook it to your winch (can be 3 or 5 pin...doesn't matter) and try it. If it works...then the hand controller is your problem.

If you don't have access to another hand controller...then you will need to check yours for continuity through the switch and across the pins.

To do this with a 5 pin unit (what most of have these days), set your multimeter on the "ohm" feature. With the 5 pin HC plug facing you (looking down into it) you will notice a "keyway" at the top. We will call this 12 O'Clock.

Place one probe of the MM on the pin at 2 O'Clock (this is your hot wire) and the other probe on the pin at the 6 O'clock position. Toggle the switch downward (as if to power in) and check for continuity. If have cont. then leave the one probe at the 2 O'Clock position and place the other at the 10 O'Clock position (power out).

As before, toggle the switch upward (as if to power out) and note if there is continuity. If there isn't...then something in your hand controller is at fault. If it does show cont. then we have proven the hand controller to be good and can move on to the wires from the receptacle to the solenoids.

We will check them individually for continuity (insuring there are no breaks in the wires). If the wires check out O.K., then the next step will be to test the solenoids.

Start with this...and let me know what you find.

Remember: Step one is to clean all connections and to make certain the wiring is run correctly.

This is what the backside of the solenoid cover (with receptacle) should look like for a 3 wire set up.

8274threewire.jpg
 
Hi Flint,

Hope you are well?

I have hit a dilema, the casing has just come back from powder coating and looks great, the only snag is the needle bearing inside the lower case has seezed with sand from shot blasting, I am afraid I forgot to take it out and didn't think about the effects on it. I am going to replace it and see it as a replaceable part but does anyone know how to remove it. Is the cup on the outside of the casing part of it and do you just tap it through? I guess it goes from the outside in becase there is a lip on the inside edge of the bearing inside the casing.

Thanks, any help would be appreciated, I can't believe I was daft enough to leave the needle bearing in :doh:

Thanks
Simon
 
Last edited:
I have hit a dilema, the casing has just come back from powder coating and looks great, the only snag is the needle bearing inside the lower case has seezed with sand from shot blasting, I am afraid I forgot to take it out and didn't think about the effects on it.

As long as the needle bearings were not "rusty" (in need of replacement) then there is no reason to remove the bearing. In the future...stuff the bearing with a piece of oil soaked rag in order to keep "most" of the blasting media out.

I am going to replace it and see it as a replaceable part but does anyone know how to remove it. Is the cup on the outside of the casing part of it and do you just tap it through?

The "plug/cap/cup" on the outside of the case is not part of the bearing. It is held in place by means of an "interference fit".

So...yes it can be tapped out...but let me warn you..there is a good chance you will deform it in doing so. I would not expect to be able to reuse it...and I don't see the part represented in any of my parts diagrams.

I guess it goes from the outside in becase there is a lip on the inside edge of the bearing inside the casing.

Yes, a new bearing would normally be installed from the outside. Also, you have correctly noted that the bearing lip protrudes into the casing a small amount in order to act as a "thrust washer" for the shaft (see post #37). This is a common theme on this winch and we see the same practice used for the bronze bushing on the brake shaft as well as the bushing for the drum.

Thanks, any help would be appreciated, I can't believe I was daft enough to leave the needle bearing in :doh:

No need to despair Simon, even though I placed a rag inside my bearing when blasting the housing....I still experienced some contamination.:rolleyes:

My bearing wasn't fully "seized" as you describe, but very nearly so.

The good news is: As long as your needle bearings are not rusty or otherwise worn beyond usefulness, then we can get the blasting media out (I did).

Logic tells us that if the media was able to get "in" then it must be able to come "out". ;)

I was able to accomplish this using compressed air, but I suspect a high pressure stream of water would work too.

First you have to create a "void" by which the particles can escape. I did this using an ordinary toothpick that I shaved down slightly. You can create a fairly decent "gap" between two of the needle bearings if you force a toothpick between them.

Then.. simply apply compressed air (watch your eyes...as everything will come directly back out of the bearing bore).

Remove the toothpick, rotate the bearings a little and repeat until you get free movement.

Once you get free movement you will no doubt still feel the bearings "grinding" a little. At this point... I used a light oil (Marvel Mystery Oil) and completely soaked the needle bearings. This caused the remaining grit to clump..and the oil helped to carry out the remainder with a blast of air. It's messy though, I have to warn you.

So, you'll have to weigh the trouble/effort of salvaging your present bearing against the cost, parts availability, and labor of doing a replacement.

I spent perhaps 10 minutes cleaning mine up, but... I had a compressor and everything else needed.

Hope this helps, sorry for the length.

Flint.
 
Last edited:
Hi Flint,

Thanks for the advice on the needle bearing. I tried to clean it using your approach but unfortunately it was too seized to do any good and I could not save this bearing. A friend of mine helped me to remove the old bearing today and we have fitted a brand new one in its place.

A few of the Warn sellers here in England I spoke to have never needed to replace a needle bearing before because they are pretty much indestructable as i understand unless you do what I did and fill it with media sand. :p If anyone needs advice on removing this bearing and refitting please let me know as we found a great method that took very little time and put no stress on the casing.

He also kindly used his digital calipers to help me set the lower drum bushing to .190 as required. We used a little threadlock material to hold it in place (recommended by a Warn seller in the UK), what did you use to hold your bushing in place Flint? Also does it matter if it moves at all once the drum is in and working as it won't really be able to go anywhere I guess. :)

I have painted the drum tonight with black Hammerite satin black spray paint and it looks great and like new. I am wondering if it is worth spraying a clear satin laquer on top to help protect the finish but i am not sure yet. It really depends if i can afford synthetic winch rope or if I go with the standard steel cable route. I will definately use the laquer with the steel cable to help it wear a little better.

Just the motor casing to spray now next week and re-assembly can commence at last.

Thanks, I shall post a picture of it once it is all finished.

Regards
Simon
 
Hi Flint,

Thanks for the advice on the needle bearing. I tried to clean it using your approach but unfortunately it was too seized to do any good and I could not save this bearing. A friend of mine helped me to remove the old bearing today and we have fitted a brand new one in its place.

Excellent! You are now that much closer to having your winch rebuilt and you will have full confidence that the new bearing will give good service.

If anyone needs advice on removing this bearing and refitting please let me know as we found a great method that took very little time and put no stress on the casing.

Simon, if you don't mind taking the time to document the procedure, we would all love to hear about it. It would also be very helpful for anyone else needing to replace the needle bearing.

With your participation..and that of others, we can assemble one of the better "rebuild" threads available. Anything you can add here will be greatly appreciated.

He also kindly used his digital calipers to help me set the lower drum bushing to .190 as required. We used a little threadlock material to hold it in place (recommended by a Warn seller in the UK), what did you use to hold your bushing in place Flint? Also does it matter if it moves at all once the drum is in and working as it won't really be able to go anywhere I guess. :)

I did not use any thread-locker on mine (not that it hurts anything). Mine was a fairly snug fit...and as you say, it really can't go anywhere.

The .190 measurement is not ultra critical IMO.

It is given..so that the correct amount of "lip" protrudes into the case to act as a thrust bearing for the drum gear and also to establish the proper amount of "crush" for the lip seal on the drum. The only way it could move...would be if the lock-plate somehow lost contact with the drum and brake-shaft (pretty much impossible).

I have painted the drum tonight with black Hammerite satin black spray paint and it looks great and like new. I am wondering if it is worth spraying a clear satin laquer on top to help protect the finish but i am not sure yet.

I did not clearcoat the drum on mine....as I chose to use steel cable...and it will eventually wear through the black epoxy paint anyway. I did clearcoat everything else except the motor and solenoid cover.

Just the motor casing to spray now next week and re-assembly can commence at last.

You are making good progress!

Thanks, I shall post a picture of it once it is all finished.


We are happy to help in any way that we can...and we await your "finished project" pictures.


Flint.
 
Last edited:
Hi Flint,

Thanks for all of your advice so far I am at last finding time to re-assemble my winch after a break from it for a few weeks. I have re-installed the lower drum tonight with no issues with the larger lip on the main gear facing inwards towards the brake side of the casing (facing away from the drum) as you have pictured but i am a bit unsure with the main shaft re-assembly so was hoping for your advice please.

Firstly does it matter if the cam gear is in the open or fully closed position when placing the intermediate gear back on top of it and sliding the shaft through into position. It seems to naturally close anyway when sliding the gear into position. Also am I correct in positioning the intermediate gear so that the side with the larger lip is facing the brake side of the case? Sorry to ask trivial type questions but after all of the work i have put into the refurbishment i don't want to damage anything now. Also should i put any thread lock on the brass bushing which is tapped back into the case around the main shaft before fitting the lip seal or just lightly grease it?

Thanks, regarding the needle bearing replacement i will place a step by step guide once I have finished rebuilding the winch plus some pictures of the rebuild.

Thanks Flint,

Kind Regards
Simon :)
 
Last edited:
Hi Flint,

Thanks for all of your advice so far I am at last finding time to re-assemble my winch after a break from it for a few weeks. I have re-installed the lower drum tonight with no issues with the larger lip on the main gear facing inwards towards the brake side of the casing (facing away from the drum) as you have pictured but i am a bit unsure with the main shaft re-assembly so was hoping for your advice please.

Hi Simon, I just read your post, glad to see things coming along.


Firstly does it matter if the cam gear is in the open or fully closed position when placing the intermediate gear back on top of it and sliding the shaft through into position. It seems to naturally close anyway when sliding the gear into position.

As you have already discovered...the cam gear is predisposed to closing when any pressure is applied to the drum side. This is good however, since this is the position you will want it in anyway.

If not fully closed when you attempt to drive in the brass/bronze bushing....it will do it for you, so might as well start out correctly.

Also am I correct in positioning the intermediate gear so that the side with the larger lip is facing the brake side of the case?

Yes, good eye Sir! Both the main gear (drum) and intermediate gear are to be positioned with the taller boss facing the brake side of the case. The boss on the intermediate gear rides against the brass bushing which protrudes slightly into the case and acts as a thrust washer.

Sorry to ask trivial type questions but after all of the work i have put into the refurbishment i don't want to damage anything now.

I understand completely..and do not consider your excellent questions to be "trivial" in any way.

Also should i put any thread lock on the brass bushing which is tapped back into the case around the main shaft before fitting the lip seal or just lightly grease it?

IMO, there is no need for either. The bushing is an interference fit....so lubricating it may prove counterproductive. Likewise, should you ever need to go back into the winch (not likely)...then thread-lock can only make the job more difficult.

The only pressure (parallel to the bore) the bushing will ever experience.. will be minimal...and shouldn't ever cause you a problem. The shaft itself is captured by the lock-plate so only slight "side loading" of the gear can ever occur.

I will place a step by step guide once I have finished rebuilding the winch plus some pictures of the rebuild.

We look forward to it. Every person's experience and participation in this thread is encouraged. It is my hope that eventually...it will become one of the better (and most informative) resources for refurbishing the venerable 8274.


Thanks Flint,

You are most welcome.


Flint.
 
lip seal bronze bushing

Great write up!!!!!
Bought my 24V 8274 about a year ago for 2 cases of :beer:.

Did a rebuild with genuine Warn parts. Everything work great but.......

The lip seal and the bronze bushing on the brake shaft keep getting pushed back when letting the cable back out.

Any ideas why they will not stay in place?

:beer: Landcrusher80


Hi LC,

Honestly, yours is the first case I have ever heard of this. The bushing can be pushed by side loading of the gear when cable is "payed out"...but since the gear is free move laterally (a small amount) it is hard to imagine that this would result in your bushing and seal being displaced.

While I don't have a ready answer as to "why" this happening, I can offer a suggestion to alleviate the problem.

If it were mine, I would remove the cir-clip that holds the brake/clutch assembly in place, slide the entire unit off the shaft and then "stake" the seal in place using a sharp punch.

Three or four "stakes" placed right at the edge of the "boss" that contains the seal and bushing should suffice. These can be easily removed later if the need arises. You can see a clear picture of the "boss" in post #37 (second pic), it is more than strong enough for staking (use a sharp punch though).

Let us know how that works...or if you come up with something different.

It was asked here in an earlier post if using "loctite" on the bushing and/or seal would be recommended and I advised against it. The interference fit should be enough to keep these parts in place, but apparently not in you case.

If we see other instances of the seal and bushing becoming displaced...then I may need to re-evaluate my advise.


Flint.


Edit: It occurred to me that not everyone knows what "staking" is, so if you will look at post #66 (bottom pic) you will see an example of a factory "stake" to the right of the large motor opening (small gear shaft). I wouldn't attempt to stake in your seal to this degree...but you get the idea. Small stakes at the edge of the bore should prevent the seal and bushing from becoming dislodged.
 
Last edited:
Ugh, totally smashed mine up today. Housing and mount is totally broken, fxxx.
 
Ugh, totally smashed mine up today. Housing and mount is totally broken, fxxx.


Alright, lets hear it. What did you do? :eek:
 
Hi Flint,

On the home straight now with re-assembly and just about ready to bench test tomorrow night, I have been away a lot so only get a half hour here and there to work on it when not tired from work. I have a quick few questions please if you are able to help:

- When refitting the motor (I have an earlier Prestolite model) when the small upper locating pin slots into the upper hole on the winch casing there is still a gap of a few mm all around the motor where the inner lip on the winch casing needs to sit inside the edge of the motor. Am I okay to just gently tap the case onto the motor with a rubber mallet until it is flush, then tighten the 2 motor bolts? I don't remember it being as snug fit when removed but then I have powder coated the casing so it has probably gained a little bit more surface than previously. Also do I need to seal the motor to the casing with any rtv sealant?

- I have re-fitted the main shaft, bronze bushing and outer lip seal which sits flush with the outer surface of the winch casing. I have only got the bronze bushing just protruding into the casing by maybe 2mm at the most which can be seen from the top, is this okay? How far is too far? I notice as the case naturally slants inwards the bushing does not expose the same amount all round the inside of the winch case. It seems to be enough by sliding the intermediate gear against it so the stepped lip makes contact with it but it is hard to tell. Is the gear that likely to make contact with the casing much during use? I may tap it in a little further before final top half reassembly, although the lip seal was hard to fit with it being new with not much flex and I don't really want to remove it again to tap the bushing in further.

Thanks, regards
Simon :)
 
nt,

On the home straight now with re-assembly and just about ready to bench test tomorrow night, I have been away a lot so only get a half hour here and there to work on it when not tired from work. I have a quick few questions please if you are able to help:

Hi Simon,

Great to hear of your progress.


-
When refitting the motor (I have an earlier Prestolite model) when the small upper locating pin slots into the upper hole on the winch casing there is still a gap of a few mm all around the motor where the inner lip on the winch casing needs to sit inside the edge of the motor. Am I okay to just gently tap the case onto the motor with a rubber mallet until it is flush, then tighten the 2 motor bolts? I don't remember it being as snug fit when removed but then I have powder coated the casing so it has probably gained a little bit more surface than previously. Also do I need to seal the motor to the casing with any rtv sealant?

Yes, the motor should fit snugly against the case...however this may not be possible if the powder coat "build up" is too great.

My motor required some gentle tapping in order to "seat" it because of the small amount of paint build up present...but it did go.

I do recommend that you use a sealant in the same areas shown in post #91. This will help keep moisture/water from entering.


-
I have re-fitted the main shaft, bronze bushing and outer lip seal which sits flush with the outer surface of the winch casing. I have only got the bronze bushing just protruding into the casing by maybe 2mm at the most which can be seen from the top, is this okay?

Just enough to keep the gear from rubbing the case is sufficient.


How far is too far? I notice as the case naturally slants inwards the bushing does not expose the same amount all round the inside of the winch case. It seems to be enough by sliding the intermediate gear against it so the stepped lip makes contact with it but it is hard to tell. Is the gear that likely to make contact with the casing much during use?

I noticed the slant of the case also, my bushing protrudes into the case about .125" at the top. I could see no indication that the gear on mine had ever made contact with the case.


I may tap it in a little further before final top half reassembly, although the lip seal was hard to fit with it being new with not much flex and I don't really want to remove it again to tap the bushing in further.

As stubborn as the new seals seem to be, I don't think I would move it if you have it firmly in place now.


Be sure to post pics. of the finished product and share with us any suggestions you may have.

Take care,

Flint.
 
Alright, lets hear it. What did you do? :eek:

pulling into a parking space, was at an angle, so pulled back in, floor was wet and my foot slipped off the brake, and my buddies bumper was the perfect height to rip my winch apart and send it into the rad destroying my bezel, headlight and whatever the front piece of my truck is called.

ripped apart the right mount, ripped apart the left top mount, and ripped apart the gear case, 3 or 4 huge cracks in it, and then went full blast and smoked to s***.


:eek: :eek: :eek: :eek:
 
yeah dude im desimated, im going to try to find another gear casing and then rebuild following what u did on urs
 

Users who are viewing this thread

Back
Top Bottom