My '64 FJ40 Build - Cave Cricket

This site may earn a commission from merchant affiliate
links, including eBay, Amazon, Skimlinks, and others.

Steering shaft lengthened and in

qt8J1qDh.jpg


yylJvaGh.jpg


Ended up with 3 mm of clearance...THREE MILLIMETERS...I'd like to say I planned that but honestly I thought there would be more. Got lucky there.

On top of that, fired it up for the first time over the weekend. Super pumped. Took longer than expected because a bad ground kept the fuel pump from firing but finally got it around 11pm Sunday night - made for a great (non productive) Labor day.:grinpimp:
 
Alright 40 friends, I need help.

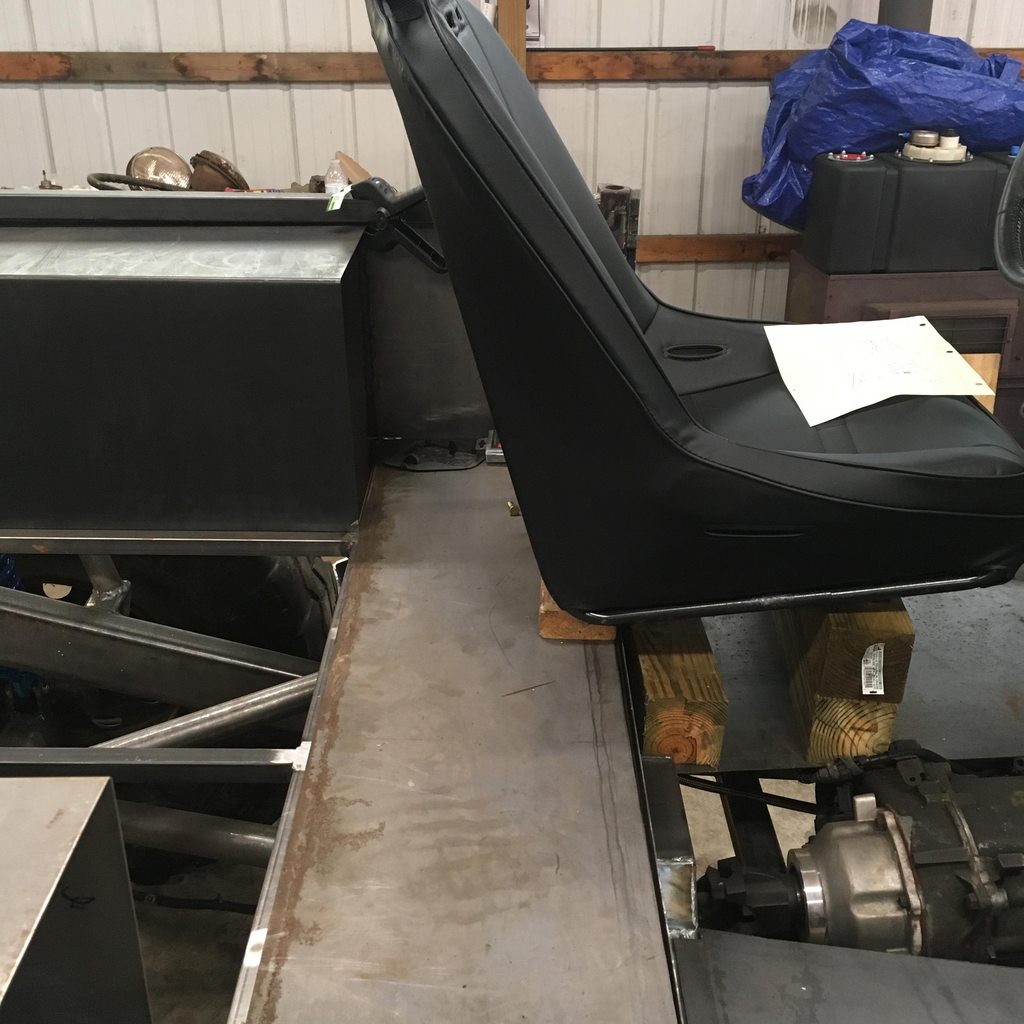
Do I need to cut at yellow line in order to clear bucket seats?

9fTEarLh.jpg


The plan is this: the seats will likely be Corbeau Baja SS or similar with harness and mounted to roll cage. I've done some mock up using 4x4s and plywood and don't THINK I will have clearance issue with wheel well and seat back if left square like they are but would hate to have to come back and redo once I get to cage/seats - I already hate body work. It seems that in most 40s it is required to be cut at some angle to clear bucket seats, however this tub has been stretched - this is the area between the wheel well and where it drops down near door opening. By mocking up the ergonomics of the wife's Grand Cherokee, it seems that I would be fine to leave the inner fender as is but I would love seat position input from fellow 40 owners and builders.

Here are a couple more shots of the fender wells since we're already here

yteRxHWh.jpg


eLbHz7gh.jpg


It looks like less clearance than it really is, but nevertheless I was super pumped that I didn't completely screw the mounts and put the shock/reservoir line into the inner fender!

As you can tell, I have gone super highline with the inner fenders...I didn't really have an option due to the cut to fit the tires. I could have dropped them a little, but mounting would have been a pain - with the way they are now I will weld to the bottom of the tube holding the side panels.

In other news, I worked on the windshield frame. Like the rest of the body, originally I thought that it was in good shape and mostly usable. With some perspective, I was not so pumped when I dug it back out a couple week ago. :mad: After a day of researching the price of one from AZ or SoCal, I decided to give this one a shot.

BtI1X31h.jpg


Both sides were like that, the other probably worse. For reference if you're not familiar, this is the underside of the windshield frame which rests on a rubber pad. Due to its design, it is a huge water trap and therefore a spot for corrosion.

The only pic I have during the fix is on the other side.

r7x5JRuh.jpg


It is not perfect, however it will get me going for now.

It is nice to see the FJ have a bulge under the tarp again :D

LCG4c10h.jpg
 
It looks like I am going to get lucky and not have to cut the inner fenders at an angle.

gxfX3EJh.jpg


This is within an inch of where the seat position felt most comfortable to me, so there is plenty of room.

It was pretty fun getting to sit in the seats, definitely pretended I was driving it. :grinpimp:

McvycrQh.jpg
 
Had another big milestone moment this past weekend when I bent the first piece of tube! :clap:

73nM5eNh.jpg


I ended up buying a JD2 model 32 bender, 2" die and the "Notchmaster" tube notcher. In addition, I also bought the Bend Tech Pro program. Overall I am delighted with all of it. The bender and notcher are certainly forever tools, very happy to add them to my collection.

I was amazed at how easy the Bend Tech program is to use once you get the hang of it. I am proficient in CAD, however I need none of that knowledge to operate the program, neat!!! I immediately went to town designing my rollcage, rear bumper and grill hoop.

dZFqiTeh.jpg


6pRZdDBh.jpg


pbmbsB7h.jpg


oxsdrMVh.jpg


The grill hoop and rear bumper are still design #1, however the roll cage is revision 4 or 5.

There was a rather steep learning curve as I bent up my first couple pieces of DOM however I mostly have it under control now. I decided to do some not-so-critical parts first to get the bugs worked out before starting the roll cage. I started with the winch hoop on the front and accidentally over bent one of the angles and therefore made it too short. Before attempt two I changed my set up point from the follower to the die and that help repeatability a TON!

The Bend Tech program is SO HELPFUL once you figure out how it works because it lays out the bends from the start of the tube, then will show you how it goes through the bender in an animated video. Plus, if you run into an issue like I did when trying to bend the grill hoop you can rotate the bends, figure out how to load it in the bender from the other direction, etc all with a couple mouse clicks and as long as you can replicate in real life it comes out perfect.

P0xjM2ih.jpg


I was also SUPER IMPRESSED with the "cutting" feature on Bend Tech which allows you to print a full scale wrap for the tube that shows the profile to cut in order for a perfect notched fit. Worked great on the grill hoop!

roSDwd4h.jpg
 
Last edited:
And a bit of a step backwards, I made my minimalist front bumper the other day. It is 1/4" thick with a fairlead opening cut in it. The angle is rouphly 73 degrees if I remember correctly - made to match the approach angle.

EDe3FWth.jpg


TFhMsUHh.jpg


I of course wish that I could have had a shorter nose and better approach but my hands were tied without going full hydro steering. This gives good room for the winch at least.

NvrBW6dh.jpg


On the rear I am still hard at work, but following the concept shown in post above. Currently struggling with the proper location for the rear tire carrier spindle to maximize strength and swing angle.

I am planning on the lights being the ovals between the frame rails. The idea was the two outside would be the tail/brake/turn signal and the middle be the reverse light. It looked better in my head, still deciding on it.

I5ZpyeGh.jpg
 
Personally I think it would give the interior a significantly cleaner and more polished look if you angled the rear inner fenderwells even though you don't need the seat clearance. I think your front bumper design looks killer. For the rear I think it would be rad if you used stock 40 tail lights or those led lamps that look just like 40 series tail lamps. What are you going to do for front fenders?
 
Great work, looks awesome.
 
Personally I think it would give the interior a significantly cleaner and more polished look if you angled the rear inner fenderwells even though you don't need the seat clearance. I think your front bumper design looks killer. For the rear I think it would be rad if you used stock 40 tail lights or those led lamps that look just like 40 series tail lamps. What are you going to do for front fenders?

Yea, you are right on the angling the inner fenders.

Are the 40 series LED lamps a whole new housing assembly and lights or is it replacement LED hardware inside the OEM lamps? Or something else maybe?


Great work, looks awesome.

Thanks!
 
oOoo, I do like those bottom ones. Integrating them into my bumper would be the tricky part though because I feel like they might look weird in the center between the frame rails?
 
oOoo, I do like those bottom ones. Integrating them into my bumper would be the tricky part though because I feel like they might look weird in the center between the frame rails?
If you like the wings on the 4x4 labs bumper in that pic you could mimic it with tube a bit. Put a bend in the upper tube so it comes down a bit like the upper flat stock in the bumper pic I put their, then add a lower tube that comes up and meets the upper tube. You could keep the bend in the upper tube that goes around the side. Then put a plate inside the 2 tubes and mount your lights. Doing that would also make for stronger wings on your bumper. Just an idea anyway.
 
Last edited:
wow just went through your build, its amazing. Seems like the jd squared tube bender does the trick.
your build skills are great. Im glad my tub is not like yours, i got more metal left to work with
 
wow just went through your build, its amazing. Seems like the jd squared tube bender does the trick.
your build skills are great. Im glad my tub is not like yours, i got more metal left to work with

Thanks for the kind words. And yes the JD2 bender is quite a nice tool, I haven't gotten to use the Notchmaster YET but am really looking forward to it as I've heard it is quite a nice piece as well.

The ONLY upside to that tub being as bad as it was is that mine is now BRAND NEW!!! :grinpimp: :p
 
I have been under an huge internal struggle over the past 4-5 days but think I have come to a decision.

No, I'm not throwing in the towel - but I probably should have after cutting the first panel off. :laughing:

The struggle has been over the roll cage. The design shown up a post or two is what I WANTED to do, however I think I need to step back a tad and go with the one below:

xtLyZdCh.jpg


The difference is in the B pillar area. On the preferred design (a few posts above, also below) the B pillar is just two straight vertical tubes notched to the A-to-C pillar bar and tied together with another straight tube on top. The B pillar is simple, it is that A-to-C that is the issue. As my fellow 40 friends know, the body widens about 8 inches as it goes from the A pillar area to the B pillar area. This makes the A-to-C bend 3 dimensional, plus it is one LONG piece with 4 total bends, 2 of which are in two directions simultaneously. My confidence in nailing it not once but twice is still pretty low and unfortunately it is basically the first piece needed to get the cage started.

Below in red is the piece I am referring to above.

D0lilCah.jpg


My solution is to break that long A-to-C piece by making the B pillar one continuous piece, essentially an upside down "U". This takes ALL of the 3 dimensional bends out of the design and gives me room for error on the A pillar. This is important for me because I am going to run the A pillar up AS CLOSE to the dash as I can without the bend that you see in common off the shelf FJ40 cages to get around the dash and windshield latches.

I will wrap this up by saying that I don't like the new design as much from a visual standpoint, however it will give about 2 inches of extra head room and be MUCH easier to fabricate. My next build though.... :grinpimp:

Anyways, thanks again for the interest - bending more tube soon!
 
Thanks for the kind words. And yes the JD2 bender is quite a nice tool, I haven't gotten to use the Notchmaster YET but am really looking forward to it as I've heard it is quite a nice piece as well.

The ONLY upside to that tub being as bad as it was is that mine is now BRAND NEW!!! :grinpimp: :p

I have the notch tn-100 and i love it. simple to use. you should get it..
 
I'm back!

Finished X in the roof and behind the seats, plus added the seat mounts then pulled the cage for final welding. Oh yea and did all of the cage to frame tie ins as well.

f0hcWS8h.jpg


6gbIHjAh.jpg


I used a Harbor Freight winch in the rafters to lift cage, then rolled the FJ out and back under - worked awesome!

uU97Dffh.jpg


VePmRfch.jpg


56L2HfIh.jpg


For some reason (because I haven't done this before) I thought it would be best if I left the interior panels loose until the cage was done so that I could get to the frame tie ins easier by removing said panels...it helped exactly zero times. Before I did anything I welded in the wheel wells so that I could get a good basis for C-pillar. I didn't weld the others in until I pulled the cage for final welding, but I certainly didn't need to - I could have saved myself some time and done that A LONG time ago. Oh well I guess?

Last time with no floor panels

jTEKe3Sh.jpg


I did a plug weld hole every 3 inches on all panels

5uSvWsCh.jpg
 

Users who are viewing this thread

Back
Top Bottom