Builds Just had to treat myself for Halloween... 65 SWB

This site may earn a commission from merchant affiliate
links, including eBay, Amazon, Skimlinks, and others.

Don't forget that your stock springs are beat. A set of new stock sized springs would definatley give you some lift.

I put a 2.5" lift on one of my rigs and got 4 1/2" of lift at the frame horms. That was how bad my old springs were. I didn't realize how bad they were. :doh:


Thanks Dan. Yeah, the springs are beat and they need replacement. I mocked up the 2.5" OME and I like the look of that.
:beer:


I'm not trying to talk you out of a 2.5" lift though.
 
Drove the SWB to work for a three day stint at 4 in the morning Thursday... 100 miles. I figured the best way to work out the bugs is just do it, right!?

I brought:

Tools, tools, and more tools.
hose clamps, electrical connectors, spare hoses...

AAA Card with 100 mile tow.

Small flashlight to see the TEMP gauge as the light is almost non existent on that side.


I went to sleep thinking "This is a pretty dumb idea" as I had only had the new tires on for less than 24 hours and about 2 miles of freeway driving. I woke up thinking the same thing and almost unloaded all my stuff to my regular car.

l left the house thinking "This is one of the dumber decisions I've made in a long time"...
:rolleyes:


:steer:
Drove at about 55-60 on the speedo (with the 33's I imagine maybe more like 58-65).


Temp stayed low, amps read just over + and oil pressure was perfect.


I arrived at work with only a few white knuckles (haven't changed out the tie rod ends yet) and no worse for wear.

Now if it will just make it home 100 miles tomorrow morning...


:grinpimp:


:beer:
 
Good luck getting home in traffic.

Made it home fine! Turns out this rig runs better driving it around. It doesn't like being parked and left alone in the garage. :)


So I decided to start cleaning up the cab a bit. Found the first of two victims in a small bag in the holes behind the driver seat. Here's were #2 met his fate...

IMG_2920.jpg


I have plans to get the seats re-done so I figured I better be sure I could get them out prior to "needing" to get them out. The seat guy will be blasting these frames and I need to come up a paint for them. I've read the interior gray is "T1434 Gray Metallic" but I am hoping to find a good spray paint color match. Anyone?


Pulling the seats was a bit of a project but not as bad as I thought considering the age of this truck. I started by spraying all the seat bolts with PB Blaster 2 days before and again an hour before I tried removing them. Some had been replaced with non-metric (but close) threaded bolts. :mad:

Well after taking my time slowly loosening and then threading in, taking turns on other bolts to prevent them from getting too hot and breaking I was successful. The only real damage was the lower welded on backing nut on the front left drivers seat broke off with the bolt. No problem there as the access is easy and I will eventually just weld one back on to the lower plate. It could have been much worse.


IMG_2918.jpg


Seats removed...


IMG_2921.jpg


IMG_2922.jpg


After the seats were out I decided to attempt to re-thread the bolt holes that had non-metric bolts in them with metric bolts to see how bad they were. I do have a tap and die set if I need it but thought I would try the least invasive first. To my surprise all but one threaded in with just a little oil and effort. I re-worked them two to three times until they all felt smooth. I also just added a nut to the backside of the driver mount mentioned before.


The floors under the seats had not been cleaned in a long time so I figured I would get a start on it.

Before:


IMG_2917.jpg


After:

IMG_2924.jpg
 
Last edited:
Anyone have some insight on what was kept under the seat? The jack location is obvious but what about the area with the footman loops and webbing?...

IMG_2926.jpg


IMG_2925.jpg


This rig did not come with a jack so I grabbed one of the shelf to try and add it. It does not fit well and I'm thinking the original 65 jack must have been smaller? The hold down does not pull over far enough to attach to the bolt. Maybe it had a thinner neck?

IMG_2927.jpg
 
Last edited:
Dude, that dead mouse if f'ing gross! How bad did it stink? Put a couple scented dryer sheets in a few places around the cab and it should help soak up a little stink.

I've still got those belts for you when you're ready for them. I found them in a box yesterday, they look pretty good. I've also got a couple used rear corner and glove box badges if you are looking for those.

BTW, I painted a lot of my interior pieces with Krylon Rust Tough Enamel Silver (really shiny) and then hit it with an enamel clear coat and it takes it back down to a nice greyish silver. Not exactly stock but close enough and makes touch up super easy.
 
Dom,
the straps and footman loops are for the tool bag.

The floorboards cleaned up well!

-Brett

Thanks Brett. It looks so empty under the seat... maybe bring a 1965 NOS tool bag with you today, huh? :grinpimp:

Dude, that dead mouse if f'ing gross! How bad did it stink?

I'm pretty sure it's been there for 5+ years. Hard as a rock and didn't smell at all. Tasted a little crunchy though...


:flipoff2:

I'll tie in with you about the belts.
 
Alright lets see the new springs!
 
Drooling profusely...........I need the same kit. If you are so inclined would you PM me with your cost on the whole kit? I just want to keep my local suppliers honest. No biggie if you want to keep it to yourself. I have a contact who buys several per year and I'm confident I'll get a fair deal with him anyway. :cheers:
 
In the second picture down in post #6 here. https://forum.ih8mud.com/fj45-owners-club/257103-ome-2-5-spring-install-65-fj45-swb.html


Is that spring perch rusted through or is it slotted on the frame side and the slot is dirty? On a few others you can clearly see a slot.

OK Dan, so I looked at that and almost threw up. YIKES! I was looking and looking thinking there's no way that could be rusted through. If you look at the pic just above it in the post it's clearly just the design. Looks like I pushed a bunch of grime up into the hole.

IMG_2974.jpg


IMG_2981.jpg


But thanks for stressing me out...

:beer:
 
Last edited:
Hi Dom,

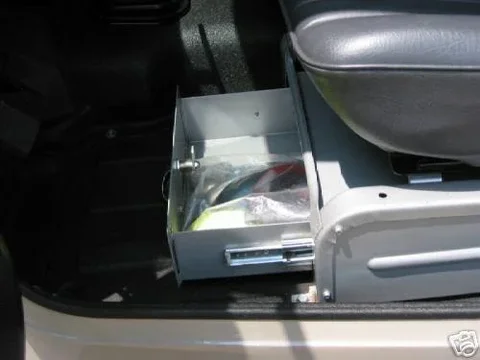
Here is what I would like to do under the drivers seat.

lock box.webp

It seems that there is never enough room in the cab of my pickup for stuff.

This we originally made by Johathan's shop (TLC) so I called them to see how much they would build me one for and they told me $650 :doh:

If you like it maybe you and I should build a couple of them when the time comes.

Cheers,

Jim
lock box.webp
 
Great write up on the install! So which took longer the install or uploading all those pictures? Truck looks great!
 
Jim,

My 45 seat cradle is a simple frame built out of square tube with some expanded metal along the front so nothing slides forward. Might be a cheaper way to create storage space under there. I can't image it costing more than $50 for materials. I have lots of room for tire chains, snatch straps, and tool bags- basically whatever fills the entire width at about a 5-6" height. The fuel tank is behind the rear wheels between the frame rails, so I get the passenger "well" as well. Have a Tuffy mounted between the seats (more storage), which are later 40 series buckets.
 
Esh,

That sounds like a great idea. I liked the way that TLC's box looked and locked but the main idea is to get more storage and keep it simple. No way I am spending that kind of money on a little metal box. But I might copy someone's idea with the thought that plagiarism is the higest form of a complemnet. ;)

Cheers,

Jim
 

Users who are viewing this thread

Back
Top Bottom