
I am not a fan of running the pipes directly out back due to the cyclonic effect of the top. With the exhaust run straight back, I sucked a ton of fumes. Side dump has always worked better for me (if that is an available option).
Navigation
Install the app
How to install the app on iOS
Follow along with the video below to see how to install our site as a web app on your home screen.
Note: This feature may not be available in some browsers.
More options
Style variation
You are using an out of date browser. It may not display this or other websites correctly.
You should upgrade or use an alternative browser.
You should upgrade or use an alternative browser.
Member Builds and Stories
This site may earn a commission from merchant affiliate
links, including eBay, Amazon, Skimlinks, and others.
- Thread starter
- #42
I am not a fan of running the pipes directly out back due to the cyclonic effect of the top. With the exhaust run straight back, I sucked a ton of fumes. Side dump has always worked better for me (if that is an available option).
Well damn. Just when I was leaning toward going out the back. Thanks though, that's kind of curve ball I was looking for in posting. To your comment: side dump is kind of an option. I'd still likely run down the boat sides so from the logical exit point it's easier to point down than straight sideways to avoid the rear tires. I could maybe do a bit down and sideways.
The concern in that case becomes whether or not I can get enough muffler to live with this thing. Maybe if I ran two of these on each side?
Thrush® Glasspack Muffler - Center / Center - P/N: 24241.
Dumping out the side behind the rear wheels is best spot.
- Thread starter
- #44
Dumping out the side behind the rear wheels is best spot.
I appreciate the thought and this type of commentary helps from folks who have been there done that... However, I still have a small problem, you see "behind the rear wheels" doesn't precisely exist on this rig. The tires are currently the most aft thing by 6" or so. (Departure angle > 90 deg).

Somehow I don't think a side dump directly pointed at the sidewall is an acceptable placement. The closest I could get would be snaking the exhaust above the tire at the rear most portion of body (below the rear window at the rear tire's 1 o'clock in the above) but I'm not sure that meets the intent of sucking less exhaust.
Yeah, I guess behind the tires would be kinda dumb on your rig.....
- Thread starter
- #47
Well now you guys have me back to thinking about scratch building some mufflers to get as much suppression as I reasonably can tucked into the boat sides and then dump with a minor turn down. Need to start measuring/packaging.
In the meantime: I'm finally getting started in earnest. Starting with basic structural stuff and weather proofing as I would really like to get some primer on this thing stat.
Roof Repair
Big crack in the fiberglass roof seemed like a good place to start since I'm already using fiberglass on my rx7.

Shaved ragged edges until I could get the surfaces to line up (this is a foam cored skin). Propped from below to get it close.

Added weight to the top to refine alignment.


Filled with quick set epoxy to hold it stable. Next need to sand to the roof and add a layer or two of glass over everything.

Oh and happy (belated) Independence Day y'all

In the meantime: I'm finally getting started in earnest. Starting with basic structural stuff and weather proofing as I would really like to get some primer on this thing stat.
Roof Repair
Big crack in the fiberglass roof seemed like a good place to start since I'm already using fiberglass on my rx7.
Shaved ragged edges until I could get the surfaces to line up (this is a foam cored skin). Propped from below to get it close.
Added weight to the top to refine alignment.
Filled with quick set epoxy to hold it stable. Next need to sand to the roof and add a layer or two of glass over everything.
Oh and happy (belated) Independence Day y'all
Great looking project, I’m building a similar car with a FJ55 body and have some comparable packaging problems.
I’m using the Bomber fab alternator mount to get it up and out of the way, you might want to take a look at the design, easy to make if you’re on a budget.
Bomber Fab LS Motor Billet Alternator Brackets
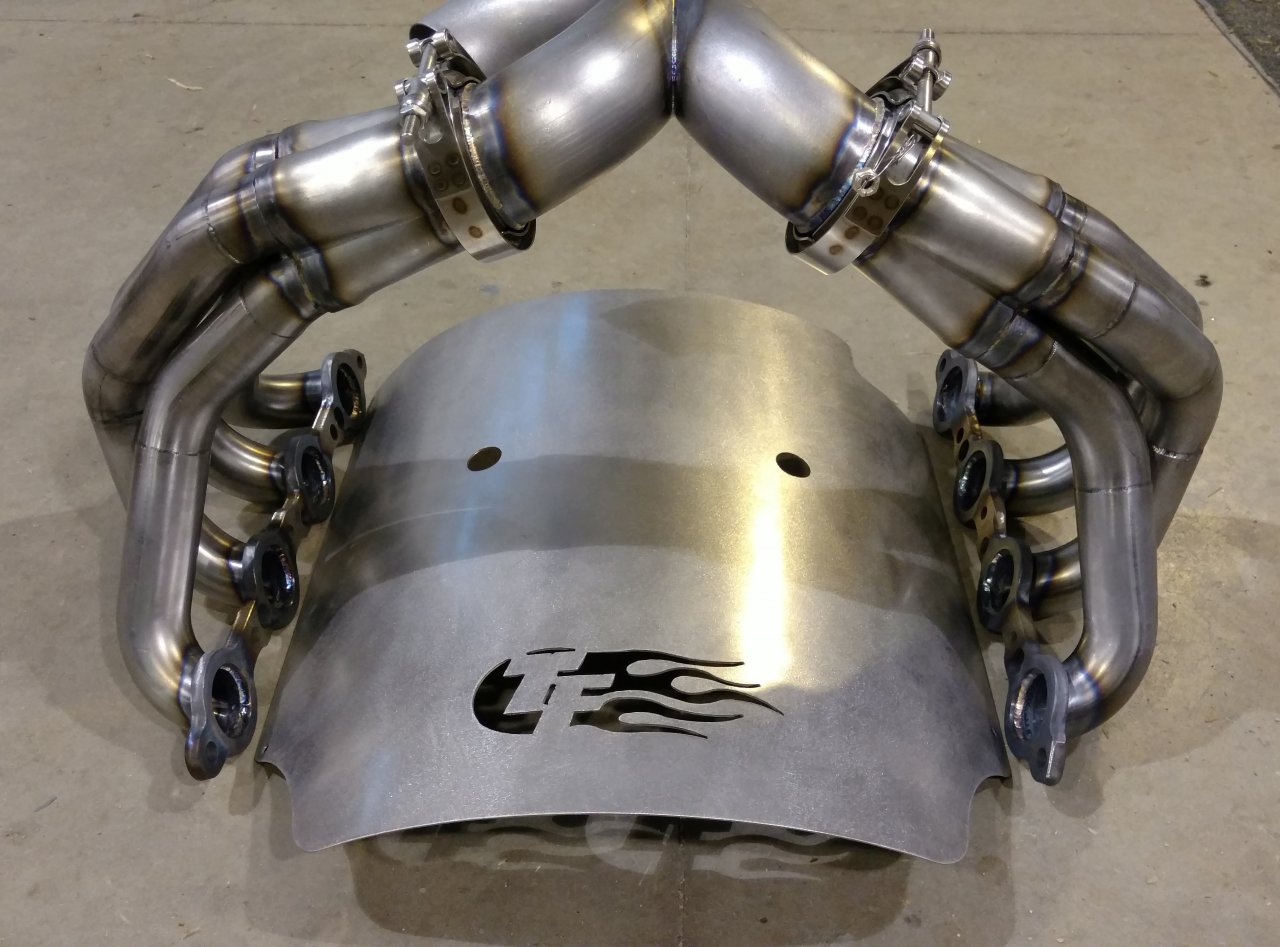
For headers take a look at the Bomber Fab headers and exhaust, he runs them over the top and joins them to a Y and runs a single out the back, I opted for the Trent Fab style on my car that also run over the top and Y at the back but mine curves out to the passenger side to a single 3” out the back, I was also concerned with header design and performance but after looking at the amount of the Ultra 4 cars running simple shorty style headers to a single pipe out back I decided that the fractional HP gain with long tube complicated headers wasn’t worth the trouble on a car that could see ~ 150 HP parasitic loss in the drive train. I know the guys here are talking about under hood temps with this style header but Randy has driven his cars hard for extended periods at races like king of the hammers and keeps building the same design so I would assume he’s not having major issues with under hood temps.
Bomber headers,

Pictures of my Trent Fab headers.
Tube running down and back.

My car has a built 3rd gen 6.0 and with the new tune runs extremely well with the new headers, no regrets going to this style header vs. a more complex design.
I’m using the Bomber fab alternator mount to get it up and out of the way, you might want to take a look at the design, easy to make if you’re on a budget.
Bomber Fab LS Motor Billet Alternator Brackets
For headers take a look at the Bomber Fab headers and exhaust, he runs them over the top and joins them to a Y and runs a single out the back, I opted for the Trent Fab style on my car that also run over the top and Y at the back but mine curves out to the passenger side to a single 3” out the back, I was also concerned with header design and performance but after looking at the amount of the Ultra 4 cars running simple shorty style headers to a single pipe out back I decided that the fractional HP gain with long tube complicated headers wasn’t worth the trouble on a car that could see ~ 150 HP parasitic loss in the drive train. I know the guys here are talking about under hood temps with this style header but Randy has driven his cars hard for extended periods at races like king of the hammers and keeps building the same design so I would assume he’s not having major issues with under hood temps.
Bomber headers,
Pictures of my Trent Fab headers.
Tube running down and back.
My car has a built 3rd gen 6.0 and with the new tune runs extremely well with the new headers, no regrets going to this style header vs. a more complex design.
- Thread starter
- #50
If anyone is curious, I found the original David Vizard exhaust article that got me jazzed. The night I found this I stayed up into the wee hours reading everything Vizard I could find online, then ordered his book right before crashing for the evening.
Auto Exhaust Science
Link above!
-Joel
Auto Exhaust Science
Link above!
-Joel
Last edited:
that's the one that got me started in building my own. DV is a really nice guy too, he does clinics all over the US.
- Thread starter
- #52
Spent some time the other evening planning all the basic structure I think I'll need. This chassis was a great starting point but still needs a great deal of triangulation to stiffen it up. Commentary appreciated but here's what I'm thinking.
Engine bay needs better connection between the upper strut structure and the frame rails. The bar I'd like to run from outside strut tower to the motor mount area is a wildcard as it may not work with headers (need the ability to side install) and/or engine accessories.

Boat sides will get triangulated with a significant floorboard cap added above them (covering exhaust) to turn this into a mini space frame on either side of the powertrain.

Back end I'm debating whether I try to incorporate a bolt in tailgate (for use in a pinch). It's a heck of a lot simpler to not, but could be useful. I was planning a double deck tube bumper extension to help support the trailer hitch so a tailgate would likely need to lift out, (but then there are tail lights to consider... blah blah). Probably overthinking this and need to keep it simple.

Inside harness support for the front seats likely pickup up just above the rear shock tower node. I can't really put in a full up X bar for lateral stiffness while keeping use of the back seat. However I could add in a second diagonal to the roof C pillar node. It leans away from passengers but I'd still need to pad it.

By modifying the seat structure I can probably get the back seat a few more inches forward, which will help with day trip storage. Rear seat belt mounting is a bit of a challenge as I'll either need to add on to the upper "tailgate" bar or else add a dedicated harness bar extending off the cage C-pillar bars.
Thoughts?
-Joel
PS My parts pile is growing. Heading down to San Diego this evening to pick up some glass and trim.
Engine bay needs better connection between the upper strut structure and the frame rails. The bar I'd like to run from outside strut tower to the motor mount area is a wildcard as it may not work with headers (need the ability to side install) and/or engine accessories.
Boat sides will get triangulated with a significant floorboard cap added above them (covering exhaust) to turn this into a mini space frame on either side of the powertrain.
Back end I'm debating whether I try to incorporate a bolt in tailgate (for use in a pinch). It's a heck of a lot simpler to not, but could be useful. I was planning a double deck tube bumper extension to help support the trailer hitch so a tailgate would likely need to lift out, (but then there are tail lights to consider... blah blah). Probably overthinking this and need to keep it simple.
Inside harness support for the front seats likely pickup up just above the rear shock tower node. I can't really put in a full up X bar for lateral stiffness while keeping use of the back seat. However I could add in a second diagonal to the roof C pillar node. It leans away from passengers but I'd still need to pad it.
By modifying the seat structure I can probably get the back seat a few more inches forward, which will help with day trip storage. Rear seat belt mounting is a bit of a challenge as I'll either need to add on to the upper "tailgate" bar or else add a dedicated harness bar extending off the cage C-pillar bars.
Thoughts?
-Joel
PS My parts pile is growing. Heading down to San Diego this evening to pick up some glass and trim.
- Thread starter
- #53
Concept for rear bumper area.

Some guys on the rx7 board convinced me that I can still get decent shear resisting properties out of my back deck by using a bolt in panel. That lets me eliminate the two major diagonals (masking tape) but also means I get rid of the two little horizontal supports I show running fore/aft to these diagonals above. Hopefully not a big deal as I think the hitch will still have quite a bit of support being tied to three major cross bars. The other advantage of not having those stubby fore/aft beams: might offer a bit more give if I ever get rear ended.
I think I'll likely just add a 1" flange around the entire trapezoidal opening so I can bolt it. That offers a bit more stability than dzus (which I considered) and I can also run some thin weatherstripping clamped inside the seam to keep it sealed.
- Thread starter
- #54
Got it into the garage...

I'd thought I was about ready to start structure additions on the FJ.
Nope.
Unfortunately I managed to snap my track bar bracket on the XJ when the front locker stayed engaged flipping a U turn on the street (had the wife driving in 4L when we dragged the FJ out of the side yard). Once on the street it didn't disengage even though I'd shifted out when I jumped in to flip the U. I heard the tires chirp once but I figured it'd just drive through it. Then BANG!! Thought I'd blown an axle shaft at first.

Criss crossed straps got it back in the driveway as above.

One more thing to fix, but thankful this didn't happen at speed. Looks like the good Lord must not be through with me yet.
-Joel
I'd thought I was about ready to start structure additions on the FJ.
Nope.
Unfortunately I managed to snap my track bar bracket on the XJ when the front locker stayed engaged flipping a U turn on the street (had the wife driving in 4L when we dragged the FJ out of the side yard). Once on the street it didn't disengage even though I'd shifted out when I jumped in to flip the U. I heard the tires chirp once but I figured it'd just drive through it. Then BANG!! Thought I'd blown an axle shaft at first.
Criss crossed straps got it back in the driveway as above.
One more thing to fix, but thankful this didn't happen at speed. Looks like the good Lord must not be through with me yet.
-Joel
oops.... as you said, at least it didn't happen at speed.
- Thread starter
- #56
Bit of a tangent but when I opened up my Jeep I decided to add frame stiffeners (since who knows when the FJ might be done). In the process I found a rotted floorboard and ended up playing with POR 15 to patch rust holes. I wanted to show progress and get your thoughts as I was pleased overall. I need to decide whether I'll take this approach on some of the FJ40 rust.
Floorboard Repair:
Let me start with a little public service announcement… 96-01 Cherokee’s have a design flaw in the fresh air intake for the cab. If you remove the wiper access panel just behind the hood and shove a camera in the cowl, here’s the difference.
Early model XJs:

Late model XJs:

There’s a great deal more information here (full credit to these folks for the pictures above as well):
Water leaking from cowl - Jeep Cherokee Forum
That nonexistent lip on the later model version means that if it rains and your Jeep has the nose pointing at all uphill, you’ll get water that leaks through the cowl and soaks your passenger floorboard. Even using textured rubber floor mats, I’d still managed to soak the carpet half a dozen times before I figured it that nose up was part of the reason why it happened. There are two solutions:
Solution Option 1) Cut through the cowl from the exterior, caulk the offending area and weld a patch back in. If you try this approach you better do it well because if your cut and patch leaks it’s headed straight into the intake.
Solution Option 2) Always park your Jeep with the nose pointing downhill, which is what I’ve been doing since I found out about this mess.
While working on frame stiffeners, I saw some cancer starting to show through the bottom of the floorboard, apparently from the inside. I yanked my passenger seat and pulled up the carpet to investigate. Yikes!

Rust completely covered the floorboard, which the exception of the sound deadening. It’s the only rust on my Jeep that I know of, but it’s bad…
Through holes confirmed.

I got in there aggressively with a wire wheel and suddenly I had quite a few holes showing.

I wire wheeled the bottom side too for good measure and now it was really pretty screwed looking.

A lot of folks jump directly to a reproduction floorboard and cut the whole thing out this point. I thought about that, but sometimes you end up compromising integrity instead of adding to it (seams rusting), and fit can be less than ideal. Instead I decided to try a version of rust conversion and encapsulation from POR-15. Floor Pan Repair.
I figured worst case if it didn’t work out, I’d be cutting out the metal anyways, but might teach me some new methods I could use on the Land Cruiser.
The trick to patching holes with POR-15 is either by using their Epoxy Putty or embedding fiberglass in the POR while wet (effectively using POR as a fiberglass resin). They call it Powermesh. I call it fiberglass chop strand mat and say “I’ll use whatever fiberglass I want, thank you very much.”
Prep maters a great deal with POR-15, so with the exception of fiberglass vs. Powermesh, I tried to follow the process. The recommended steps are:
1) Marine Degreaser, rinse,
2) Metal Prep, rinse, dry.
3) Por 15
4) Top Coat (optional, only if exposed to UV)
Note Por-15s “Metal Prep” is a rust conversion fluid much like “Evapo-Rust” which I converts iron oxide (rust) to ferric phosphate (or similar), after which it can be encapsulated with limited opportunity for future growth. You need to keep the area wet for at least a half hour in Metal Prep. I used a spray bottle periodically for more like an hour then let it sit overnight because I didn’t see much downside to doing so.
Here it is after Metal Prep.

I used three layers of glass: a fine weave to get into the corners, a heavy layer of roving to build up some thickness and give me some strength, then another layer of fine weave up top.

I taped over the holes from the bottom to keep drips at bay…

… and then went to town inside. Paint the bare steel, apply a layer of glass, repeat. I basically painted over each layer and pressed it into all the nooks and crannies as it went down to be sure it was fully wetted out. All three layers went down back to back to back.

This stuff is pretty stinky so ventilation and an organic trap cartridge mask are both good calls.
While still wet, I yanked off the tape from below and painted the bottom side. You could see just a touch of POR flowing through the holes from the topside (blooming effects at the corner of some holes).

Next day went out and it seems to have still picked up some crap as it leveled and flowed through. Maybe letting the Metal Prep sit overnight made it harder to get 100% rinsed. Not really sure.

The imperfections on the bottom side didn’t seem like a big deal as it was still REALLY solid feeling. I then used some of POR 15’s epoxy putty to fill and smooth the gaps where metal was missing. That stuff cures damn hard as well. Sanded it most of the way out and all that’s left to do is one more coat of paint. That’ll happen at the same time as the body frame rails.

Last few note on POR 15… It’ll break down with UV light, so you need to use their Top Coat paint if it’ll see sunshine (step 4 noted above). You could probably paint with anything, but paint is enough of a dark art that I prefer to stick to a single system where I can.
Finally, when capping the can it’s recommended to stick a couple layers of saran wrap between can and lid. If you get any on the paint can seal, that lid is not coming back off.
Oh, and naturally since I limped my Jeep back in the driveway with two ratchet straps in lieu of a track bar, I’m parked nose up. Seriously what are the odds of Southern California have rain in early September? Yep, we had a freak weather day and it already rained once, but I at least I can still confirm that the new area is water tight (that’s one step better than a raw replacement floorboard so I’d recommend POR 15 either way).

Need to retap the holes for my seat and shave down some pointy edges inside, but the major fix looks good so I thought I’d post up. Let me know if you have thoughts on POR 15 as I expect to be using this a bunch more on projects going forward.
-Joel
Floorboard Repair:
Let me start with a little public service announcement… 96-01 Cherokee’s have a design flaw in the fresh air intake for the cab. If you remove the wiper access panel just behind the hood and shove a camera in the cowl, here’s the difference.
Early model XJs:
Late model XJs:
There’s a great deal more information here (full credit to these folks for the pictures above as well):
Water leaking from cowl - Jeep Cherokee Forum
That nonexistent lip on the later model version means that if it rains and your Jeep has the nose pointing at all uphill, you’ll get water that leaks through the cowl and soaks your passenger floorboard. Even using textured rubber floor mats, I’d still managed to soak the carpet half a dozen times before I figured it that nose up was part of the reason why it happened. There are two solutions:
Solution Option 1) Cut through the cowl from the exterior, caulk the offending area and weld a patch back in. If you try this approach you better do it well because if your cut and patch leaks it’s headed straight into the intake.
Solution Option 2) Always park your Jeep with the nose pointing downhill, which is what I’ve been doing since I found out about this mess.
While working on frame stiffeners, I saw some cancer starting to show through the bottom of the floorboard, apparently from the inside. I yanked my passenger seat and pulled up the carpet to investigate. Yikes!
Rust completely covered the floorboard, which the exception of the sound deadening. It’s the only rust on my Jeep that I know of, but it’s bad…
Through holes confirmed.
I got in there aggressively with a wire wheel and suddenly I had quite a few holes showing.
I wire wheeled the bottom side too for good measure and now it was really pretty screwed looking.
A lot of folks jump directly to a reproduction floorboard and cut the whole thing out this point. I thought about that, but sometimes you end up compromising integrity instead of adding to it (seams rusting), and fit can be less than ideal. Instead I decided to try a version of rust conversion and encapsulation from POR-15. Floor Pan Repair.
I figured worst case if it didn’t work out, I’d be cutting out the metal anyways, but might teach me some new methods I could use on the Land Cruiser.
The trick to patching holes with POR-15 is either by using their Epoxy Putty or embedding fiberglass in the POR while wet (effectively using POR as a fiberglass resin). They call it Powermesh. I call it fiberglass chop strand mat and say “I’ll use whatever fiberglass I want, thank you very much.”
Prep maters a great deal with POR-15, so with the exception of fiberglass vs. Powermesh, I tried to follow the process. The recommended steps are:
1) Marine Degreaser, rinse,
2) Metal Prep, rinse, dry.
3) Por 15
4) Top Coat (optional, only if exposed to UV)
Note Por-15s “Metal Prep” is a rust conversion fluid much like “Evapo-Rust” which I converts iron oxide (rust) to ferric phosphate (or similar), after which it can be encapsulated with limited opportunity for future growth. You need to keep the area wet for at least a half hour in Metal Prep. I used a spray bottle periodically for more like an hour then let it sit overnight because I didn’t see much downside to doing so.
Here it is after Metal Prep.
I used three layers of glass: a fine weave to get into the corners, a heavy layer of roving to build up some thickness and give me some strength, then another layer of fine weave up top.
I taped over the holes from the bottom to keep drips at bay…
… and then went to town inside. Paint the bare steel, apply a layer of glass, repeat. I basically painted over each layer and pressed it into all the nooks and crannies as it went down to be sure it was fully wetted out. All three layers went down back to back to back.
This stuff is pretty stinky so ventilation and an organic trap cartridge mask are both good calls.
While still wet, I yanked off the tape from below and painted the bottom side. You could see just a touch of POR flowing through the holes from the topside (blooming effects at the corner of some holes).
Next day went out and it seems to have still picked up some crap as it leveled and flowed through. Maybe letting the Metal Prep sit overnight made it harder to get 100% rinsed. Not really sure.
The imperfections on the bottom side didn’t seem like a big deal as it was still REALLY solid feeling. I then used some of POR 15’s epoxy putty to fill and smooth the gaps where metal was missing. That stuff cures damn hard as well. Sanded it most of the way out and all that’s left to do is one more coat of paint. That’ll happen at the same time as the body frame rails.
Last few note on POR 15… It’ll break down with UV light, so you need to use their Top Coat paint if it’ll see sunshine (step 4 noted above). You could probably paint with anything, but paint is enough of a dark art that I prefer to stick to a single system where I can.
Finally, when capping the can it’s recommended to stick a couple layers of saran wrap between can and lid. If you get any on the paint can seal, that lid is not coming back off.
Oh, and naturally since I limped my Jeep back in the driveway with two ratchet straps in lieu of a track bar, I’m parked nose up. Seriously what are the odds of Southern California have rain in early September? Yep, we had a freak weather day and it already rained once, but I at least I can still confirm that the new area is water tight (that’s one step better than a raw replacement floorboard so I’d recommend POR 15 either way).
Need to retap the holes for my seat and shave down some pointy edges inside, but the major fix looks good so I thought I’d post up. Let me know if you have thoughts on POR 15 as I expect to be using this a bunch more on projects going forward.
-Joel
Dumped my exhaust out of the boat sides just before the rear tires, mufflers under the floor. Even with heat wrap from downpipe to exhaust tip and mufflers wrapped in fiberglass/ aluminum shielding, the floors get to approximately 110 deg F. Boat sides are open front and back plus my super high speed dimpled step plates and it still gets toasty.


- Thread starter
- #59
Time to pick this back up. I'm making plans for a good bit of shopping on Black Friday/Cyber Monday.
Looking for a bit of commentary/validation of my plans.
Gauges: Speedhut Revolution in 4.5 and 2.062
-Speedo (non GPS 120 mph with turn and high beam)
-Tach (8k with shift)
-Fuel
-Volts
-Water Temp
-Eng Oil Pressure
-Engine Oil Temp
-Trans Oil Temp


Couple tweaks to the standard Revolution versions. These are planned to go in a carbon fiber backing plate. Any you think I should add (or else thoughts on why I don't need some)? Trans temp is probably my biggest debate, but I might tow with this. Water temp can be a surrogate for engine oil temp too...
Looking for a bit of commentary/validation of my plans.
Gauges: Speedhut Revolution in 4.5 and 2.062
-Speedo (non GPS 120 mph with turn and high beam)
-Tach (8k with shift)
-Fuel
-Volts
-Water Temp
-Eng Oil Pressure
-Engine Oil Temp
-Trans Oil Temp
Couple tweaks to the standard Revolution versions. These are planned to go in a carbon fiber backing plate. Any you think I should add (or else thoughts on why I don't need some)? Trans temp is probably my biggest debate, but I might tow with this. Water temp can be a surrogate for engine oil temp too...
- Thread starter
- #60
I didn't want to run autolockers on the street so I'm going toward ARBs. Already have an RD114 (14B rear). Buying a RD167 front. Debate is now compressor to match.
ARBs compressors have a great rep so that's fine. Comparison of their lineup (first 30 seconds gives you the basics).
Black friday deals include a free mini compressor and I already have a C02 tank for full air ups. I'm debating whether the midsize would be worth getting in a pinch for when my C02 tank taps out... Downside is that it's only 50% duty cycle so I could be waiting a long time for that fill. Refilling C02 could become a PITA with big tires too. If I skip straight to the big twin I should be OK since it's 100% duty cycle, but it's heavy, harder to package, and only really claims 37" tires (I'm 41.5s).
What compressor/CO2 mix should I run and I why?