Builds I need to practice my diesel swap skills. So I will. (FJ-60 getting a 12HT) (1 Viewer)

This site may earn a commission from merchant affiliate
links, including eBay, Amazon, Skimlinks, and others.

Sure, it looks ok....but boy would it look outstanding in a 40....say an LX, perhaps.

Man, that was a good try. ;)

Too late though, we tightened the nuts and bolts and everything.

Dan
 
DanS HJ-45 said:
Man, that was a good try. ;)

Too late though, we tightened the nuts and bolts and everything.

Dan

Never too late. Look at the title; what I'm offering is the rare opportunity to practice your diesel swap skills on a rare LX. Think about it. It's one heck of an offer if I do say so....
 
Wow.

As always, Casa Silbaugh does epic work.

And the fact I can be the "parts fairy" makes me especially happy.

:)

:cheers:
 
Wow.

As always, Casa Silbaugh does epic work.

Thank you sir. My neediness has a few upsides, occasionally.

And the fact I can be the "parts fairy" makes me especially happy.

Yep. I hope you say "poof" every time you ship something out. It makes it seem more magical to the guys in the shop I'll bet. ;)

Dan
 
Hey Dan, luv you quote about Aussies don't use coolant, only water.

So in true Aussie fashion "what a load of cocky crap" :)

Keep up the good work mate
 
Hey Dan, luv you quote about Aussies don't use coolant, only water.

So in true Aussie fashion "what a load of cocky crap" :)

Fun fact: 100% of the Australian motors I have used had clearly never had coolant in them, only water by the look/smell of it.

Post a picture of an Aussie buying coolant, and I'll revise my overly broad generalization. :beer:

Keep up the good work mate

Thank you sir! You too! I'm watching your work on the power windows/doors carefully, because I'll be doing some of that soon enough...

Dan
 
...Post a picture of an Aussie buying coolant, and I'll revise my overly broad generalization. ....Dan

CoolantPurchase.jpg

CoolantPurchase.jpg
 
:D:D
I think it all depends on where and what the cruiser was used for. All our 3 cars are filled with coolant (pictorial proof available on request), but again, if a machine was low on water on the farm, we'd just wack in the nearest water and call it done.
 
I'll take my camera to Supercheap and catch a buyer, old days yes, these days nothing but coolant :)
 

Nicely played.

:D:D
I think it all depends on where and what the cruiser was used for. All our 3 cars are filled with coolant (pictorial proof available on request), but again, if a machine was low on water on the farm, we'd just wack in the nearest water and call it done.

I suspect that's the real explanation. Industrial use trucks probably got filled up with tap water regularly, whereas a personal vehicle probably gets coolant and distilled water instead. But my overly broad generalization is funnier. :grinpimp:

I'll take my camera to Supercheap and catch a buyer, old days yes, these days nothing but coolant :)

You totally should. Just because then when they asked what on earth you were doing, you could respond that you were "winning an internet argument with a Yank." Which would be hilarious in and of itself.

Dan
 
I don't have dog in this fight but when I was in Oz this years mate had coolant in his rigs. They were all basically new. He didn't have any bush rigs.

Here's a pic of the cd start switch I used. It looks like a hella switch. I'm guessing the po maybe had some aux lights hooked up to it. I'm assuming it is in the home for the factory dimmer switch...not quite sure on the rhd model.

Blis...I've owned plenty of IDI diesel an have a couple in the stable now. I've never had one this touchy. I may get a new cable just to see if it helps. My factory hand throttle up cable is frayed and non functioning so I need a new one of those anyway.

Ok enough blah blah...get this thing fired up :beer:

image.jpg
 
Ok enough blah blah...get this thing fired up :beer:

Trying!

I am busy with work until sometime friday, when I will hopefully make it back to the shop for a few solid days of wrenching/soldering to get it done.

But we shall see. I have a bad feeling that some work related stuff will pop up that will take a lot of my free time away for a month or two.

Dan
 
DanS HJ-45 said:
Trying!

I am busy with work until sometime friday, when I will hopefully make it back to the shop for a few solid days of wrenching/soldering to get it done.

But we shall see. I have a bad feeling that some work related stuff will pop up that will take a lot of my free time away for a month or two.

Dan
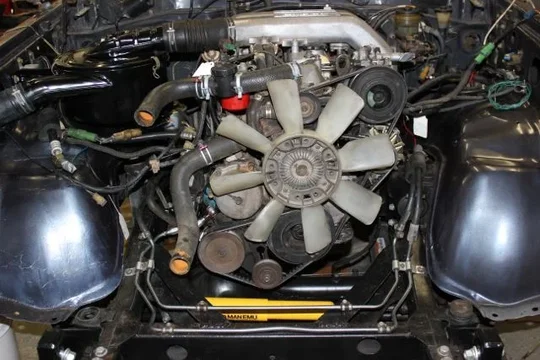
Shoulda brought in ALPA..... :)
 
Where to start....

Well, it's about time to get the rest of the front sheet metal on, so that meant we had to get the PS lines done.

ps lines done.jpg

ps lines done 2.jpg

It actually took two trips to the hose store, but eventually got a workable solution. There's not a lot of room between the PS line on the frame and the PS pump, with the Banjo fitting. But in the end--we got it.

I spent the day cleaning up more wiring and stuff. I'll talk about that in the next post...

ps lines done.jpg


ps lines done 2.jpg
 
Not only am I in the phase of the wiring where I start connecting things back together, but I also needed to run the battery cables.

Of course, no point in doing it halfway, right?

So yesterday I stopped by Slee and picked up an IBS Dual Battery system. I picked the IBS because it has the highest continuous rating of the three systems we looked at (IBS, National Luna and Ironman 4x4). It doesn't SEEM like a 200A continuous relay to me, but it clearly is. We really liked the idea of having a microprocessor control the opening and closing of the aux battery relay, so that we don't have to think about it normally--only on really cold mornings might we need to actively link the batteries for start.

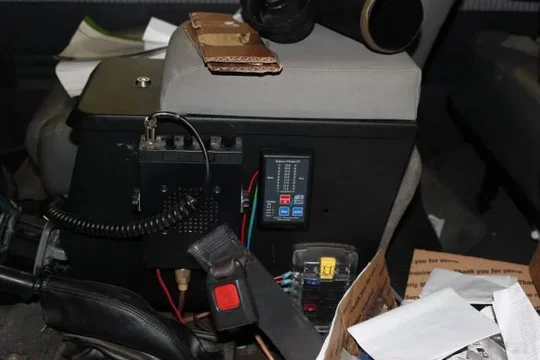
First question was where to mount the battery monitor. Normally I would have put it in the engine bay, since it's not really something we need to look at--but it's not exactly water proof, or even very resistant, so we decided to mount it on the side of the center console. That way it'll still be out of the way, but accessible if needed.
dual batt 1.jpg

Next up was adding the left hand side battery tray. A little work with the drill, and some nutserts later and we've got a nicely installed battery tray.
dual batt 2.jpg


Then I mounted the battery relay, and the boost module (it's separate in the IBS system--if you purchase it)
dual batt 3.jpg

All buttoned up, I ran the wiring inside split loom, and whatnot.
dual batt 4.jpg

And here's that left side again, with the overflow reservoir moved to make room for the battery.
dual batt 5.jpg

Other stuff that there weren't any good pictures of:
  • Mounting the Glow Screen Relays to the inner fender
  • Installing a new clutch flex line
  • Reattaching the front core support
  • Cleaning up wiring in preparation for the glow screen wiring and engine specific stuff (like the coolant sensor for the glow system)
  • Replaced the heater hoses
  • Replaced the Fuel Filter

Nothing huge, but it's progress....

Dan

dual batt 1.jpg


dual batt 2.jpg


dual batt 3.jpg


dual batt 4.jpg


dual batt 5.jpg
 
Get busy ya slack prick. Lazy, lazy, lazy.
 
Get busy ya slack prick. Lazy, lazy, lazy.

You know how hard it is to do wiring from a hammock?

If I could do that, I bet I'd get a lot more done. ;)

Still wiring today, pictures later tonight--maybe.

Dan
 
Again, not a whole lot of photogenic stuff with the wiring, but we're plugging along very well.

First up, here is the glow timer system, ready to go into the truck. Its really simple, at the end of the day. It has a couple wires (2) that go to the temp sensor in the block, 1 wire to each glow relay, 1 wire from the fuse box, 1 wire from the start terminal on the ignition switch, one wire to the glow indicator light, and one from the alternator/hot bus.

glow timer wiring.jpg

Similarly, the tach is incredibly simple. The ONLY difference between the FJ-60 and HJ-61 is the tach signal wire itself (of course, the plugs connect to different tachs, so there are some differences there--but the wiring is almost entirely the same).

So, here's how you convert the FJ-60 harness to the HJ-61 tach signal, without ugly cutting and splicing of wires that aren't the same color. :)

FJ-60 (Gas engine) wiring. The black wire is the one that will be removed.
tach wiring 1.jpg

HJ-61 (Diesel engine) wiring. The red wire will replace the black wire in the FJ-60 plug.
tach wiring 2.jpg

To remove the pins, take a very small pick, or a very small flathead screwdriver and put it in the front side of the plug. You will see the little tab that you need to press to release the pin. While pressing the little tab, apply light pressure to pull the pin out, and eventually you'll get it and the pin will slide right out.

Once the pin is removed, you'll have a wire with this pin on the end, ready to plug into the correct spot on the FJ-60 harness plug.
tach wiring 3.jpg

Done! The red tach wire simply runs across the dash, through the firewall on the right side, and down to the bell housing. The other wire from the tach sensor is just a ground wire.
tach wiring 4.jpg

That's all the pics for today. First thing tomorrow I'm headed to town to get some custom AC lines made, and to buy some batteries for this thing. Then it's back to the wiring--and hopefully I'll even get that buttoned up...

(fingers crossed)

Dan

glow timer wiring.jpg


tach wiring 1.jpg


tach wiring 2.jpg


tach wiring 3.jpg


tach wiring 4.jpg
 
Custom AC lines were made. They didn't QUITE fit though, so they are going back for adjustment. Then it'll fit just right. ;)

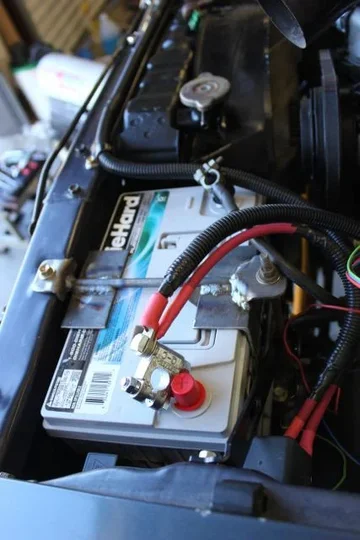
While we were in town, we picked up two Group 65 Diehard Platinum batteries.

And of course, me being me, I just couldn't stand kludging a battery hold down....

So I did THIS.
battery 1.jpg

And this.
battery 2.jpg

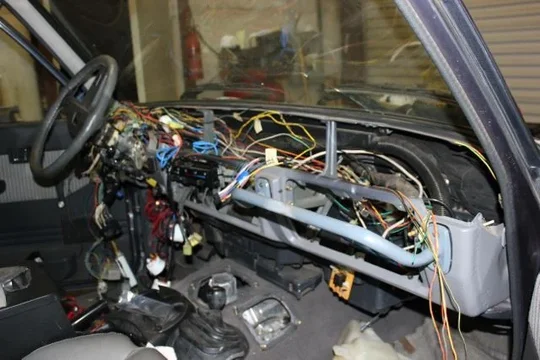
Again, LOTS more wiring work. Not that it's very photogenic, but you can see the dash is cleaning up slowly...
wiring progress 1.jpg
wiring progress 2.jpg

Since I'm off to work again tomorrow, and probably won't be back until mid January, Dad wanted to start rebuilding the Full Float Rear axle, so we pulled it apart tonight so he can start cleaning it up and stuff.

FF axle.jpg

Absolutely disgusting. It was kind of like mud mixed with oil in there. Very glad to have it removed, and we will put the nice, healthy 3rd member from his SF rear axle into it (and probably just reuse the backing plates and brake stuff from his SF axle)

battery 1.jpg


battery 2.jpg


wiring progress 1.jpg


wiring progress 2.jpg


FF axle.jpg
 
See? Sludge.

Australian sludge. ;)

ff axle sludge.jpg

Anyone who knows how I do these swaps knows that I save the fuel filler until nearly the end. So, since the end is in sight....


I whipped out the rotary file in the die grinder, ground down the spot welds that hold the restrictor into the fuel filler neck, and ground them down until I could knock the restrictor out of the neck.
fuel filler neck 1.jpg
fuel filler neck 2.jpg

That's all the pics for today.

One question I have: how does the vacuum shutoff VSV get power to shut down? There's not a "shut down" bus anywhere that I know of, but there obviously must be one. I don't want to kludge a "shut down" button, but as I trace the wiring in the HJ-61, it goes to a solid yellow wire, which appears to be a constant power source. So, what's the deal? Is the ground somehow grounded when the key is turned off or something?

EDIT--OR is it simply powered when the key is on, to close the VSV, so that once it turns off (with the key off) the vacuum then the VSV opens the valve, and allows vacuum to the shutoff actuator? That sounds like the case, now that I type more--but I want to make sure.

Dan

ff axle sludge.jpg


fuel filler neck 1.jpg


fuel filler neck 2.jpg
 
Last edited:

Users who are viewing this thread

Back
Top Bottom