Builds I need to practice my diesel swap skills. So I will. (FJ-60 getting a 12HT) (1 Viewer)

This site may earn a commission from merchant affiliate
links, including eBay, Amazon, Skimlinks, and others.

Dan,

My HZ has the 24v starter... Unfortunately, it is going into the 24V BJ44 so I will need it. :)

On another, and more related note, how hard would it be to source or rewrap my 24V 12HT stuff to drop into a 12v '72 FJ40?

I did three starters alts at once, couple hundred per unit.. Like 500plus for the starter, alternator I think was around 500.00.....Cruiserpilot who owns one of the trucks had the alternator go south, not sure what the fix was but it was cheap.. This is going back 8 years...

Rob
 
Last edited:
This build is awesome!! Quality craftsmanship! Hope that steering line and latch works out for you!

Thank you sir!

I just got home and decided to clean it up before I went to bed. It cleaned up really, really nicely.

Those bits will work out just about perfectly, by the looks of it. And, the hood latch will get rid of that non Toyota CCOT "thing" that was on there. Ewwwwww! Non-OEM parts give me the willies, so now Josh can stop worrying. ;)

Dan
 
Last edited:
DanS HJ-45 said:
Thank you sir!

I just got home and decided to clean it up before I went to bed. It cleaned up really, really nicely.

Those bits will work out just about perfectly, by the looks of it. And, the hood latch will get rid of that non Toyota CCOT "thing" that was on there. Ewwwwww! Non-OEM parts give me the willies, so now Josh can stop worrying. ;)

Dan

Whew. I was more worried for you Danny. I knew how distracted you'd be knowing that 'thing' was holding your hood down and I was worried it would prevent you from fully enjoying the ticky-tac purr of that 12ht.
 
Whew. I was more worried for you Danny. I knew how distracted you'd be knowing that 'thing' was holding your hood down and I was worried it would prevent you from fully enjoying the ticky-tac purr of that 12ht.

True. Much sleep would have been lost.

Not only was it non-Toyota, but it was plated in a silver color, instead of the yellow cad that God intended.

The shaking has subsided. ;)

Dan
 
Ok so after ordering two different spst nc momentary switches for my manual glow screen they have both been wrong when they arrived (normally open). Did you order yours online...if so where? i can't find one locally b/c I live in bfe. I really need to find a quality one online somewhere...it shouldnt be this hard!
 
Ok so after ordering two different spst nc momentary switches for my manual glow screen they have both been wrong when they arrived (normally open). Did you order yours online...if so where? i can't find one locally b/c I live in bfe. I really need to find a quality one online somewhere...it shouldnt be this hard!

I'll let you know once I get home to check on it--it should have arrived by now I think.

And to be clear, you're talking about the switch to fool the glow screen timer into operating as if it were very cold (long glow) correct?

Dan
 
Yup that's the one. The switch has to be normally closed. I ordered one and it was wrong then the second one I ordered was also wrong. Both were normally open even though the description said normally closed. Not worth sending them back. Let me know if yours is right.
 
Yup that's the one. The switch has to be normally closed. I ordered one and it was wrong then the second one I ordered was also wrong. Both were normally open even though the description said normally closed. Not worth sending them back. Let me know if yours is right.

I think I know the problem you might be having....

I'm using a toggle switch, and not necessarily a spring loaded one (I don't mind just leaving the switch on for a cold start). So, for me, I just require a simple SPST toggle, or to make the solution more elegant, a two position SPDT toggle switch.

Very simple all around.

BTW--I'm back to working on the truck tonight and tomorrow. No pics at the moment though, my camera battery died. The Toyota fairy arrived though, and that means the engine should be in the truck tomorrow morning. ;)

Dan
 
I decided to go a different route...there was an unused switch on the left hand side of the wheel. It is a nice switch but I don't believe it was factory. It had the terminals I needed and was in a good spot so I just used it. Its a push pull switch. Did the trick for me.

Have you gotten rid of the half cut yet? I may be interested in some of the rhd interior stuff. Don't take it to the scrap yard yet.

Hope the engine goes in smoothly for you:beer:
 
I decided to go a different route...there was an unused switch on the left hand side of the wheel. It is a nice switch but I don't believe it was factory. It had the terminals I needed and was in a good spot so I just used it. Its a push pull switch. Did the trick for me.

Very good. I should have pics of my solution for the "Cold Start Switch" up tomorrow. ;)

Have you gotten rid of the half cut yet? I may be interested in some of the rhd interior stuff. Don't take it to the scrap yard yet.

Nope. I still haven't gotten rid of the RHD interior bits from the half-cut I used to put the 2LT-E into the faux-lux in 2006. So there's lots of goodies here if you need them. Not many people need a RHD heater duct, but when they do....

Dan
 
OK, so a day late on the progress report...

First off, here's my "Cold Start" Switch. It's a simple SPST toggle switch, with a rubber boot over the toggle to protect it from the elements (and also to make it look less home-brewed). When the switch is switched up, it will break the circuit through the block water temp sensor that the Glow Timer uses to determine how long to glow for. When the circuit is broken (or the plug unplugged) the timer logic dictates that it glow for the maximum length of time. I ordered the switch panel online, and all I had to do was cut out a hole for the toggle switch itself, and then drill and tap the holes in the dash for the M5 machine screws. Added bonus: it covers up the "Unleaded Fuel Only" placard.
cold start switch.jpg

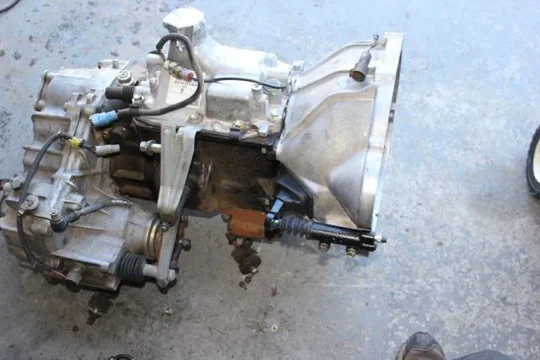
Next up, the Toyota fairy visited, and left us some goodies like a new clutch fork boot, and a new clutch slave cylinder. Of course, to install those meant mating the bellhousing to the transmission...
bellhousing 1.jpg
bellhousing 2.jpg

After replacing the pilot bearing, and fixing a stripped out hole in the block (one of the top M12 bell housing bolt holes) with a helicoil, we mated the engine and transmission together. I used the clutch from the 2F that came off of the truck, since it was almost brand new (maybe 2,000 miles). Bolted right up for us.
eng bellhousing 1.jpg

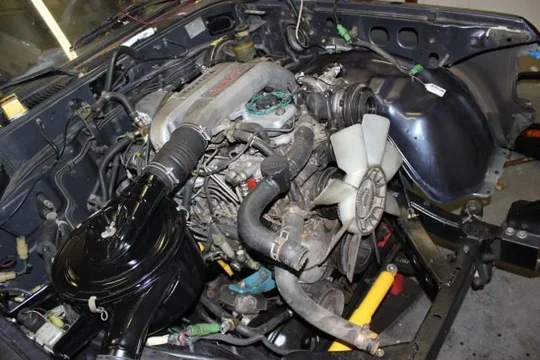
And then, with that done, Dad and I argued with the engine and got the thing into the truck. His 60 now has a diesel in it--the way god intended.
eng in 1.jpg

cold start switch.jpg


bellhousing 1.jpg


bellhousing 2.jpg


eng bellhousing 1.jpg


eng in 1.jpg
 
First thing to check was the RHD throttle cable that I had installed on the LHD firewall. It fits absolutely perfectly. Much simpler than the throttle pedal>linkage>bellcrank>cable stock assembly.

Once I see that it fit in place, I had to test with the pedal to make sure we had full throttle travel--which we did. Once that was done, I removed the pedal assembly, finished the welds (see previous post), and powder coated the whole thing black.
RHD throttle cable.jpg

In the engine pic above, you can see that I added a Tefba radiator filter. Since the truck was australian, and apparently they don't use coolant down under--just water, we got a good bit of rust out of the radiator and engine when we pulled it apart. The Tefba will help protect the nice rebuilt radiator from that crud.
tefba radiator filter.jpg

I also picked up some PS lines from an FJ-62 last week from Ryaneddy16, and I installed them on the frame, and then bent the pressure line towards the PS pump. Here you can see the custom hose that we'll have to make to bridge the gap between the PS hardline and the PS pump, but that should be pretty easy (in fact Dad may already have it done).
62 ps 1.jpg
62 ps 2.jpg

Obviously the left hand side of the US FJ-62 PS lines fits perfectly into the gearbox, and the return line just isn't all that difficult either (simple flexible tube). So really, this solution will only require the one single custom hose bit, from the pressure hardline to the PS pump banjo fitting.

RHD throttle cable.jpg


62 ps 1.jpg


62 ps 2.jpg


tefba radiator filter.jpg
 
Here's a couple more pics of the engine sitting in it's natural habitat...
eng in 2.jpg
eng in 3.jpg
Also, notice how incredibly good all that clean stuff sitting in there looks! That is one seriously sexy air cleaner housing!

On the interior, Dad just couldn't stand the thought of not using the grab handle from the HJ-61 on this. The grab handle he had previously installed was just held on with one stud through the dash, and then a big washer and bolt behind it. Plus, it was big and padded, whereas the HJ-61 had a simple metal bar, with a vinyl wrap around it. So, he removed the vinyl, and repainted all but the center of the handle. Which is OK, because it will get re-wrapped with vinyl, in fact it will get re-wrapped with vinyl that matches the seats.

So, since he was going to all of that trouble with the grab handle, I drilled some holes and installed some nutserts. We also got some new stainless hardware to hold the thing on there in style!
grab bar 1.jpg
grab bar 2.jpg

And here's the last picture I'll leave you with:
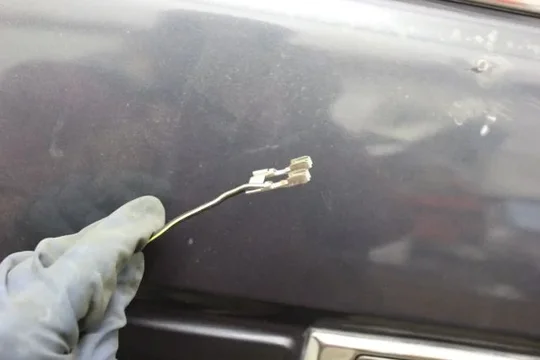
extra fuse wiring.jpg

I was busy with wiring, but didn't to much in the way of picture taking of the wiring, but here's a chained terminal that I removed from the HJ-61 fuse box. This allowed me to add two IGN switched fuses for who knows what. I'm using one fuse for the auxiliary gauges, and the other one so far doesn't have a use set aside. But someday, it'll probably be handy to have another IGN switched fuse to tap into in the fuse box already. Much cleaner than those inline fuses that come with a lot of electrical part kits.

OK, that's it for a spell. I'm working straight for the next week and a half or so, but after that, I'm hoping to finish this guy up!

Dan

eng in 2.jpg


eng in 3.jpg


grab bar 1.jpg


grab bar 2.jpg


extra fuse wiring.jpg
 
Pretty work:beer:
I'll post up a pic of my cold start switch. I'm just curious why this switch was there but not used. The hole n the dash appears to be factory but the switch obviously isnt b/c it has made in Germany stamped on it.

I thought the throttle cable would,be long enough to work... It seems way to long to be on the rhd truck. Mine seems way to long and no matter how I route it or adjust it the pedal is way to touchy. Going down a bumpy road in first or second is a pain in the ass. Would be interested to see picture of how the cable is routed on a rhd truck. Doesn't make sense to me why it is so long.

I may take you up on some rhd dash tid bits. If the plastic bezel that surrounds the gauges is in good shape I could use that. The po hacked my up when they installed a stereo.

Anyway keep up the good work:beer:
 
I thought the throttle cable would,be long enough to work... It seems way to long to be on the rhd truck. Mine seems way to long and no matter how I route it or adjust it the pedal is way to touchy. Going down a bumpy road in first or second is a pain in the ass.

Many diesel engines feel like that. You get used to it eventually. You can also add a throttle dampener. The basic problem is that the engines are very torquey and the torque and power drop off immediately as soon as you remove your foot from the throttle, so every little bump makes your foot move just a little bit on the throttle, which causes those bumps to the throttle. Dampening that movement of the throttle itself would smooth this out. I know Henry James the 47th installed a throttle damper on his 2H for exactly that reason.

Would be interested to see picture of how the cable is routed on a rhd truck. Doesn't make sense to me why it is so long.

original throttle cable.jpg
Done.

I may take you up on some rhd dash tid bits. If the plastic bezel that surrounds the gauges is in good shape I could use that. The po hacked my up when they installed a stereo.

Once the truck is running I'll make an inventory of all the stuff we'll be disposing of. The dash itself is in rough shape, very cracked and bent (probably from the method used to ship it in the container). But other than that most all of the bits were in real good shape.

Anyway keep up the good work:beer:

Will do. I can't wait to get done with this next week and a half to get back to working on this project.

Dan

original throttle cable.jpg
 
That twitchy throttle on 12ht is definitely a feature, that is made more profound by all the play in power transmission... Easiest fix is to use hand throttle when off-road or learn to position your throttle foot accordingly :D (let it rest on the tunnel instead of throttle pedal)...
 
My 2h is way less sensitive....not sure if its be linkages apposed to he cable or what. I may have to get a dampener. I've driven plenty of diesels and never had one this temperamental
 
My 2h is way less sensitive....not sure if its be linkages apposed to he cable or what. I may have to get a dampener. I've driven plenty of diesels and never had one this temperamental

Now, that's becouse your 2H is IDI engine compared to 12HT that is DI engine, that explains the difference... And yes, 12HT is notorious for twitchy throttle, drive it for month or two and you wont even notice it...
 
DanS HJ-45 said:
Here's a couple more pics of the engine sitting in it's natural habitat....

Dan

Sure, it looks ok....but boy would it look outstanding in a 40....say an LX, perhaps.
 

Users who are viewing this thread

Back
Top Bottom