Horn wiring Still not working

This site may earn a commission from merchant affiliate
links, including eBay, Amazon, Skimlinks, and others.

You should NOT have any voltage on the GR wire! This wire GROUNDS when you push the horn button. Do you have the device shown in the pic below installed inside the column? The gizmo is the horn contact insulator bushing and sits on top of the column. It has a wire embedded in it that connects to the GR wire you ran to the horn relay S terminal. When you press the horn button the you are connecting the center contact plate (which is BOLTED to the steering shaft which MUST be grounded) to the horn contact brush which is riding on the horn contact insulator bushing which is attached to the GR wire going to the Horn Relay S terminal.
So... If you unplug the GR wire form the column and ground it the horns will blow right? So the ONLY thing that could possibly be wrong is the column SHAFT is not grounded via the rag joint, or your horn button assembly is not correct. I have a web page that goes into great detail about the exact order the parts have to be installed in. Horn Troubleshooting

Hang in there you will get it to work!

View attachment 1163565
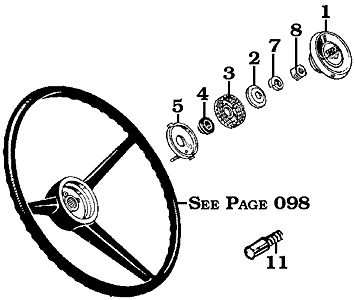
Thanks Coolerman. Your photo is correct, I have the Horn Seat and spring loaded contact in the horn. I Had to replace the Green / Red wire completely as it was not there. Soldered the end of the new to the metal contact ring (through the rubber bushing) and it is connected to the Horn Relay S terminal.

Grounded the new wire by the horn ring and had a spark, now lost the power...I'll figure that one out, not to worry. Will check out your link.

Focusing on the Grounding of the Rag joint as this to me seems the most logical issue. Even though I grounded the steering nut and tried to blow the horn to no joy. I know what the Rag joint is and how to ground it via photos, but it is not exposed on my LC, as in the attached picture... Will get there but the journey is a choice curse dictionary :)

Rag Joint where are you.jpg
 
had the same issue. The steering wheel shaft was not grounded. But it had been until last week....

The rag coupler at the bottom did have continuity through the bronze(?) bolts, but still no shaft ground.

The answer was in the attached picture
I am thinking that is my issue but as I replied to Coolerman, the Rag Joint is not visible as identified in the picture. No problem taking it apprat but want to know what I'm doing first.
 
Hi Trollhole, it came from Either Cruiseparts .net or another Cruiser site...Interesting thought though. I guess I can switch the wires and see what happens. The relay I see on SOC.com is definitely different than mine. Thanks
 
You should NOT have any voltage on the GR wire! This wire GROUNDS when you push the horn button. Do you have the device shown in the pic below installed inside the column? The gizmo is the horn contact insulator bushing and sits on top of the column. It has a wire embedded in it that connects to the GR wire you ran to the horn relay S terminal. When you press the horn button the you are connecting the center contact plate (which is BOLTED to the steering shaft which MUST be grounded) to the horn contact brush which is riding on the horn contact insulator bushing which is attached to the GR wire going to the Horn Relay S terminal.
So... If you unplug the GR wire form the column and ground it the horns will blow right? So the ONLY thing that could possibly be wrong is the column SHAFT is not grounded via the rag joint, or your horn button assembly is not correct. I have a web page that goes into great detail about the exact order the parts have to be installed in. Horn Troubleshooting

Hang in there you will get it to work!

View attachment 1163565
One little bit of difference between the contac you show in the photo and mine. The contact is flat and sits on the ring, not the curve, but that should not matter (should....)
 
Horn
Well Coolerman? I have lost the power in the Green / Yellow wire that powers the Relay, no voltage, confirmed fuse was fine (replaced it anyway). Is there an in-line fuse some where? I traced the thick tape, shrink wrap and found nothing, does not mean it is not there. wire diagrams show no in-line fuses. When I take a wire from the battery to the "B" electrode on the relay, the horns sound.

Still trying to determine if I need to remove the steering column "cover" to expose the Rag Joint. That would be a pain. See attached phot earlier in the thread of the "Hidden Rag Joint". There is also an open plug in that picture also, any thoughts on where it goes?​

Dash Plug
I like your electrical page. It seems your dashboard plug is connected directly to the wiring harness, my wire harness has a 6 pin plug, and a 2 pin "T" plug to receive the dashboard plug wires. That leaves 2 wires, the two wires from the dashboard plug without a home: the Left and Right blinker wires. Any idea where they plug into? I see no open plugs. Also the Emergency flasher has only 2 plugs, the ones I've seen on SOR have 4. The diagrams seem to indicate the blinkers route to the Flashers first. Is that right?

Thanks for all your help.

A frustrated Boaf.​

Rag Joint where are you.jpg
 
no in-line fuses in the OEM '72 wiring configuration

there is also no rag joint in a OEM '72 steering column - it's a one-piece rod that runs into the worm gear in the steering box - which begs the question: where is your steering box ? something has been modified :confused:

do you have the insulator rubber (Specter Offroad calls is a "horn spacer" Page 190 Land Cruiser Horn Assembly, click on the '72 tab) between the horn contact plate and the horn seat ? seems you are missing this: #4 on this drawing

190A3.gif


the OEM horn rubber insulator/spacer is unobtanium, but a large flat rubber washer from Ace can be made to work - you might also need a thin rubber insulation sleeve around the steering wheel mounting bolt - the OEM rubber insulator had both the sleeve and washer parts as one angled rubber flange (Specter appears to have sourced a workable aftermarket replacement now - wasn't available when I rebuilt my horn assembly)

also, as Coolerman's photo shows, the horn contact brush rides halfway on the contact ring - in my experience, the spring can be worn out to the point where the brush slides off the ring and gets stuck outside - this can be prevented by putting a tube sleeve around both the spring and the contact that keeps the brush aligned with the spring and prevents it slipping off the horn ring (as it turns out, the perfect size for this tube sleeve is a piece of a McDonald's soda straw :hillbilly:)

ground for the horn button/switch circuit is provided by the steering wheel mounting bolt and nut that have direct contact with the horn contact plate #3, and the steering wheel bolt and column are directly grounded to the frame via the steering box - the wire to the horn contact ring #6 is always hot when the ignition key is on acc - completion of the circuit to ground is accomplished when the horn button is pressed, meaning that the horn contact plate #3 makes contact with the horn seat #5 on the areas outside the rubber insulator/spacer; #3 is ever so slightly domed, so it can tilt towards the contact plate #5 when the horn button is depressed - the wire to the horn contact ring is NOT grounded (and #5 is also hot regardless of whether you have the horn button installed or not, as long as the brush makes contact with the horn ring - by providing ground to #5 you can test whether your horn circuit works while the steering wheel is off- CORRECTION: while the horn button is off, steering wheel set on but not bolted down)

190A2.gif


also, while you have the steering wheel off, take the blinker ring off and thoroughly clean the rollers and re-grease the whole assembly - yours looks quite gunked up
 
Last edited:
Hi DSRTRDR,

Good points, and thanks for the education, I definitely need it
  1. I have the rubber insulator (#4) under the horn Spring (#3). Maybe it's not the correct one but looks and seats like it belongs. I attached a picture (Wheel, Rubber and Seat) of what I have, and I am ordering part #4 from SOR (its inexpensive).
  2. Purchased a brand new horn seat from SOR, but I do like the McDonald's straw trick... I sanded the horn seat today (the part that contacts the horn spring (#3). It looked a bit tarnished, even though it's new from SOR.
  3. The steering box is towards the front of the engine bay. Looking at the photo, it's at the bottom of the photo.
  4. Cleaning the gunk out of the blinkers too,.
Still having problems identifying why the Green / Yellow wire now has no power. Stumped on that. I ran a temporary wire directly from the fuse to the relay (B contact), and the horn sounds without pressing the horn button. This is such a simple circuit, but such a pain...

Wheel, Rubber and Seat.jpg


Horn Seat Installed.jpg
 
you do have the turnsignal canceling post on your steering wheel - to make it work so that the turn signal automatically switches off after a turn:

the correct distance between the blinker switch ring and the steering wheel is critical for this - install blinker switch ring but do not tighten the bolt on the right side - install steering wheel normally - now you can slide the blinker switch up or down the steering column to make the canceling post work properly - the objective is to position the blinker ring so that the canceling post is exactly in the middle with the same distance from either of the ends of the little wings in the blinker arm mechanism

distance too tight between blinker ring and steering wheel: post gets wedged into ring and mechanisms doesn't cancel the turn signal; in fact, the whole turn signal won't work properly - distance too far apart between the two: post does not touch the little arms in the blinker ring and can't cancel - it takes some adjusting up and down, just as the blinker post from the blinker switch into the ring needs to sit just right to make both blinker indicator lights work

thus, the blinker ring gets adjusted up and down the steering column and so that the canceling post makes the correct contact - and then the blinker ring also gets adjusted left/right around the steering column so that the long post from the blinker switch down under the dash also makes proper contact at the blinker ring
 
All,

That's it, gave in with the factory steering wheel hooter and purchased a horn button. Ran the attached circuit DIRECTLY from the fuse to the relay (B). I push the horn button, the relay clicks and stays locked (even when I release the button). I disconnect the power from the Fuse and the relay un-locks. It's progress, but this is ridiculous.

FYI: Connecting the horns from one side of the relay (S) and directly connecting the Battery to the center electrode of the relay (B), the horns sound. Tells me there is continuity and good ground in that side of the circuit. The other side has the horn button grounded to the frame and completely isolated wire to the other side of the relay. Switched the button and horn connectors at the relay, and the horn sounds (as expected).

The relay is new from Village Toyota. Any suggestions (besides yelling Beep Beep?)

Electronic spaghetti master...not,

Boaf

Horn Wiring Connection.png
 
All,

That's it, gave in with the factory steering wheel hooter and purchased a horn button. Ran the attached circuit DIRECTLY from the fuse to the relay (B). I push the horn button, the relay clicks and stays locked (even when I release the button). I disconnect the power from the Fuse and the relay un-locks. It's progress, but this is ridiculous.

FYI: Connecting the horns from one side of the relay (S) and directly connecting the Battery to the center electrode of the relay (B), the horns sound. Tells me there is continuity and good ground in that side of the circuit. The other side has the horn button grounded to the frame and completely isolated wire to the other side of the relay. Switched the button and horn connectors at the relay, and the horn sounds (as expected).

The relay is new from Village Toyota. Any suggestions (besides yelling Beep Beep?)

Electronic spaghetti master...not,

Boaf
Update: I can now activate the Horn Relay with the factory steering wheel :bounce:. I had to run a temporary power wire from the Horn fuse to Terminal B, but it operates!. However, connecting the horns to the relay and pressing the horn button, the relay locks up. Need some help.

That tells me two things:
  1. the wiring (the Green / Yellow) has no power from the Fuse. Fuse is good. Oh crap how do I get that power back :doh:? Any advice is appreciated.
  2. the wiring to the horns may be crossed (I say may because I was able to get them to work by running the battery directly to the B Terminal and horns to the H terminal.
    1. I see by the wiring diagram that the G/Y Power wire at the relay, connects to the Green / Red at the Fuse Panel.
    2. The G/Y from the relay converts to a Green \ White that also Powers the Stop Lights switch rear (which work) and,
    3. also connects to the "S" terminal at the blinkers (which do not work) Any thoughts on how to attack this???
Thanks Everyone, Boaf
 
Last edited:
All,

Read in the wiring diagrams that the Hazard Lights are OPT (Optional?) is that right? I don't have a connector running off the main wiring harness which would make sense.

  • Still have horn issues (not blowing, when connected to the H terminal)
  • blinkers are still inoperable (aren't they connected to the Hazards?)
Boaf
 
Horn Relay Wiring: The HORNS connect to the H terminal, the Horn Button (SWITCH) is attached to GROUND on one side, and to the S terminal of the relay on the other. +12V POWER from the FUSE Block goes to the B terminal on the relay. Until you get this wired correctly it will never work.

You stated that when you applied power directly from the battery to the B terminal the horns blew? That is NOT what is supposed to happen. The only way that would happen is if the S terminal was already grounded.

Again: The horn button should be grounded on one side and the other side should be attached to the Horn Relay S terminal. The B terminal has battery power on it. When you press the horn button you are GROUNDING one side of the Horn Relay causing it to pull in which routes battery power out to the horns causing them to blow.
 
Horn Relay Wiring: The HORNS connect to the H terminal, the Horn Button (SWITCH) is attached to GROUND on one side, and to the S terminal of the relay on the other. +12V POWER from the FUSE Block goes to the B terminal on the relay. Until you get this wired correctly it will never work.

You stated that when you applied power directly from the battery to the B terminal the horns blew? That is NOT what is supposed to happen. The only way that would happen is if the S terminal was already grounded. Yep, something does not seem right there.

Again: The horn button should be grounded on one side and the other side should be attached to the Horn Relay S terminal. The B terminal has battery power on it. When you press the horn button you are GROUNDING one side of the Horn Relay causing it to pull in which routes battery power out to the horns causing them to blow.


I believe (I say that tongue in cheek cause it is still not working) that is how I have it set up:
H to the horns via GW Wire (horns themselves are grounded at the mounts)

B to the Battery (12V, via the GY from the fuse - which is currently not supplying power through the harness. Ran a wire directly from # 2 Fuse for diagnosis) The GR from the fuse supplies power to the GY for the B terminal

S to horn button through a brand new wire through the steering column soldered to the horn contact (thick rubber bushing).

The horn relay itself is also grounded to the fender. One thing I tried, completely disconnected the horns from wiring loom, made sure they were grounded and ran a new wire to one horn directly from the H terminal. Still no blow. Been following the attached diagram . Link to this page 2 of 1972

I have a 928S so pretty good with wiring. The LC should be easy, especially the horn. I appreciate all the help your giving. Word is you are the man for Harness. Any thought about building a new wiring loom to address what I believe is missing connectors? Do you do that kind of stuff? Or in your opinion, just build out on the existing loom?

Thanks, Buy you a beer.
 
OK well do this: Disconnect EVERYTHING from the relay. Using jumpers, apply +12V to the B terminal. Does the relay click? (It shouldn't) if it does then that relay is grounded through the case and is not the correct relay. You can still use it but you will have to isolate the relay case from ground with some type of insulator.

If it does not click then using a jumper, ground the S terminal. Relay should click and you should measure +12V on the H terminal. IF that works then connect the horns back to the H terminal and again ground the S terminal. Horns should blow. If they do then connect your new horn button to the S terminal and when you push the button the horn should blow.

928S huh? So you are familiar with Lucas the Dark Lord?
 
OK well do this: Disconnect EVERYTHING from the relay. Using jumpers, apply +12V to the B terminal. Does the relay click? (It shouldn't) if it does then that relay is grounded through the case and is not the correct relay. You can still use it but you will have to isolate the relay case from ground with some type of insulator. Now that makes good sense. The diagrams says it needs to be grounded...but, will definitely try it this weekend

If it does not click then using a jumper, ground the S terminal. Relay should click and you should measure +12V on the H terminal. IF that works then connect the horns back to the H terminal and again ground the S terminal. Horns should blow. If they do then connect your new horn button to the S terminal and when you push the button the horn should blow. I like that methodical approach, thanks.

928S huh? So you are familiar with Lucas the Dark Lord?
"The wire it is, May the ground with you be"
 
To answer your question about harnesses. Currently I cannot build a new harness for you due to the fact that Toyota, starting in the 1972 model year, started using weird , no longer available, connectors. I do carry MOST of them but the best example of what is not available is the fuse block connectors. I am in the process of documenting the 72 harness I have. Once that is done then I will offer a refurbishment service for 72-73 harnesses. This involves un-taping the harness, making a list of all damage, soda blasting the connectors to clean them up. Repairing the harness, testing it completely, then re-taping it back up with non-adhesive harness tape.

Your comment about the hazard lights being an option I don't believe is correct for a 72. I believe that Hazards were a requirement in the US after late 68 early 69. Living in the Past could tell us exactly when that occurred. I posted a pic in your other thread showing where the Hazard Switch connector should be located on your 72. Right next to the wiper switch connector.
 
OK well do this: Disconnect EVERYTHING from the relay. Using jumpers, apply +12V to the B terminal. Does the relay click? (It shouldn't) if it does then that relay is grounded through the case and is not the correct relay. You can still use it but you will have to isolate the relay case from ground with some type of insulator. Now that makes good sense. The diagrams says it needs to be grounded...but, will definitely try it this weekend

If it does not click then using a jumper, ground the S terminal. Relay should click and you should measure +12V on the H terminal. IF that works then connect the horns back to the H terminal and again ground the S terminal. Horns should blow. If they do then connect your new horn button to the S terminal and when you push the button the horn should blow. I like that methodical approach, thanks.

928S huh? So you are familiar with Lucas the Dark Lord?
"The wire it is, May the ground with you be"
To answer your question about harnesses. Currently I cannot build a new harness for you due to the fact that Toyota, starting in the 1972 model year, started using weird , no longer available, connectors. I do carry MOST of them but the best example of what is not available is the fuse block connectors. I am in the process of documenting the 72 harness I have. Once that is done then I will offer a refurbishment service for 72-73 harnesses. This involves un-taping the harness, making a list of all damage, soda blasting the connectors to clean them up. Repairing the harness, testing it completely, then re-taping it back up with non-adhesive harness tape.

Your comment about the hazard lights being an option I don't believe is correct for a 72. I believe that Hazards were a requirement in the US after late 68 early 69. Living in the Past could tell us exactly when that occurred. I posted a pic in your other thread showing where the Hazard Switch connector should be located on your 72. Right next to the wiper switch connector.
Thanks! Saw that also...
 
This may be totally off-base, but when I tried to use any of the original wiring and depended on the horns to be grounded through their mounts, I could not get my horns to work. I ended up running new wires independent of the original wiring for the horns and ran extra wires to ground them to the ground on the passenger side of the engine bay. I didn't want to run extra wiring, but that is the only way I could make my horns work. HTH, Taro
 
T
This may be totally off-base, but when I tried to use any of the original wiring and depended on the horns to be grounded through their mounts, I could not get my horns to work. I ended up running new wires independent of the original wiring for the horns and ran extra wires to ground them to the ground on the passenger side of the engine bay. I didn't want to run extra wiring, but that is the only way I could make my horns work. HTH, Taro

Thanks Taro, I will be methodical and follow the steps first that Coolerman outlined. It may come down to wiring outside the loom.
 
Coolerman, Update:

OK well do this: Disconnect EVERYTHING from the relay. Using jumpers, apply +12V to the B terminal. Does the relay click? (It shouldn't) if it does then that relay is grounded through the case and is not the correct relay. You can still use it but you will have to isolate the relay case from ground with some type of insulator. Now that makes good sense. The diagrams says it needs to be grounded...but, will definitely try it this weekend

If it does not click then using a jumper, ground the S terminal. Relay should click and you should measure +12V on the H terminal. IF that works then connect the horns back to the H terminal and again ground the S terminal. Horns should blow. If they do then connect your new horn button to the S terminal and when you push the button the horn should blow. I like that methodical approach, thanks.

  1. Disconnected all wires from the relay, and the relay was still grounded to the fender.
  2. applied 12V with jumper, no relay click Yeah!!!
  3. Grounded the S terminal, and the relay clicked on and off as it should, with 12.6V
  4. Connected the horns (using the wiring loop). Connected the power, relay clicks once and locks. I measure 12.6 V
    1. Connected the horns outside of the wiring loop (now the wiring for the horns is completely removed). I still get one click and measure 12V
So to me, that sounds like the Relay is not right. Anytime I have the horns completely disconnected from the relay, I can get the relay to cycle. The moment I connect the horns to the H terminal, the relay locks and will not release.
I can buy another relay but this relay was from a CruiserParts.net , brand new. Attached a photo.


It looks very different than the relays from SOR.com.

Horn Relay 1.jpg


Horn Relay 2.jpg
 
Last edited:

Users who are viewing this thread

Back
Top Bottom