HJ 60 into small camper thingy #didgeriblue (1 Viewer)

This site may earn a commission from merchant affiliate
links, including eBay, Amazon, Skimlinks, and others.

Joined
Mar 14, 2017
Threads
5
Messages
34
Location
korumburra
hi everyone,

i hope this is the right place, but im currently very busy with turning my HJ60 into a small kind of camper thing, so i can travel australia with it after my internship(im from Holland) i will do a 3 month travel with it.

i bought Didgeriblue (that's the name of the car) from a friend of a friend. it was quite standard when i bought it, and it is slowly turning in to a custom build one.


i will keep posting pics in this thread....

i will try to keep them in order of how my progress is going....

This is how i bought it:


first thing: move the amp from the trunk to under the passanger seat

leds under the hood, and on the bullbar (spot and flood)


the s*** load of cables at the passanger side)


Spot beam

Flood beam

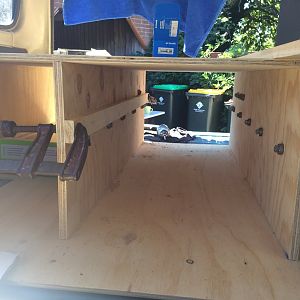
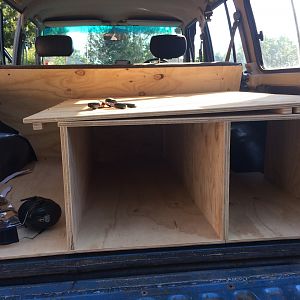
The begin of the new interior at the back


Total sleeping size: 220x90cm


Last edited:
thight but it fits!!

Not the way to do it, but it works!!! macgyver!!!


split system CB/UHF radio (the big amp piece is under the dash)


Dual battery volt meter (batt 1 is main, batt 2 is aux)

nice big stick on the front!

ball bearings for the drawers!! (NO jokes about my wooden shoes!!!!)

skate board bearings, cheap as *$&% on ebay!!!

Less than a 1 millimeter of margine!

slide out fridge and stove!!! with plates and muck drawers under it!


Looking great!
You may have already thought about it, but if not, I would suggest sandfly-proof mesh on the windows if you are heading up north (northern NT / QLD / WA). That way you can sleep with the windows open without getting eaten alive!!! Also a small 12v fan...
 
Looking great!
You may have already thought about it, but if not, I would suggest sandfly-proof mesh on the windows if you are heading up north (northern NT / QLD / WA). That way you can sleep with the windows open without getting eaten alive!!! Also a small 12v fan...
hey, yes i did, i got a 12v fan from ebay( i love that site) and im about to put a mesh around the windows....
 
Good stuff!!
What is your rough itinerary?
hey,

im first going from melbourne(where i live) to brisbaine (in a 2 day drive(skip the cities etc) no mud there, so no fun)
than up the coast from there on to cape york....
than back down probably to alice springs (pickup a traveling buddy)
from alice springs to darwin, darwin to perth(costal route probably)
and than back to melbourne, to pickup my mates for an other month of travelling
 
Plenty of mud on the NSW mid coast, especially around Newcastle.
aaa okay, i will try to find some!! thnx.

tomorrow i'm going to make my battery bracked for under may car(spare tyre place)
 
You already have twin battery set up and you can fit a 3rd under the bonnet. I would not suggest a battery in spare wheel spot if doing the "tele track"
 
You already have twin battery set up and you can fit a 3rd under the bonnet. I would not suggest a battery in spare wheel spot if doing the "tele track"

Because im going to smash it? Or what will happen?
 
A few reasons mate. Firstly you will drown it. It would need to be fully waterproofed with elevated vent to prevent the terminals being shorted out in dirty water and mud. We usually move the spare wheel because it gets bashed on rocks etc and any auxillary fuel tank put there needs a heavy duty bash plate to protect it.
You have room on the drivers side behind the original battery to fit a third battery (longways) with just a little fiddling to make a bracket for it.
This also keeps the run from your alternator to charge the battery a lot shorter.

Aa thnx yeah it true what you are saying, but i hope to get a bit more weight at the back and make the springs a bit better work(got heavy springs) but i made a fulle heavy metal battery bracket(see photo)

Under my hood it is already packed

IMG_1399.JPG
 
There's a few cruisers rolling around with battery trays under their trucks, however, they don't see any mud.

So I would avoid putting the batteries in an area that's gonna get that abuse. Never mind the huge rear end a 60 had and how easy you can hang that up.
 
I got the batteries mounted!

I know the welding is not beautiful, but I don't have any tools here, so i have to do it with stuff i can borrow!!

The total weight is around 100kg!
The mount is bolted to the tailgate thing(the frame of the part where you hook up the trailer!!)

It's all fused etc!

The weight really improves my driving, i got heavy suspension at the back, and im driving around most of the time empty....

IMG_1409.JPG


IMG_1412.JPG


IMG_1413.JPG


IMG_1414.JPG


IMG_1415.JPG
 
Part 2 of the photos!!

With a forklift or something i can easily unbolt the 6 bolts and drop the thing down to the ground!!

IMG_1419.JPG


IMG_1420.JPG


IMG_1421.JPG


IMG_1407.JPG
 
i did a bit of work the last weeks on my car.....

hooked up the rear battery bank to the aux battery in the front.
i putted two bolts trough the side of the battery bank (just in case the welds crack or whatever)

also i put a sticker on the motorhood of the car....

IMG_1481.jpg


IMG_1482.jpg


IMG_1434.jpg


IMG_1480.jpg


IMG_1542.jpg
 
also i put some night drive lights in the cabin(it's more comfy for your eyes)
and an on/off switch for the aux battery connection with the main batt

IMG_1543.jpg


IMG_1544.jpg


IMG_1418.jpg


IMG_1428.jpg


IMG_1492.jpg
 
awning and cupholder is added to!!

so as the curtains (had to ask grandma for those ones the make them)

IMG_1524.jpg


IMG_1540.jpg


IMG_1490.JPG


IMG_1483.JPG


IMG_1453.JPG
 

Users who are viewing this thread

Back
Top Bottom