Help with 3-link on '99 4-Runner (1 Viewer)

This site may earn a commission from merchant affiliate
links, including eBay, Amazon, Skimlinks, and others.

That thing's looking awesome. You "Georgia Boys" were a lot of fun hanging out with at Cruise Moab. Hopefully see you there again next year. What size tires are you running. If you get the chance, email some build pics to jlheepetr@live.com. Can't wait to get the Heepetr looking like that.
 
Last edited:
Well, I finally got a chance to work on my truck a little more. Finally finished all the grinding on the frame rails and started making patterns with cardboard for the frame plates. I will have them put on CAD and cut by computer. Also got the oil drained so I can change the oil pan tomorrow.

I had some problems with changing the rear axles and thought I might save someone else the same trouble. When I originally ordered my axles from Marlin Crawler I asked about any trouble with the ABS and was told I would have to eliminate it. No big deal. What I didn't know was that they don't have an ABS axle and that I would need a part machined to move the axle seal out to the original position of the non-ABS axles. Just a little heads up. I got it ordered today.:bang:
 
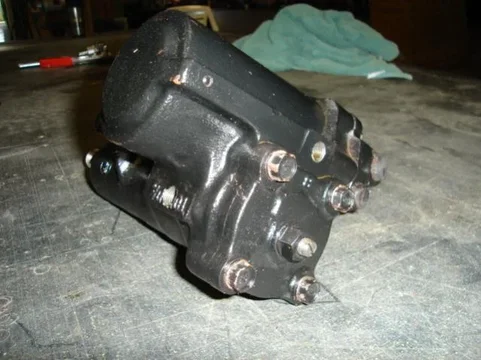
I didn't get the pan changed today but did get my steering box drilled and tapped for the hydro assist. For any one that doesn't know how to do this (myself included untill today) there are some good threads on Marlins forum. I've got the 87-88 IFS box. To start, center the input shaft, remove the 4 bolts on top of the output shaft flange, and remove the output shaft with a couple taps from a dead blow. Then turn the input shaft all the way to the left, remove the 4 bolts from the input shaft flange and remove carefully as there is a teflon seal you don't want to damage. This is my box all torn apart.
Wheels 002.jpg
Next step was to drill and tap a 2 holes on the box. The first was in the middle of the Toyoda and the second on top of the box along the raised vein. Some of the forums will warn about the Toyoda location getting in the way of the body mount but I plan to use a 90 degree hydrolic fitting so it won't be a problem. The top hole should be drilled carefully to avoid drilling past the channel. Drill both holes to 7/16 and tap with a 1/4" 18NPT tap. Here you can see both holes after tapping.
Wheels 003.jpg
Here's the box reassembed after carefull cleaning for all the metal drillings. You can see both tappped holes from this angle. Also be carefull reassembling as to not damage the seals. Check the post on Marlins forum for more info.
Wheels 004.jpg
Wheels 002.jpg
Wheels 003.jpg
Wheels 004.jpg
 
Last edited:
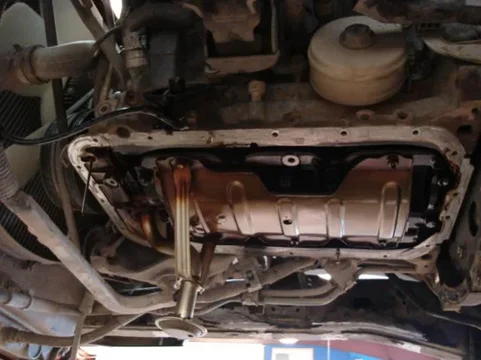
Very little done today. Just got the oil pan pulled and the sumps changed Hoping to get the T100 pan on tomorrow. Here's the old sump.
oil pan 002.jpg
And here's the rearward T100 sump.
wheels 003.jpg
oil pan 002.jpg
wheels 003.jpg
 
Last edited:
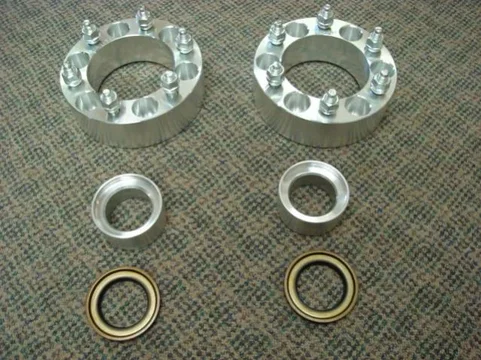
I recieved my 2" spacers and the ABS eliminator spacers from Marlin today. The eliminator spacers are what you'll need if you have ABS and want to go to the Alloy USA rear axles.
wheels 001.jpg
wheels 001.jpg
 
What did those spacers set you back from Marlin. I have a TRD rear under my 4 Runner and have heard the axles like to snap with anything over a 35-37" tire. Was looking to upgrade to the Alloy USA shaft that Marlin has.
 
The ABS eliminator spacers were $20.00 ea. with the heavy duty seals. I'll be starting on 37s and keeping the stock axles as trail spares (hopefully never have to use them).
 
I finally got the oil pan swap done today. The pan itself was easy but installing the rearward dip stick was a pain. You can see its' new location just below the motor mount.
oil pan 007.jpg
I also got my new rear axles back complete with new bearings and the drum assemblys removed.
oil pan 004.jpg
oil pan 005.jpg
oil pan 007.jpg
oil pan 004.jpg
oil pan 005.jpg
 
For my disc brake conversion in the rear I wanted to run the stock discs with the 2" wheel spacers and weld a mount to the axle to hold the calipers. Problem is the wheel flange on the axles is a little to big to fit down in the discs. I'm considering having the flanges machined down to fit. I've also heard of people using chevy discs and calipers instead. Anyone have any ideas? :confused:
oil pan 006.jpg
oil pan 006.jpg
 
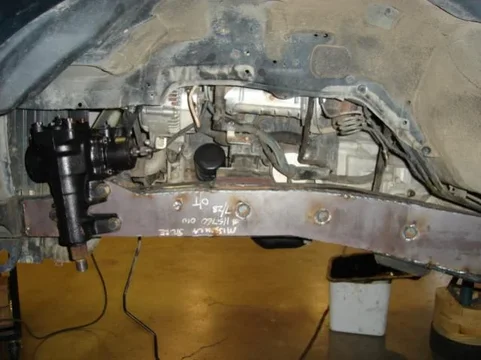
I got my frame plates back yesterday. A big thanks to CDA Metals. I had the CAD drawing to them Monday afternoon and they had the parts lazer cut and back to me Tuesday morning.
wheels 004.jpg
This is the motor mount plate.
wheels 005.jpg
I tried to weld things a little at a time and hopefully not warp the frame.
wheels 009.jpg
wheels 004.jpg
wheels 005.jpg
wheels 009.jpg
 
Here's the passenger side
frame 002.jpg
Here's the driver side. I sleeved the holes for the steering box bolts with 3/4" x .120 tube.
frame 003.jpg
frame 002.jpg
frame 003.jpg
 
Hey this is Tim; met you at Cruise Moab - "The Georgia Boys" in the white 80. We talked about SAS 4Runners at the campfire. Here's IPORs progress with mine. The Heepeter will be awesome!

DSC01958.jpg


DSC01986.jpg

not to hi-jack but is there a build thread or more info somewhere?
 
Wow - those are cool rims :lol::lol:


And look at all the ground clearance :lol::cool:
 
Yeah, I tryed to design a setup with no axles for the clearance but havn't figured out how to drive it off the jacks yet.:hmm:
 
I got a little time today and since I don't have my brackets yet I started welding up the control arms instead. For the frame end I'm using the fixed 2.5" johnny joints.
control arms 006.jpg
On the other end of the arms I'm using 2.5" x 1" johnnys. I was going to use the 1 1/4" but got a steal on these. Has anyone ever broke the treaded shank on one of these? Currie told me they had never seen one fail at the threads?
control arms 005.jpg
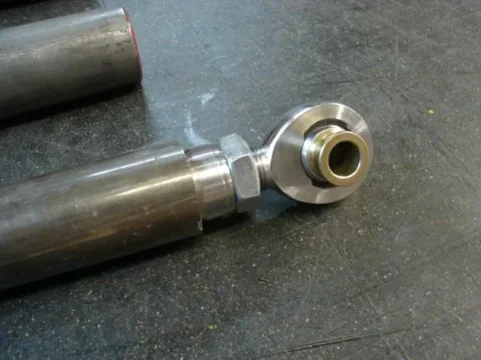
For the panhard links I'll be using 7/8" heims. I opted for the cheaper ones...I mean more affordable. I figured if I was unhappy with these they'd be easy enough to change over.
control arms 004.jpg
control arms 006.jpg
control arms 005.jpg
control arms 004.jpg
 

Users who are viewing this thread

Back
Top Bottom