H55 going in - real time question (1 Viewer)

This site may earn a commission from merchant affiliate
links, including eBay, Amazon, Skimlinks, and others.

A trick we used to use on Jeeps was to take a couple of the bellhousing bolts at say 10 and 2 o'clock and grind the heads off, put some flats on them so you can get them back out, lube them well, and then put them in before we slid the tranny forward. Essentially using them as dowels. This gives you something to index the bellhousing on that can take some of the the weight and give you a pivot point. It also gives you points that are a lot easier for your helper to see from the access cover when you are sliding the tranny forward. Obviously, after you get it in and put the rest of the bolts in, you need to take out the dowels and put in good bolts.

At one point we were having to make a custom throwout bearing for a CJ5->SM420. We R&R'ed the transmission 5 times one afternoon with a test drive between each one. We had it down to about 45 minutes to take it out and put it back in, and that included welding and grinding on the throwout bearing. The dowel trick took it from a three hour job to a 45 minute job. I still have those two 7/16" fine thread, headless bolts in the top drawer of my tool box.
 
getting closer!!!

still got denied. but feeling much better about next try. i think i’m not aligned well enough to hit the pilot bearing hole.

turning the axel flanges to spin the input shaft - i can tell i’m not inside the clutch splines yet...soooo close!!

better jack + the alignment pegs really helped

should happen this week. gods willing

511300C4-DEB4-493F-B99D-9CDAD5D2991C.jpeg


FC16C958-530B-4CCC-8260-52CBFB8197AB.jpeg
 
Wow, you are close.

Despite what was said earlier, I have seen burrs on the input nose, bind up in the pilot bearing. Best to fit the pilot and input together before the install and remove any burrs that may hang it up. A bit of emory coth on the shoulder of the input may help.

I am really surprised it didn't go with those dowels to line it up. Your clutch alignment tool goes in easily right? It has to be something easy at this point.

Usually right around now, a few well timed and said curse words makes it go right in.
yeah - couple of ideas. with the alignment dowels that long... i noticed that i had a fair bit of weight and tension on them...which tells me that i wasnt quite lined up....

lined up enough to go over the dowels...but still just an RCH off at the other end.

ill pull it back and take your suggestion and polish up the input shaft a tiny bit. I did slide the bearing over it when it was all on the garage floor and it fit fine there...so i'm pretty sure i'm close... just a bit of tuning left.
 
I’ve been stuck at that point before. I kept wiggling the transmission from the rear & slightly adjusting the height till the angle was just right. The slight taper at the end of the input shaft can get you started but forget it if the angle of the transmission is a degree or two off.
 
In that picture above, the input shaft splines are getting hung up on the clutch disc splines- there's still another inch or so until the tip of the input shaft gets near the pilot bearing. The shaft only inserts like 1/2" in.

ill pull it back and take your suggestion and polish up the input shaft a tiny bit.

DON'T!

That's not the problem why it's hanging up. The input shaft tip HAS to have a firm-ish interference fit with the pilot bearing. Burnishing it to make it slip in easier is a good way to ruin the input shaft down the line - cuz the shaft can spin free of the bearing when the bearing gets old - and then grind itself down... and a new bearing will no longer fit it.

The picture below shows an example of just that. The tip of the shaft is ruined. Doesn't grab the bearing.
Notice how little distance the tip needs to insert into the pilot bearing. The front of the transmission should be about 1/2" away from the bell housing before sex can begin.

image.jpeg
 
Last edited:
In that picture above, the input shaft splines are getting hung up on the clutch disc splines- there's still another inch or so until the tip of the input shaft gets near the pilot bearing. The shaft only inserts like 1/2" in.


DON'T!

That's not the problem why it's hanging up. The input shaft tip HAS to have a firm-ish interference fit with the pilot bearing. Burnishing it to make it slip in easier is a good way to ruin the input shaft down the line - cuz the shaft can spin free of the bearing when the bearing gets old - and then grind itself down... and a new bearing will no longer fit it.

thank you OSS.


i was turning the flange to spin the input shaft to see if i was reaching the
splines of the disc. and i was not touching the clutch disc at all. so that’s good beta. i’m not close enough yet. so it can’t be pilot yet.

i’ll give it another go tomorrow after work
 
In that picture above, the input shaft splines are getting hung up on the clutch disc splines- there's still another inch or so until the tip of the input shaft gets near the pilot bearing. The shaft only inserts like 1/2" in.

DON'T!

View attachment 1683625

Not so sure about that. That's the wear that happens when your pilot bearing seizes. Some of the aftermarket ones are not even sealed. And, right now, I'm running an oil impregnated bronze BUSHING in my FJ40 and its been going strong for years. I'm almost thinking like Chevy, this is the way to go.

These trucks are well engineered and well built. It's only a matter of a few seconds before this one is stabbed and back on the road.
 
is the trans and transfer in gear? turning the output flange and not being in gear won't turn the input shaft.

you just need to be close on the alignment, there is a chamfer on the input shaft to help guide it into the bearing

using a tape measure you should be able to get close, side to side and up and down
yep - in gear. turn the companion flange and i can see the splined input shaft spinning... so the fact that its turning freely tells me i'm not quite touching the clutch spines yet.

good call - use a tape measure and see where i've got gaposis.
 
If you get super close (1/2"), and the trans. still won't go in, press the clutch pedal, and that frees up the disk and lets it go forward. I keep forgetting this, but saw it recently and it worked like magic.
 
Yeah!

Nice going. What was the final move that made it go?
 
Yeah!

Nice going. What was the final move
that made it go?

EDIT:

so the first attempt (of this round) I went ahead and dropped the trans - pulled the clutch fork out of the way and double checked my clutch alignment tool... everything seemed good.

I stabbed in the trans with the fork out of the way - having done this 2 or 3 times now - i was able move the trans into position in about 10 minutes

the trans slid right in so that told me i just needed to be more precise on angles. i could turn flange and see clutch & flywheel rotating - boooom!!! we have connection!!!!

measuring tape was key. I kept checking the distance at all 3 alignment dowels and adjust very little at a time.

one observation. with a lot of weight and tension on the jack - transmitted through to the alignment dowels - it was not clear with direction to rotate the jack screws to rotate the jack plate.. so i made a few practice turns while it was lowered to figure out which rotation did what. i think the previous attempt yesterday i was just bound up on the alignment dowels.

if i were making the dowels over again i'd make them a little shorter... it'd give a little more room to maneuver

finally it's all bolted up!!!


seems like everything after this will feel like a cake walk. but i know i just jinxed myself by writing that!
 
Last edited:
You got lucky! I was struggling with one and had a friend just push the clutch and it shifted down and I had to start all over again-meaning drop the tranny, set it up with the alignment tool, etc.

I remember when I first installed mine, I filled it with oil, then ran the truck just to see the output flange spin around.

By the way, I hope you put a sign or note in the middle of the windshield to remind you to fill it with gear oil before you drive it. I'd even consider filling it right now so you don't forget. Really, this is an easy mistake to make and it ruins a lot of hard work. A couple of years ago I forgot to put gear oil in the front diff of my 80 and drove just around the block. Ruined the ring and pinion. Ever since, multiple notes to myself about needed fluids and a sticky taped over the ignition until all the fluids are full.

You will be very happy with that tranny when done. It suits the truck perfectly.
 
You got lucky! .... fill it with gear oil before you drive it.

To make it easy before installing the shift lever pour the oil in through the shift tower. Pull the fill plug so that you'll know when enough has been added.
 
To make it easy before installing the shift lever pour the oil in through the shift tower. Pull the fill plug so that you'll know when enough has been added.
cool idea.... love it!
 
now that the trans is bolted in - i see things going like this:

1 - take measurements and get drive lines off to the shop - since the shops around my hood have about 5 to 7 days turn around...i figure i can fiddle with

2 - clutch hydraulics
3 - electrical
4 - cross member
5 - 4-Lo linkage
6 - fluids

so - speaking of electrics... knuckle head question time.

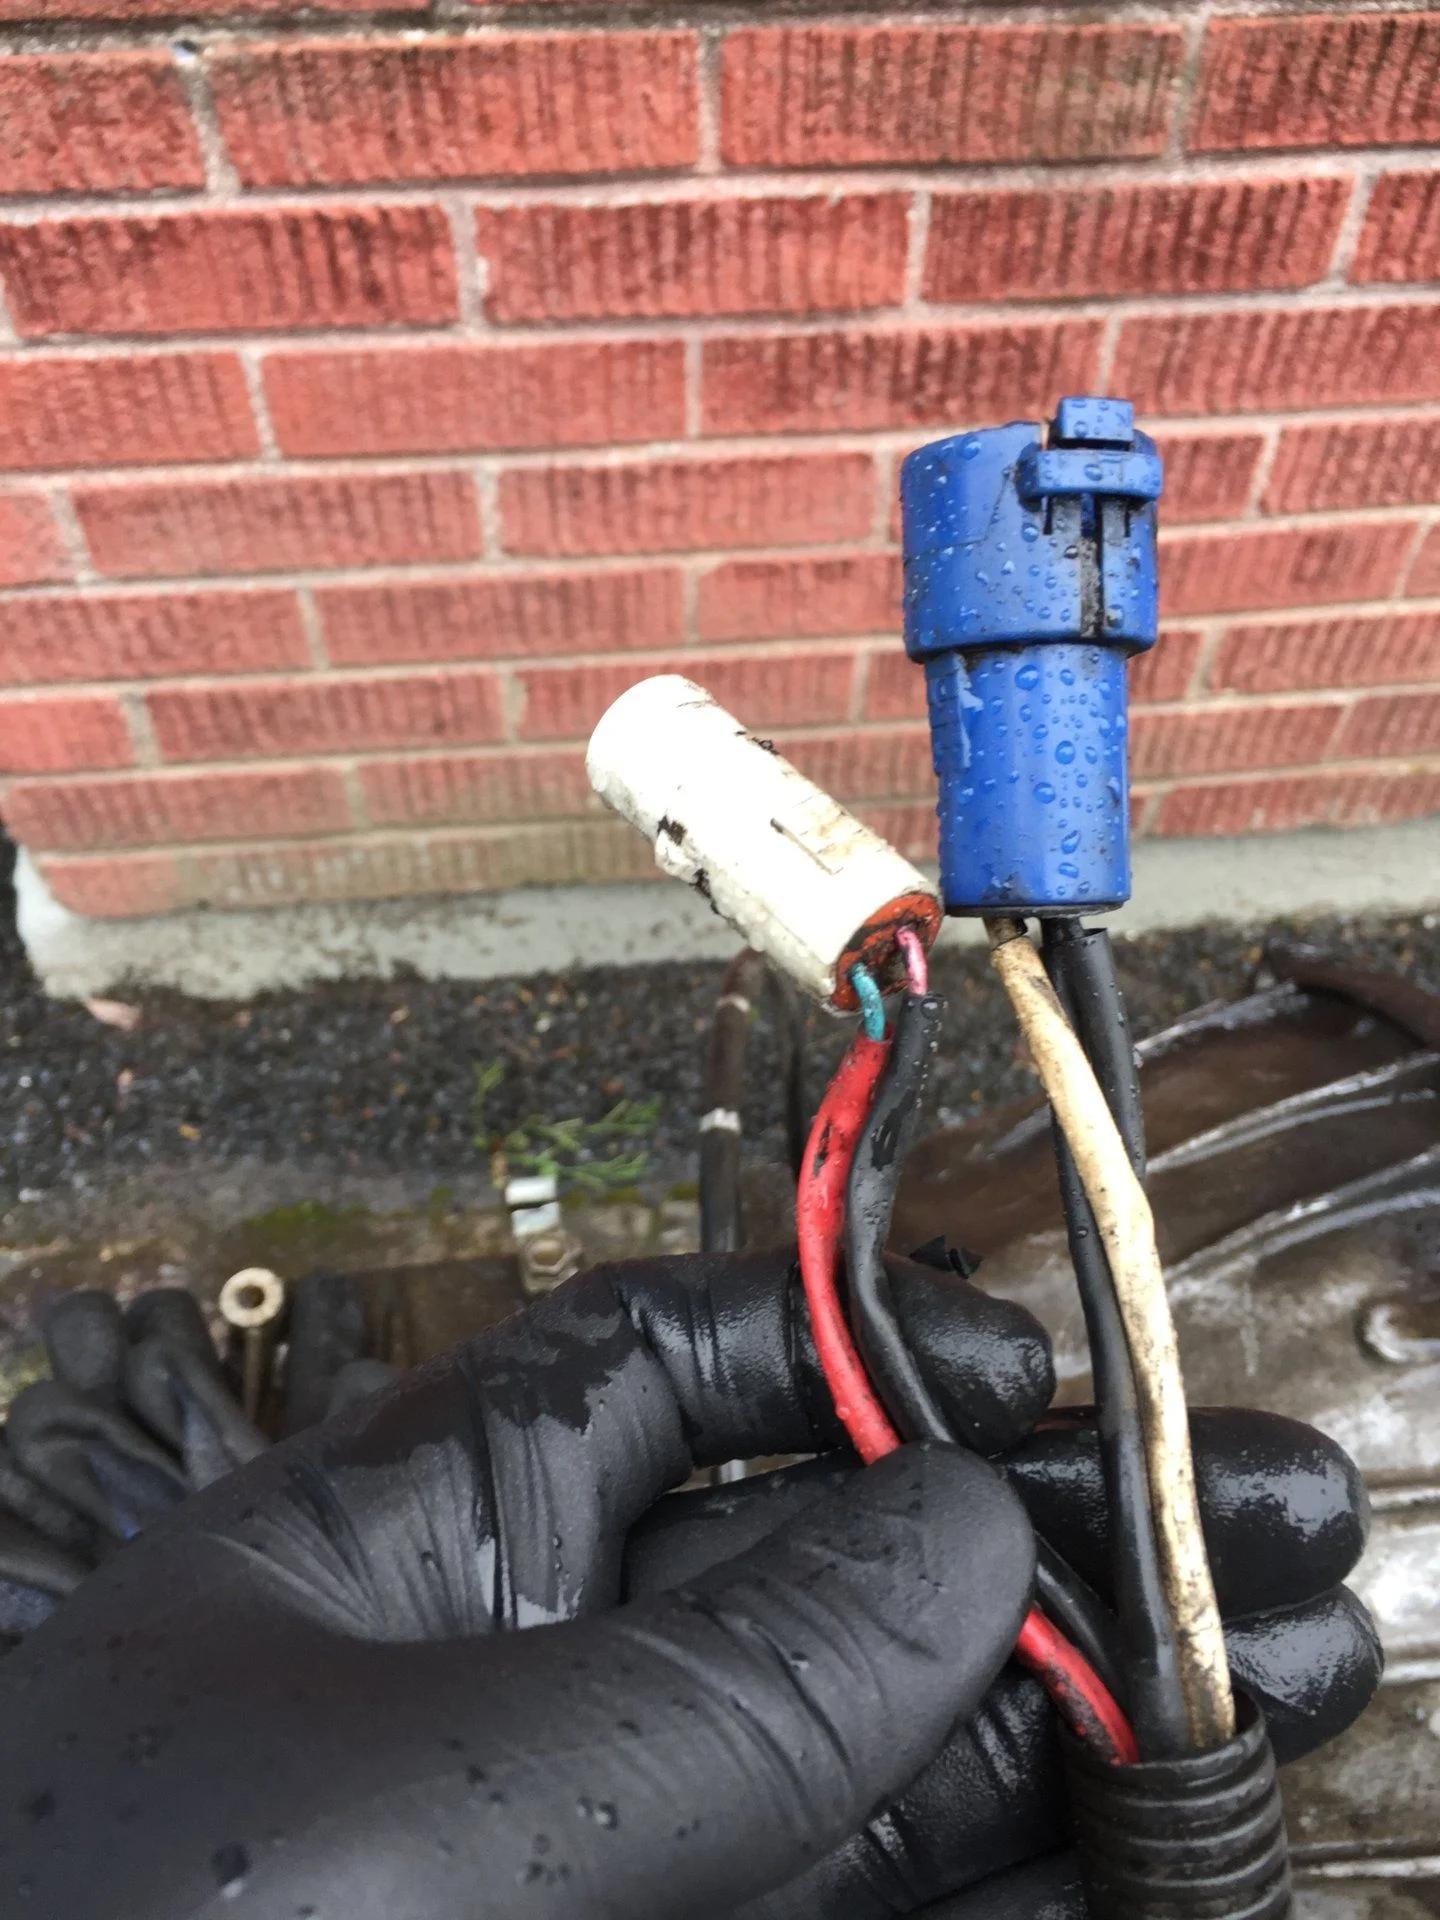
there's 2 electrical connectors coming off the A440 neutral safety switch.

for the life of me - i can't find where the other end of the 2 conductor white connector goes... i snipped it off the NSS since i read that i'm going to need to jumper some pins.

the blue one was easy - there's only one connector like that back under the truck and i found it's mate...so jumpering those connections will be easy

but the white one... wtf - i can't find it's mate.

anyone have pearls of wisdom?
 

Users who are viewing this thread

Back
Top Bottom