Front Diff Mount Change & SuperPro Bushing Review (1 Viewer)

This site may earn a commission from merchant affiliate
links, including eBay, Amazon, Skimlinks, and others.

Joined
Jul 27, 2016
Threads
2
Messages
15
Location
Santa Clarita CA
I've read a couple of threads on this subject, but thought I could fill in some info that was hard to find or undocumented. Also no one seems to have posted about the SuperPro poly bushing so I thought this write-up could be handy.

My truck is a 2001 LX470. I don't think the front diff mounts changed much, if at all in the 100-series production run, but YMMV. I decided to change these mounts after getting sick of the clunking noise heard and felt when unloading the drivetrain, even after lubing the driveshafts. It was bad enough that my wife would even comment on the clunking--it's her daily. I also knew some of the mounts were toast because I had also hastily installed a Slee diff drop several months back and saw what a disaster they were. It may not have been the best decision, but I bolted the diff drop in, prayed the retaining washers would hold the whole mess together (it did) and hit the road. It was high time to fix it right.

Here's what that bushing in the front diff cover looked like.
99Wep37.jpg


Here's the inner portion. It fell out under it's own weight.
RR5Dz9C.jpg


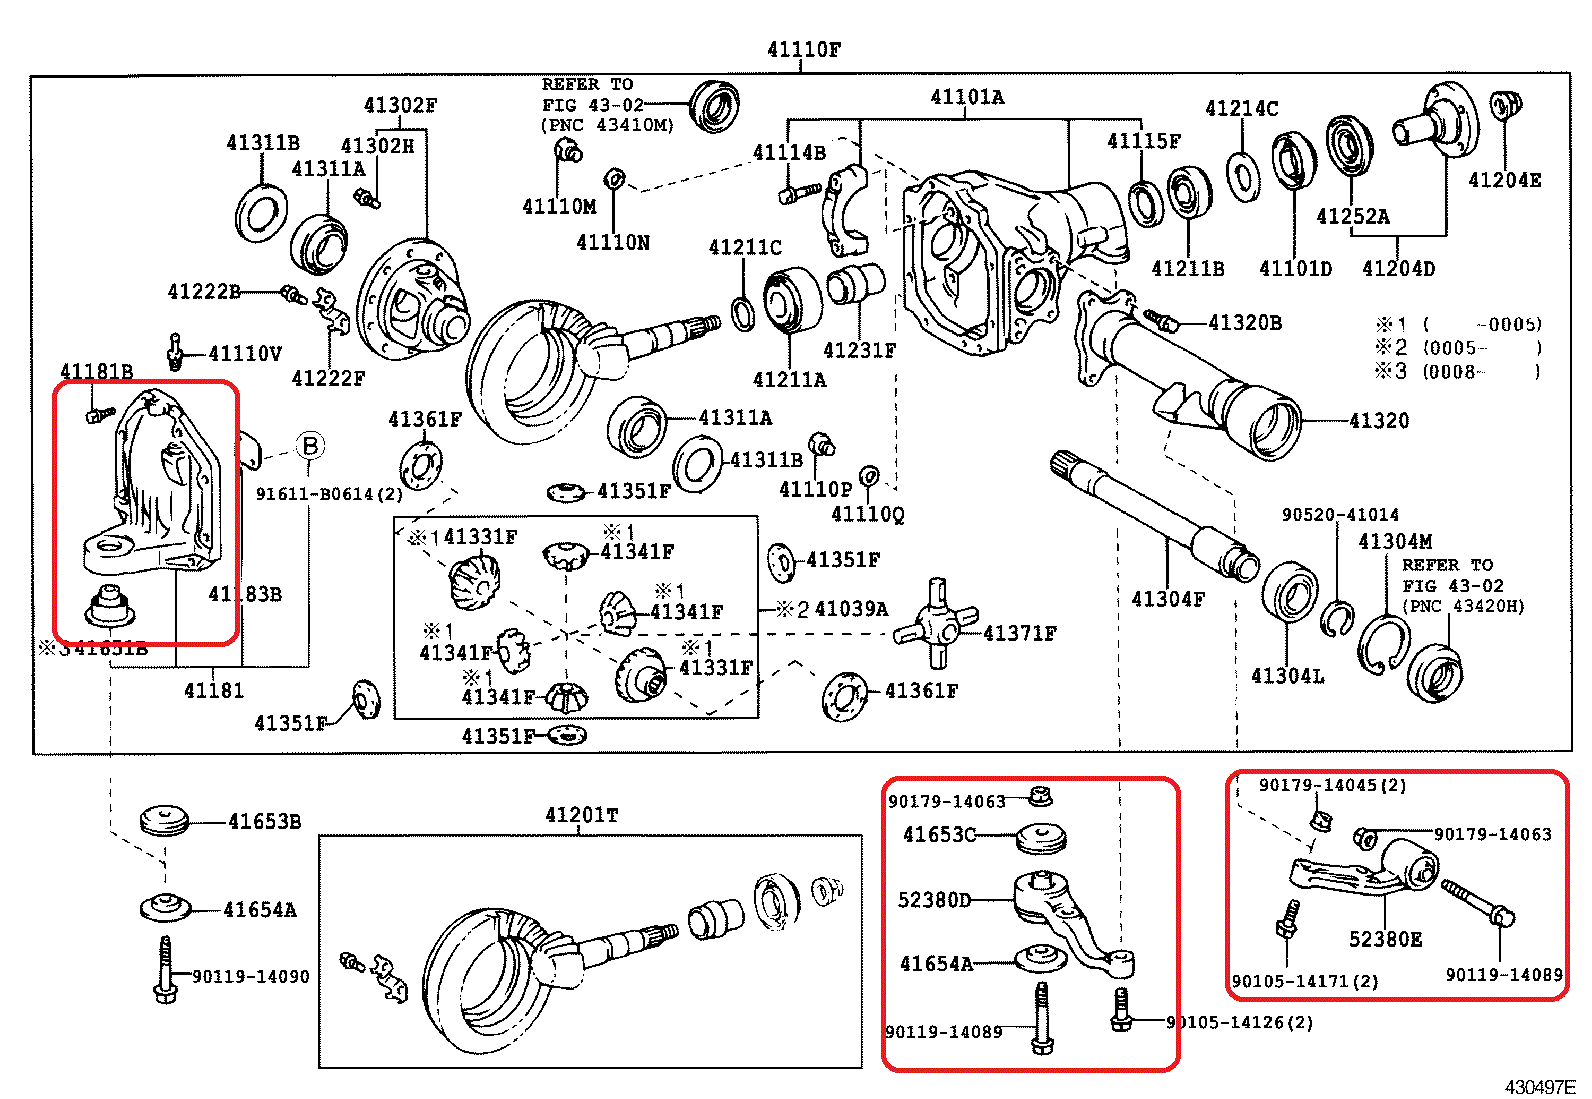
If you've never taken a look at this bushing arrangement, here's the factory parts diagram.
smPVzUh.gif

The 3 circled bushings are what mount the entire assembly into the truck and what we're going to replace.

Here's the complete list of parts for a total refresh.
  1. Driver side support bracket w/bushing #52380-60040. $120
    *OPTIONAL* SuperPro polyurethane bushing #SPF3575K, available from these guys in the USA (in stock too!) and a few sellers on Ebay. $65
  2. Rear support bracket w/integral bushing #52380-60030. $120
  3. Front diff cover w/bushing #41108-60011. $180
    *OPTIONAL* Separate bushing available as #41651-60010. $30
  4. Front diff cover upper cushion #41653-60010. $27
  5. Rear bushing upper cushion #41653-60020. $27
If you surf the OE parts diagrams you'll see an additional "cushion", #41654-60010, used on the front and rear bushings. This isn't a cushion at all, but a big stamped washer. Unless you've somehow cracked yours there's no reason to replace. Save the $16.

If you don't have a press you can buy the entire front diff cover with a new bushing already pressed in it. You'll probably have to remove the entire front diff to change it but it looked like it may be possible to let it droop down just far enough to clear the engine crossmember. Maybe someone can clear that up. Because I have a press and wanted to save some time, money, and an oil slick, I opted to buy the separate bushing and install it in situ.

Similarly, I also opted for the SuperPro poly bushing for the driver side mount. Curiously, this is the only location that a poly bushing seems to be available (just talking front diff here). It's the only one of the three that is oriented side-to-side in the chassis, and it does see a torque reaction anytime power is applied through the diff, so it makes sense that it can get a little squished. Mine was deformed and tearing.

TXy9OdP.jpg


I left the front diff installed and the front cover undisturbed for this installation Here were my steps and notes...
 
The first thing I did was loosen (but not remove) all the bushing, bushing mounting bracket, and diff cross member bolts. All are 19mm head except for the rear mount if you have a Slee diff drop (22mm there). Also the four diff crossmember bolts are 17mm heads. I used a bottle jack to support the diff at various stages but it's not necessary yet.

Front cover and drive side mounts.
PhQ4koA.jpg


Rear mount.
GrDKoYx.jpg
 
At this stage I supported the front diff and removed the crossmember. If i was doing this job over again I'd leave the crossmember in at this stage, support the diff with a jack, and remove the front cover bushing bolt. Why? Because the diff will move around a lot less when it's hammer time.
L4Dlz6k.jpg


Either way, remove the front bushing hardware so you can get at the bushing. If your bushing is *NOT* totally discombobulated like mine, drill out the rubber between the inner and outer portions until you can hammer out the inner bushing. Alternatively you can burn the rubber out with a torch, but I've never enjoyed the smell so I don't do it.
99Wep37.jpg


The bushing is cupped in the diff cover; only the inner portion protrudes through, so you'll need to use a chisel and hammer or an air chisel to deform the outer shell so that it can eventually break free. Be prepared to settle in for a small battle on the garage floor if you're doing this by hand, as I was (air compressor is busted). Exercise some caution since the diff cover is aluminum. It took me at least 30 minutes to finish this stage. Battle 1 of 3 completed.
Q9Dzfxy.jpg
 
Next, clean and smooth the bushing seat in the front cover. You want to smooth out any high spots and remove any corrosion. I used some scotchbrite pads and fine grit sanding drums on a dremel.
9KB4Xqd.jpg


Here's the new OE front diff cover bushing, waiting to be installed.
MFogkwN.jpg


I happened to have an old Honda FWD hub bearing sitting around, but anything of a similar shape will work. What you're looking for here is something to fit between the front diff and the engine mount so you can press the new bushing in from below while letting the inner bushing protrude through. Since I have a diff drop installed, this gap is already ~1". If didn't have this wheel bearing I would have cruised through a hardware store to find a galvanized pipe union, or something similar, to do the job.
sJMhcBp.jpg


With the spacer (FWD bearing) between the engine crossmember and diff, we can begin pressing the new bushing in using a bottle jack. Make sure to lube OD of the new bushing with anti-seize or grease. It's a little hard to get started and may test your patience a bit, but it didn't take nearly as long as removed the old one did. It took several attempts and lifted the whole front end of the truck several times, but really wasn't a big deal.

Note that there is an orientation to this bushing. The meaty part of the rubber is oriented north-south in the chassis. This means the wide groove is pointing forward and backward in the truck.
l0r21qb.jpg


Note that I used a socket to fit between the ridges on the padded face of the bushing. This was to prevent smashing those padded faces. Go slowly and alternate the position of the socket in both grooves to ensure the bushing stays square and seats fully in the diff cover.

7XQRi8c.jpg


Remove your improvised spacer and reinstall the upper cushion, diff spacer (if applicable), lower stamped washer, and snug the bolt down.

Battle 2 of 3 completed.
 
Last edited:
Making sure the diff is supported, fully loosen and remove the rear mount arm and bushing. Again, all hardware is 19mm head from the factory; 22mm bolt head on the bushing if you have the Slee diff drop.

The bushing is not available separately and is slightly different than the front cover bushing. There's only one way to install everything. Make sure the cushioned washer is on the top and the big stamped washer is on the bottom. Reinstall the diff drop spacer if applicable and snug the bolt down.

XU1ifwL.jpg
 
If you're installing a new OE rubber bushing on the driver side mount, it's cake from here. Support the diff, unbolt the diff crossmember (17mm heads to frame, 19mm bushing bolt), unbolt the bushing bracket (19mm heads) from the diff and pat yourself on the back because you're done.

If you're a picky bastard who has to improve on everything the factory does wrong (ha!) and can't do anything the easy way, then begin the SuperPro polyurethane bushing installation. Support the diff, unbolt the diff crossmember (17mm heads to frame, 19mm bushing bolt), unbolt the bushing bracket (19mm heads) from the diff and prepare for the last small battle. Drill out the rubber or press out the inner bushing.

At this point I did attempt, with little hope, to press the outer bushing out. I had a few dies that seemed to be a suitable size and thought maybe it would work but the reality is this bushing has a lot of contact area and it's a tight fit. After scarring up a few dies I gave up and got the die grinder and a carbide bit. I had to borrow an air compressor at this point.
eJaLcQe.jpg


If you're slightly more patient than I am at 6:00AM, you can avoid grinding all the way through the bushing shell and into the bracket slightly. Just in case, I advise to do like I did and pick a spot to grind that's located near all the extra material on the bracket.
x0BG9aT.jpg


When you get to that point, a hammer and punch can pop the bushing out.
5kbarRH.jpg
 
Now we need to press the poly bushing into the OE bracket. Find something that engages the outer shell so you can avoid smashing the polyurethane portion of the bushing. I found a 1-1/2" female pipe union to be just about perfect. Here's the setup I used on the press.
oa6KAss.jpg


Press out the inner bushing, apply the supplied silicone lube, and press it back in. This was too stiff to do by hand but didn't take much pressure from the press at all.

At this stage you can probably just go ahead and press the bushing in after lubing the outside with grease or anti-seize, but I had a break in the action and decided to put the bushing in the freezer and the bracket in the oven at 170F to use thermal expansion to make my life easier. Three hours later, the duration of the little league baseball game my son played, and I set back to work and easily pressed the bushing home.
WqlQ0JC.jpg


Note that I wasn't able to get the outer bushing shell to protrude 100% the same from both sides due to the shape of my 1-1/2" pipe press die. One side was flush and the other stuck up maybe 1/16-1/8" from memory. In reality this doesn't matter at all because the diff cross member is not located precisely in the chassis. I let my OCD go.

I bolted the bracket back on the diff (19mm heads) and reinstalled the diff crossmember and bolts (17mm to frame, 19mm bushing).

The last step is full torquing all the bolts. From the FSM:
(x3) Bushing bolts 137 ft-lbs
(x4) Diff crossmember bolts 50 ft-lbs
(x2) Driver side bracket to diff bolts 137 ft-lbs
(x2) Rear bracket to diff bolts 58 ft-lbs

TIElXDC.jpg


1ZhG0QR.jpg
 
I'm happy to report it drives like a dream. The big clunk is gone when I shift into gear or get back on the throttle while driving. Much, much better.

There is no additional vibration, noise, or harshness from the SuperPro polyurethane bushing either. I don't see how anyone could find a complaint. The factory bushing probably isn't a bad choice here but I'm willing to bet the stouter polyurethane version will last longer. Time will tell.
 
Last edited:
Nice write up!
 
FYI, all bushings for front diff are available separately from Febest.
TAB-331 ARM BUSHING DIFFERENTIAL MOUNT
TAB-332 ARM BUSHING DIFFERENTIAL MOUNT
TAB-333 FRONT DIFFERENTIAL MOUNT
TAB-334 ARM BUSHING DIFFERENTIAL MOUNT
TAB-335 ARM BUSHING DIFFERENTIAL MOUNT

Quality seems good, fit was spot on.

One tip I have is to use a hole saw, slightly smaller than outer sleeve, to drill out rubber. Quick and safe.
 
Thanks a ton bro for going through all that and giving us great directions and pics!

If your ever in Asheville I owe you a couple beers!!!
 
Very nice write-up. I'll be doing the poly bushing, same as you. I'm putting in a e-locker so I'm gonna have the whole front diff out to do these
 
I'm curious; did you find any rust on #3 crossmember, bolts or in holes?
035.JPG
032.JPG
033.JPG


BTW: I don't know if it really matters as long as wide opening through center as you did. But though i mention; Factory actually gives us alignment marks.
Inspecting, OLD factory installed just before removing.
Differential front (5).JPG

NEW OEM bushing inline dots face the front.
frt diff new Bushing alignment.jpg
 
BTW: I don't know if it really matters as long as wide opening through center as you did. But though i mention; Factory actually gives us alignment marks.
Inspecting, OLD factory installed just before removing.
View attachment 1707086
NEW OEM bushing inline dots face the front.View attachment 1707088

Do the alignment marks go towards the front of the truck? This would conflict with the comment that the meaty rubber parts go north/south, assuming north/south means front/back.
 
I had rust on my 3rd crossmember and bolts like that. I happen to have the BIOR diff drop but I imagine it would happen to the stock crossmember as well. I have been thinking about how to clean it up and protect it from happening again. I live in SoCal so the rest of the underside is very clean with no rust.
I've found on every #3 crossmember I've pulled.
See index in OP of: Scored a 2007 Unicorn. The holy grail of 100 series.. Look for "Reconditioning #3 crossmembers bolt, bolt guide and contact points are rusting. Post #190." You'll see what I did to protect from further rust.
Do the alignment marks go towards the front of the truck? This would conflict with the comment that the meaty rubber parts go north/south, assuming north/south means front/back.
OP has it right, and he clarified by saying "This means the wide groove is pointing forward and backward in the truck." He just reversed with inline dots facing rear, as seen in post #3 above. The factory way is; backside of bushing has 2 dots at sides on bumps (which he has in front) They go to rear aligned parallel to axles tubes of differential.
 

Users who are viewing this thread

Back
Top Bottom