Frankie - '87 FJ-60 Refurbishment Plus a Few Mods

This site may earn a commission from merchant affiliate
links, including eBay, Amazon, Skimlinks, and others.

Gotcha on the carpet. Like you say, it sure looks good in the pics.
I went with the SOR black vinyl liner over the front and mid.
I have to get the rear pieces for the cargo area now.
 
Here's the inside with a 1/8" phono jack for iPods, a 12V charging plug, and the display for the wireless tire pressure gauges.

Mud 353.webp


I debated for a long time where to mount the 110V power inverter. It needed to be easily accessible from both the front and rear seats and with the rear seat down for camping. I didn't want it using up dash or glove box space. It has to be able to vent. Under the cup holder fit all these requirements but is vulnerable to spilled drinks.

I finally decided that it was small enough to be sufficiently covered by the cup holder. Plus the sideways mounting didn't expose any openings for liquids to run in. The straps are aviation grade zip ties with screw rings on the head. I used the original cup holder mounting holes with longer screws.

Mud 355.webp


Mud 356.webp
 
Last edited:
One more shot with the rear seat down. There's enough room to reach your hand down to plug and unplug devices with the seat down.

Mud 357.webp


Shortly after the console I got the front carpet down and the seats in. There are 2 layers of Second Skin sound block on the transmission hump and drivers floor and more foil covered heat block 1/2" insulation over the area above the cat.

The seats have new seat bottom foams from SOR. Their foams are very pricey but the fit is perfect and they feel great. They're quite firm. Now my head touches the headliner, which is a problem, but I'm sure they'll break in.

Mud 361.webp


Mud 363.webp
 
Last edited:
R u going to sell this gorgeous truck? I call dibs on it. Wow. Beautiful classic loaded up with modern amenities while keeping the classic look. Toyota should hire you for a release of a NEW retro 60, and after seeing your truck they shouldn't spend any time debating if it would be a good move or not but rather go on ahead and release an exact copy of Frankie. You know clot and tlc make great trucks but yours has been taken 3 more steps forward. Wow is all I can say. How long did the whole process take you? Are you done?
 
Wow. Tits on toast !
 
Dude I may have to steal many of these ideas!!!!

Feel free. I'd take it as a compliment.

Thanks, Spike, Wally.

Mongoose, your faith in my abilities is inspiring. Frankie isn't for sale, at least for now. Who knows what the future may bring any of us though? Building up our old trucks is a labor of love. To try and make a living off the work would be difficult because of how many hours we invest. Even with all the receipts and photo documentation of how the refurbishment was done, I doubt I could even recoup my parts bill, let alone the 3 years of sporatic labor.

I would love to work for TRD and explain to Toyota how the FJ Cruiser is so completely NOT what we ordered. :bang: Unfortunately there's only, what, a couple thousand of us. We're not a big enough market share.
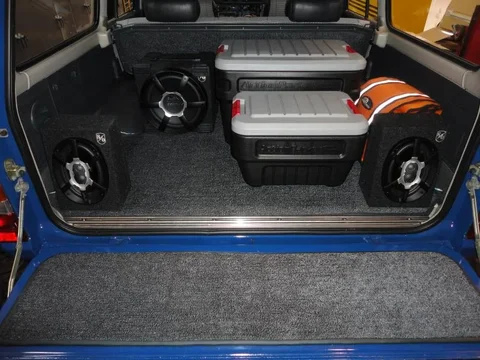
 
Here's the sub amp tucked up next to the C pillar.

mud 370.webp


And the rest of the quarter panel.

Mud 376.webp


I wanted to have another fuse panel easy to access in the rear. Serviced by a 4 GA feed from a deep cycle battery, it's a utility bus for comfort items like the radio amps, fridge, and lighting. Fused off the switched 4 GA feed, is a 8 GA wire connection the fuse panel. The blue 8 GA is unswiched direct from the battery. The trailer harness is tied into it. 6 GA wires feed the amplifiers.

Mud 374.webp
 
Last edited:
There are terminal blocks on the back too. These are the input signals from the trailer lights and dash switches to the relays. The blocks make it very easy to troubleshoot problems and to change accessories. The other side has fused inputs to the relays and a block just for the outputs.

Mud 371.webp


I used relays to supply the trailer lighting. They should be brighter that way, just like with the headlight harness' we add.

Mud 377.webp


All closed up but very easy to get to.

Mud 375.webp
 
Last edited:
One more.

Mud 378.webp

Mud 378.webp
 
Dude, now that is an INSANE amount of wires back there. I hope you have documented all of this very thoroughly, would hate to see something happen and then suddenly you don't know what is what (if you are really curious why PM me and I will tell you the story).

The truck is looking awesome and I am sure she will be a joy to drive once you are done.
By the way, what do you do? I consider myself intelligent and somewhat mechanically inclined but electrical scares the hell out of me. I attune all the electrical work to almost genius level intelligence.
 
Dude, now that is an INSANE amount of wires back there. I hope you have documented all of this very thoroughly, would hate to see something happen and then suddenly you don't know what is what (if you are really curious why PM me and I will tell you the story).

The truck is looking awesome and I am sure she will be a joy to drive once you are done.
By the way, what do you do? I consider myself intelligent and somewhat mechanically inclined but electrical scares the **** out of me. I attune all the electrical work to almost genius level intelligence.

Thanks, Greg. You seem pretty savvy to me and the advice in your posts is spot on.

The wiring got a bit more extensive than planned but the set up does work well and is simple in concept, even if it doesn't look it. I started with only an 8 GA feed to the quarter but then the amps came with a 4 GA wiring package (and a huge 1 Farad capacitor which I didn't use) and Rockford Fosgate strongly advised the large wires and a 100 Amp fuse. Rather than pull the 8 GA I chose to add the 4 GA and have switched and unswitched.

The rear is documented well. I need to go back and label the dash wires better and use my notes to draw a diagram while it's still fresh in my head. I can imagine your story. I learned the hard way about documenting on a previous vehicle too.

I'm a ME working as an aviation mechanic (hence the hangar for a workshop). Electricity seems like magic to me too. I'm in awe of avionics techs. Sometimes those guys ARE the electron. DC at least does follow (usually) some very basic principles that, if they were taught well, most people would get instinctively.

I've learned a lot building Frankie and have had to redo some sections a couple of times. Choosing materials has been a challenge. The fancy connectors and fuse holders used by the stereo crowd look pretty spiffy but aren't as rugged as an off road vehicle should be. I fully expect that as I post these pictures someone will point out newbie errors that I've made.

At least I HOPE people will tell me if I've done something wrong that could light my truck on fire or leave me stranded. :steer:
 
Here's the supply system.

Dual Optima's. The Red Top is only used for starting. All the vehicle and accessory loads pull from the Yellow Top.

Mud 385.webp


Mud 383.webp
 
Last edited:
The Yellow Top has two main feeds: one for the OEM loads and one for all the accessory systems. You can see the junction box for the accessory feeds tucked up between the battery and fender.

Mud 382.webp


Here is it going in.

Mud 381.webp


Here's what's inside. It's a bit crude and crammed but it's working fine. The InPower Direct switch is rated for 200 Amps and comes on with a switch in the cab independent from the key.

Mud 380.webp
 
Last edited:
The rest of the system is contained in the big grey junction box.

It contains a 300 BIC Battery Isolator/Combiner from Hellroaring Technologies which controls drainage and charging. Next to it is a 150 BIC which connects the OEM harness to the system via the same switch as the accessories. This works as both a kill switch and to insure that nothing will unexpectedly drain the batteries.

A BlueSea fuse panel protects the outputs to the device relays. Large Bussman 150 A fuses protect the battery feeds and a 250 A fuse is for the output to a winch.

Terminal blocks on the lid make adding devices and troubleshooting easy.

Mud 387.webp


Mud 388.webp
 
Last edited:
Can you tell what kind of battery terminals those are? They look interesting in that they show the voltage.


Zack
 
Can you tell what kind of battery terminals those are? They look interesting in that they show the voltage.


Zack

Thanks, Zack. They are EFX made by Scosche. The voltage meter is pretty handy and they are made well for what they are. However, I would not recommend them. When I mentioned wiring products made for the stereo crowd, these were what I was thinking of. The clamps for the wires are a single setscrew without enough depth to really get a good bite. I screwed them down so the 2 GA would take a set then tinned the bare copper and reinstalled them with Locktite.

They look good and work fine for a ricer with a thumping stereo but for a Land Cruiser; if I were to do it all again I would use MIL spec battery terminals and marine spec tinned 2 GA instead of welding wire.

p/n SCLAMP for the positive

http://www.sonicelectronix.com/item_21102_EFX-Status-S-Clamp-by-Scosche.html

p/n SCLAMPN for the negative.

http://www.sonicelectronix.com/item_21103_EFX-Status-S-ClampN-by-Scosche.html
 
Wow. I just read through the entire thread and I'm very impressed with the attention to detail. I'm sure I'll be coming back to borrow ideas when I get out of the "just trying to keep it on the road" phase of 60 ownership.

Keep up the great work.
 

Users who are viewing this thread

Back
Top Bottom